CA 360° System Documentation
CA 360° is a comprehensive software solution tailored for chartered accountants, streamlining financial management, compliance, and reporting tasks. This documentation provides an overview of the system's features, access details, and how users can efficiently navigate the platform.

Managing the CA Office is Not a Joke…
-
Handling financial data, ensuring compliance, and keeping track of multiple clients require a reliable system. CA 360° is designed to simplify these processes, allowing chartered accountants to focus on accuracy and efficiency without the hassle of manual tracking.
- Key Features :
- 1. Seamless financial reporting and compliance tracking.
- 2. Secure user roles and access management.
- 3. Optimized workflow for accounting firms and financial teams.
- 4. Easy document handling and data management.
-
User Roles :
- Admin : Full system control and management.
- Manager : Oversees staff and financial operations.
- Staff : Handles day-to-day accounting tasks.
- Assistant : Supports data entry and report generation.
-
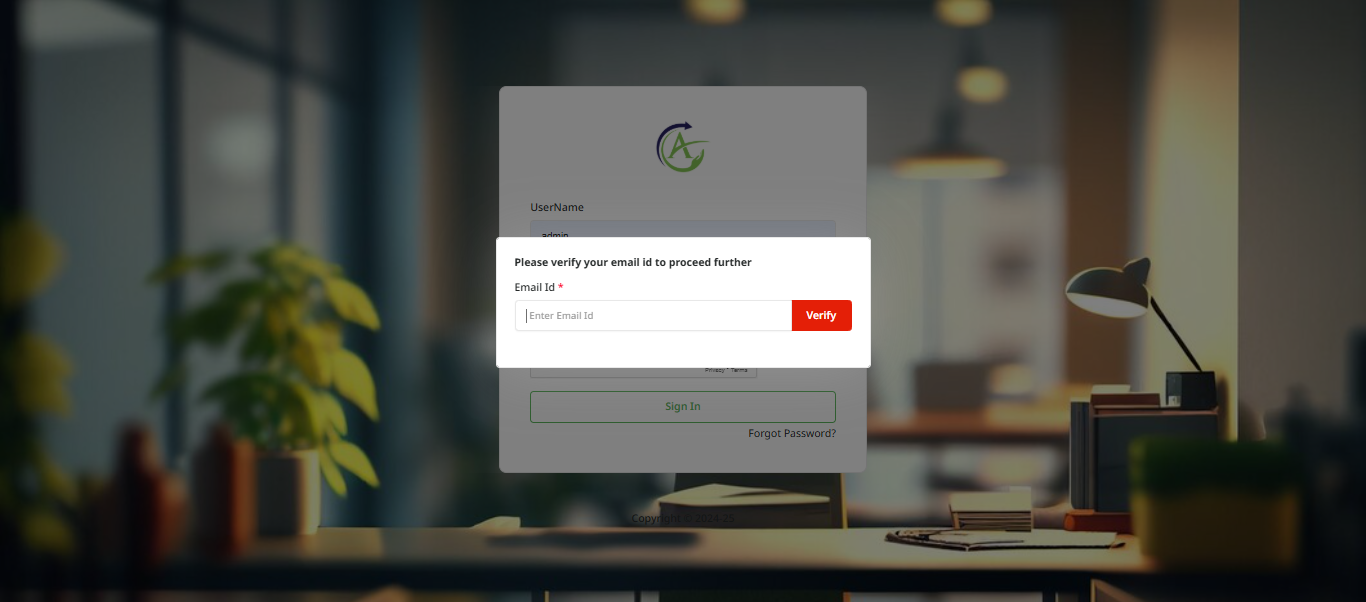
Accessing CA 360°
- Page : Click on the link https://new.ca360.in/Login.php to access the CA 360° system.
- Login Credentials : Users must obtain login details from the administrator.
- Supported Browsers : Google Chrome, Mozilla Firefox, and Microsoft Edge for optimal performance.
- First-Time Setup : The initial setup requires proper configuration of firm information, staff user accounts, task groups, task selection, and other master information.
To help users get familiar with CA 360°, a 15-day free trial is available before purchasing the full license.
-
Steps for Trial Access :
- Trial License : Obtain a trial license key for temporary access.
- Trial Duration : The free trial lasts for 15 days.
- Feature Access : Users can explore key features during the trial period.
After the trial ends, users can opt to purchase a full license to continue using the software without interruptions. CA 360° ensures a smooth transition from trial to full access, making financial management stress-free.
To use CA 360°, ensure you have the correct access and activation details.
Purchase Information
- Single-User License: $[Price] per year
- Multi-User License: (up to 10 users) $[Price] per year
-
1. Go to our purchase page: [Purchase URL]
2. Choose the license type that best fits your needs.
3. Complete the payment process.
4. You will receive an email with your full license key and activation instructions. -
Contact Sales :
Email: sales@example.com
Phone: +1-800-456-7890 - Activating the Full License :
1. Open the CA 360° software.
2. Go to the License Activation section. Enter your full license key: [Full License Key]
3. Follow the on-screen instructions to
4. complete the activation.
Once activated, enjoy seamless access to all premium features designed to simplify and enhance your accounting experience.
The Admin Panel is the central hub where administrators manage system settings, users, and operations. This section explains how users can log in, navigate, and utilize the system efficiently.
How to Log In:
Admin Panel
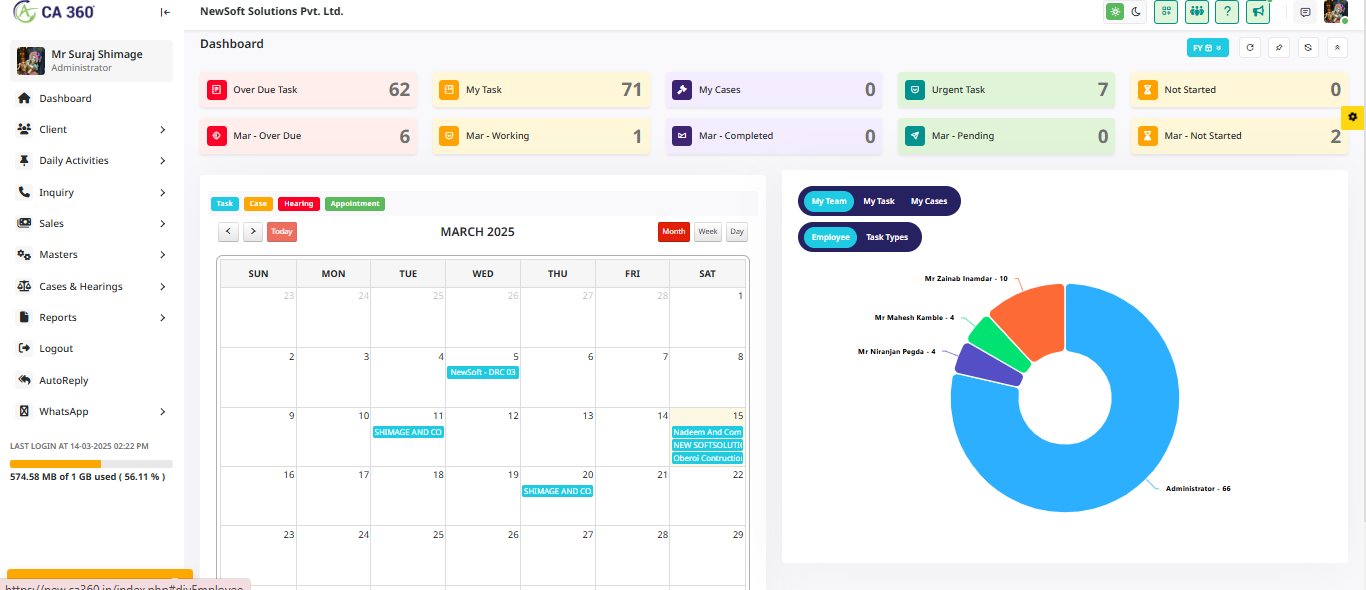
*** Note : Upon successful login, users are redirected to their respective dashboards based on their roles (Admin, Manager, Staff, or Assistant).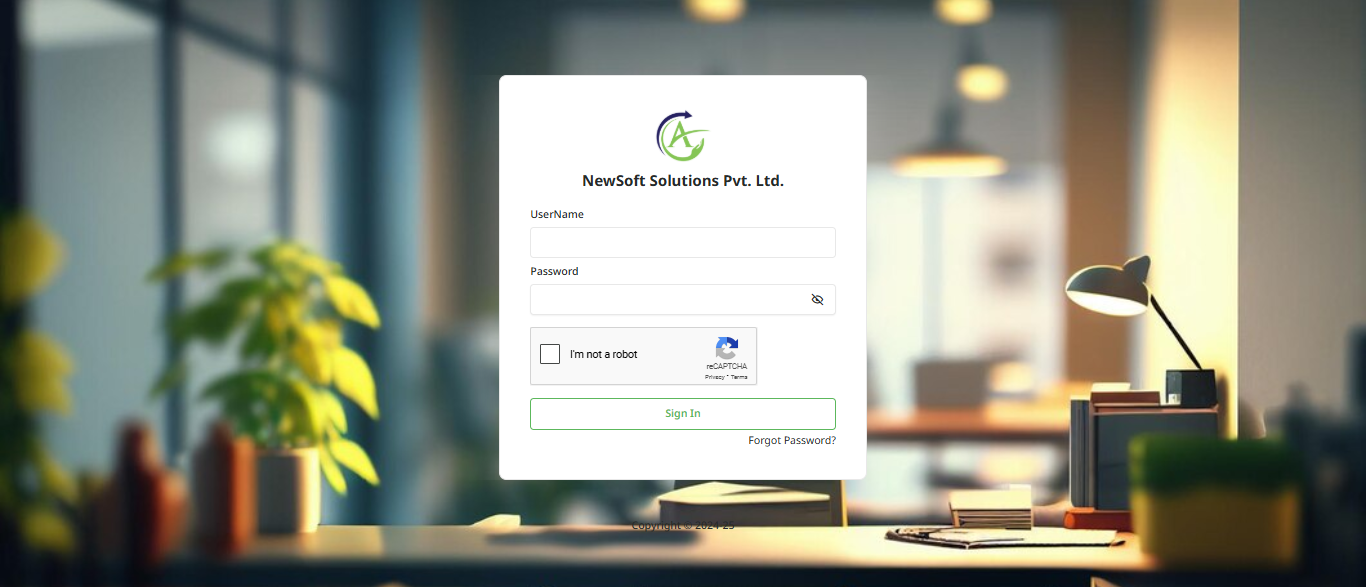
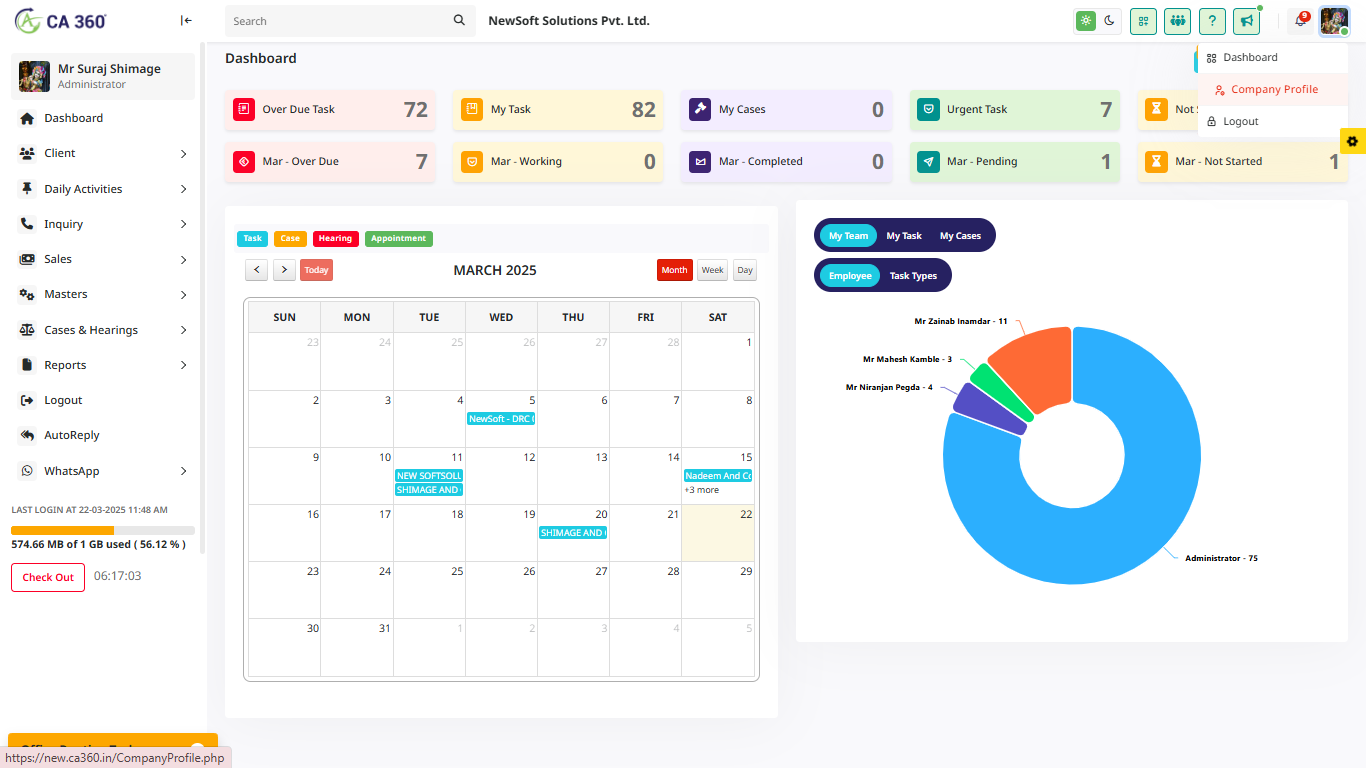
Admin Dashboard:
Manager Dashboard:
Staff & Assistant Dashboard:
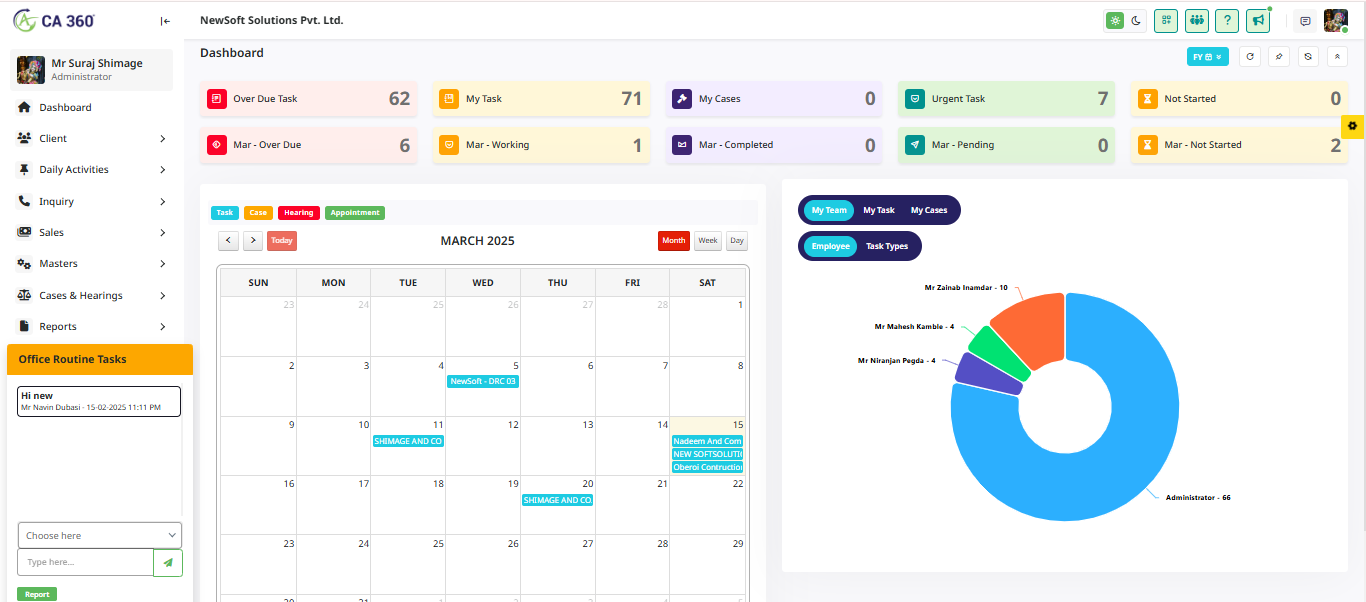
Once a user logs in, they are directed to their respective dashboards based on their role (Admin, Manager, Staff, or Assistant). The dashboard provides an organized view of tasks, deadlines, reports, and key functions, ensuring smooth workflow management.
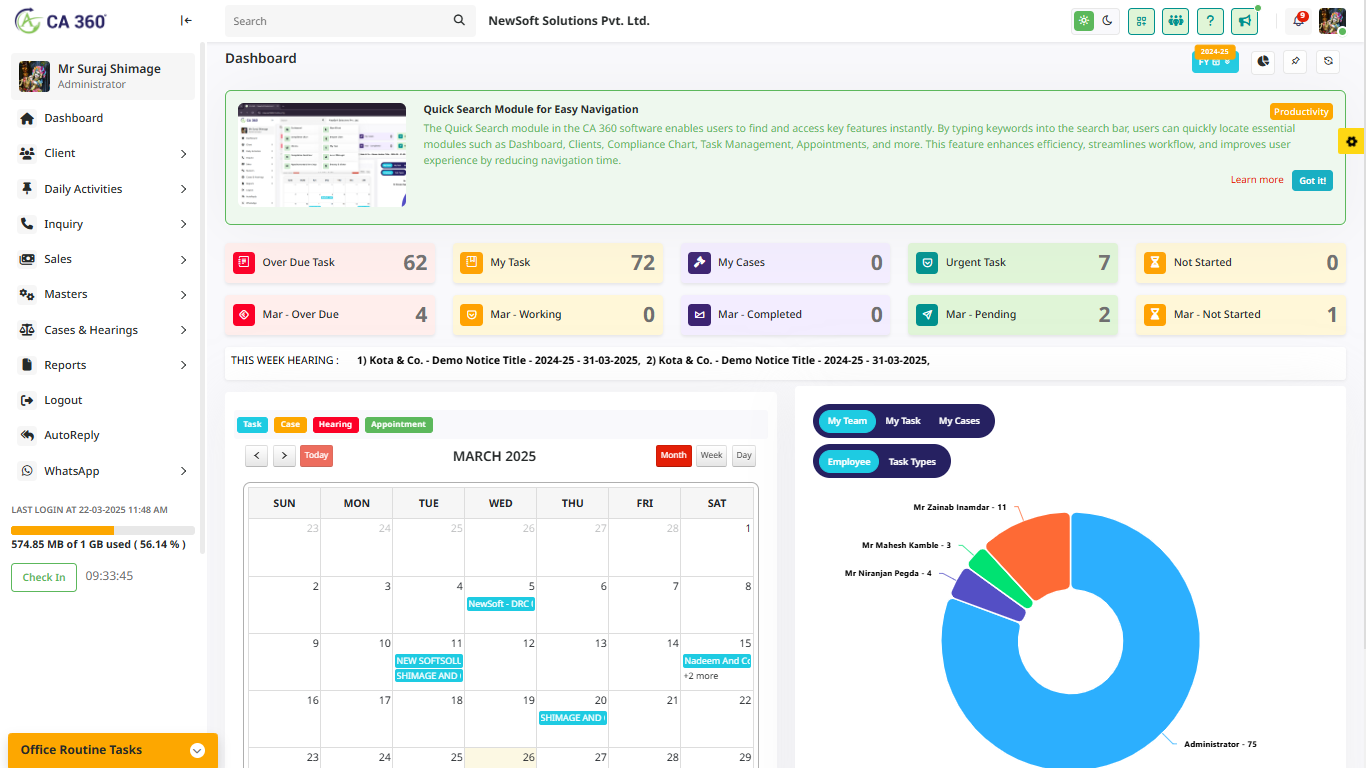
Module For Easy Navigation
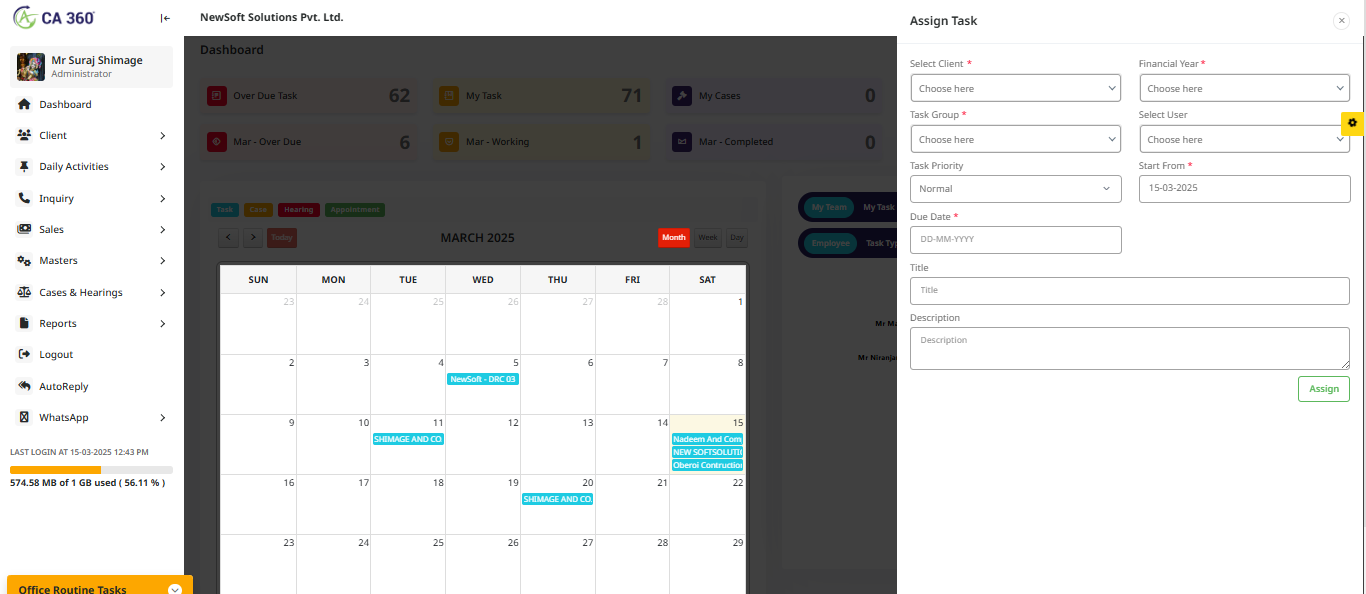
Assign Task
In this section, the admin and manager have the ability to assign tasks to the staff.
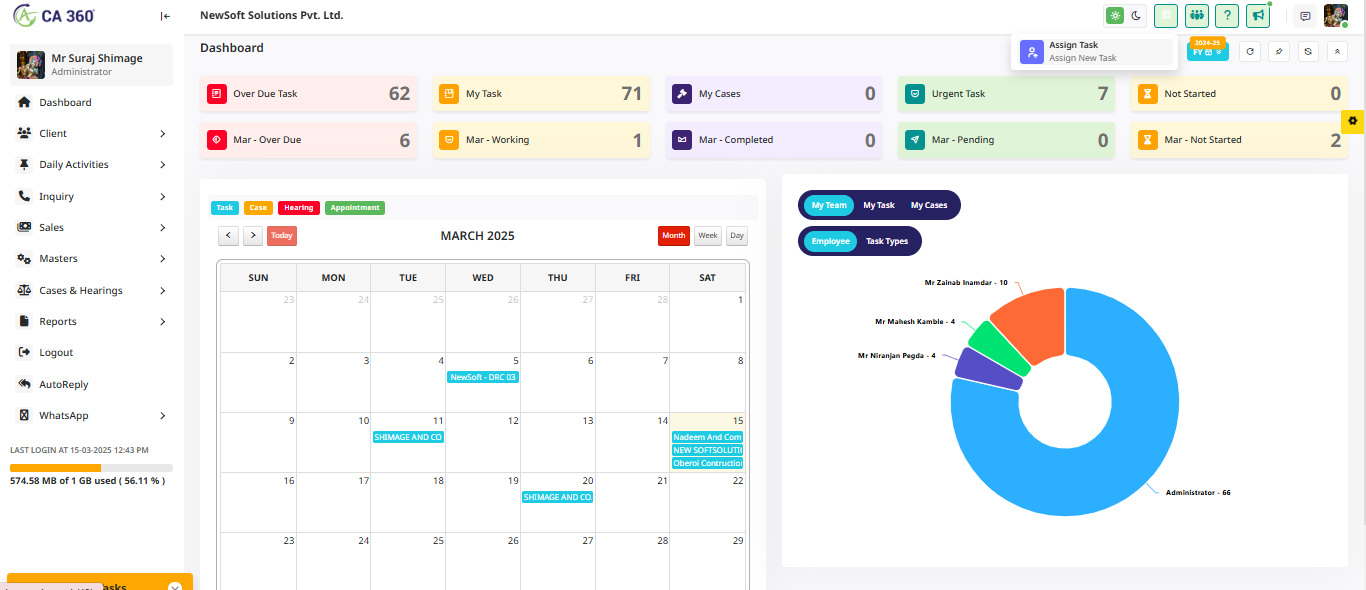
In this section, the admin can assign tasks by clicking on a task to open the Assign Task form. The admin can then select the client, financial year, task group, user, task priority, start date, due date, and more. Once all the details are entered, clicking the Assign Task button will assign the task to the selected user.
My Team
In this section, all team names are displayed.
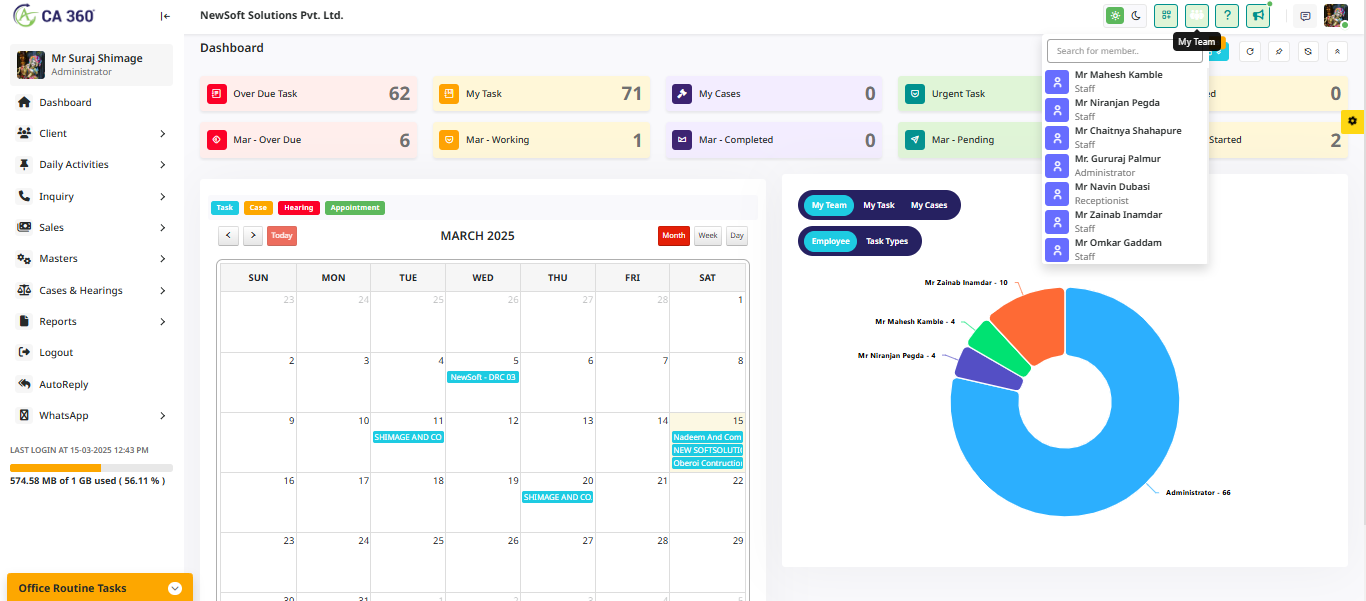
In this section, all team names are displayed. Clicking on a staff member's name will open a form showing their assigned tasks and completion details
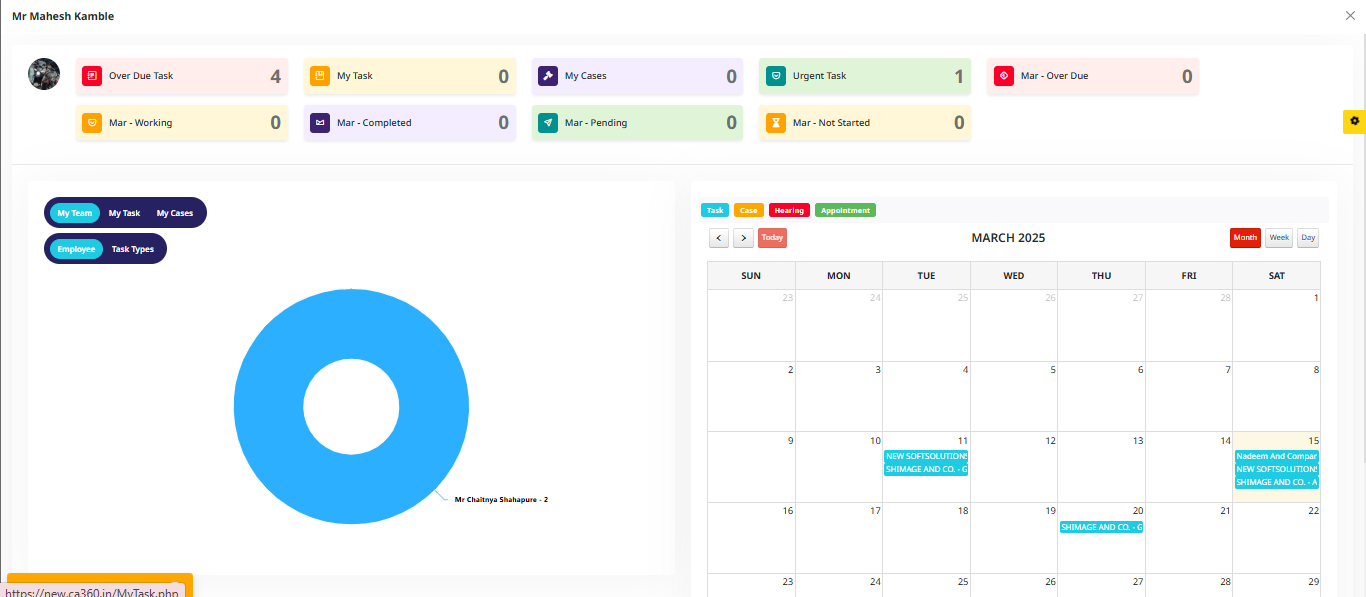
Support
In this section, by clicking on the support option, you can view our contact number and email address for any inquiries.
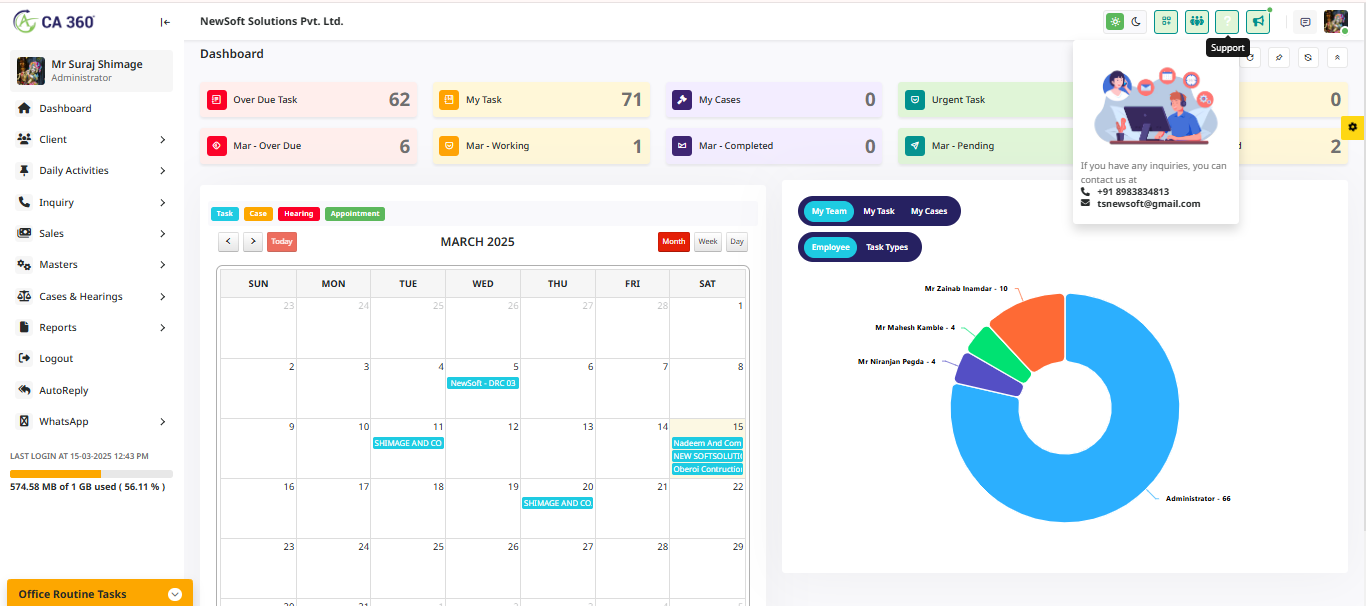
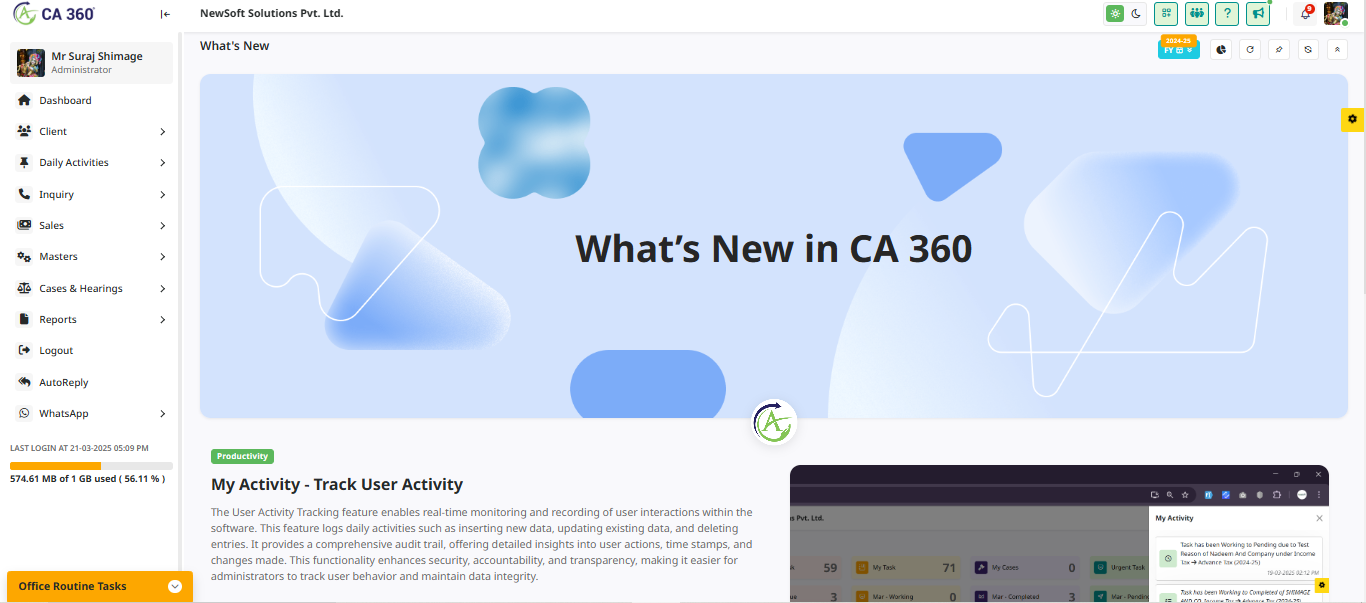
What's New
In this section, by clicking on What's New, you can view the latest updates and new features added to the CA360.
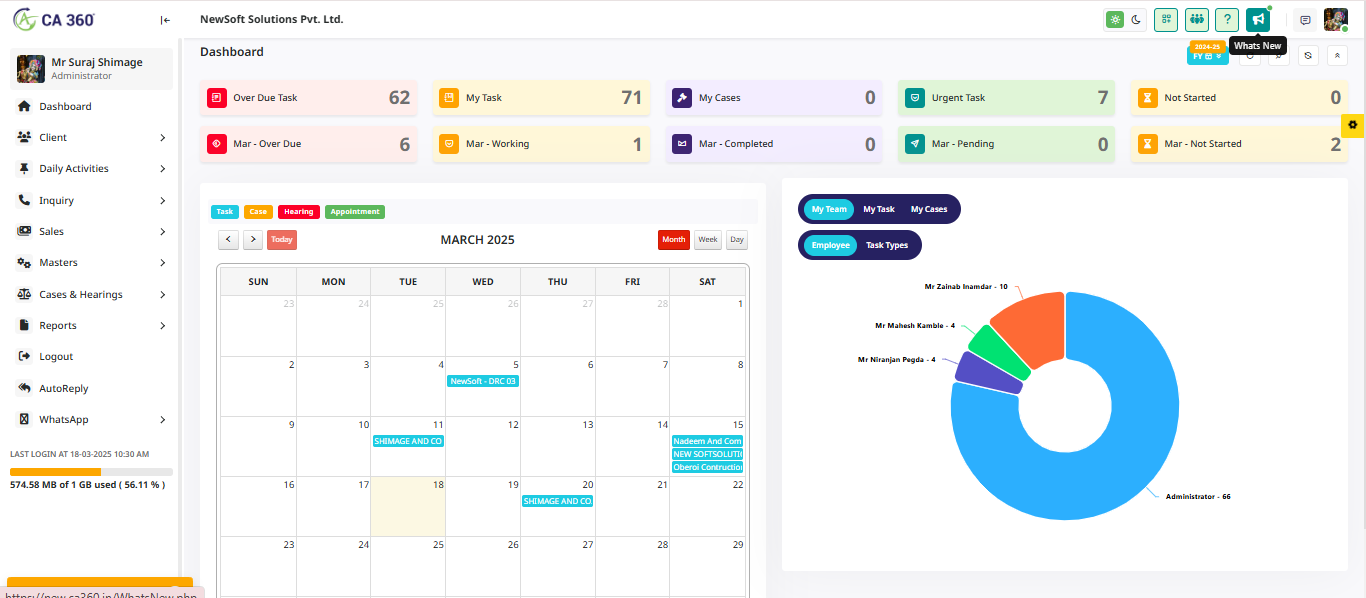
When users click on What's New, a new page opens, displaying the latest updates.
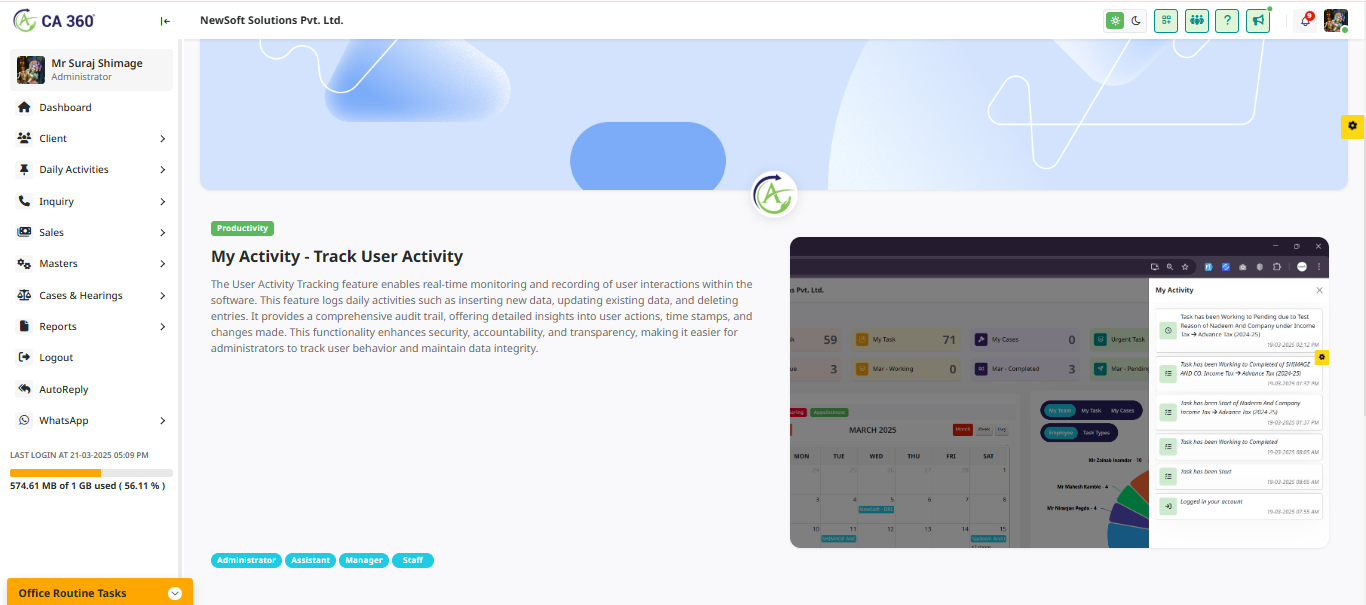
Financial Year
In this section, select the financial year to view the complete information for the chosen period.

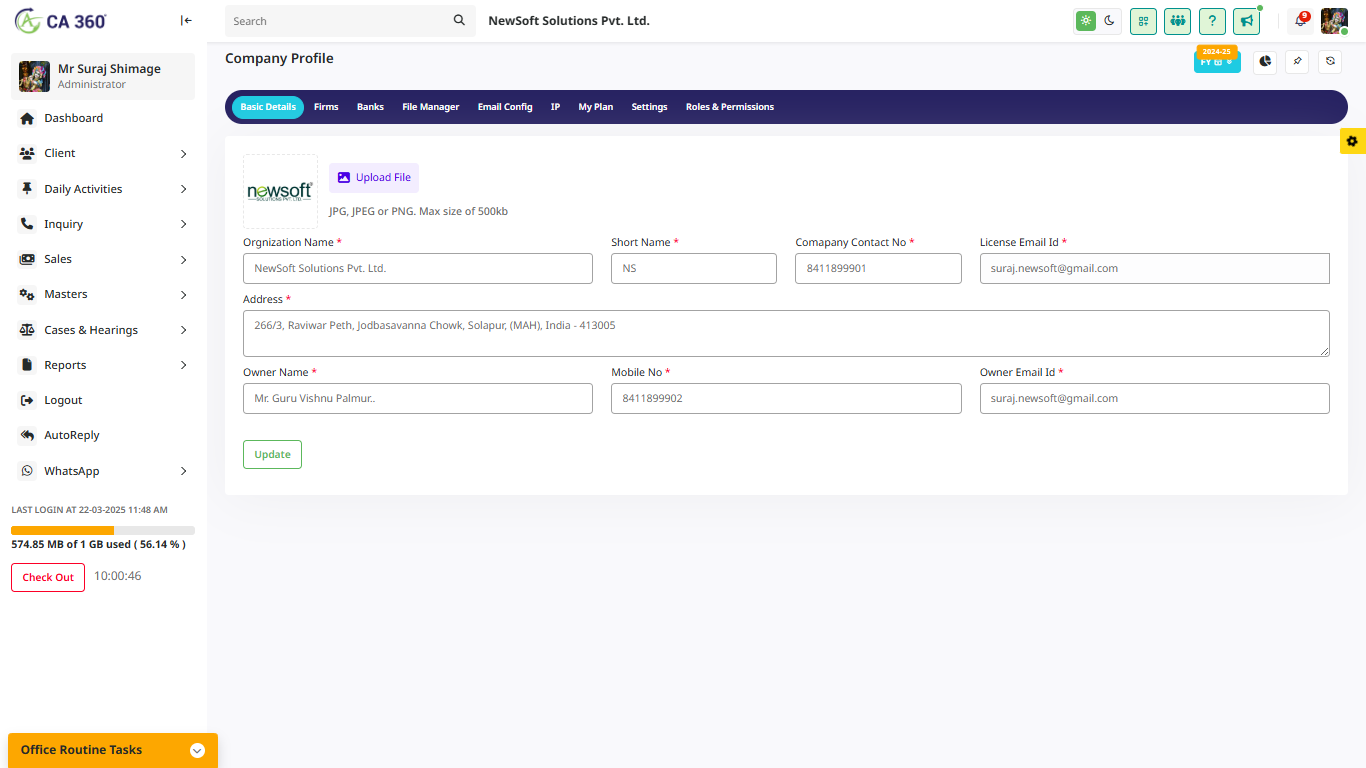
Company Profile
Clicking on Company Profile will open the section, allowing you to enter all the required details.
Company Profile Basic Details
In this section, enter the basic details to create a new company profile.
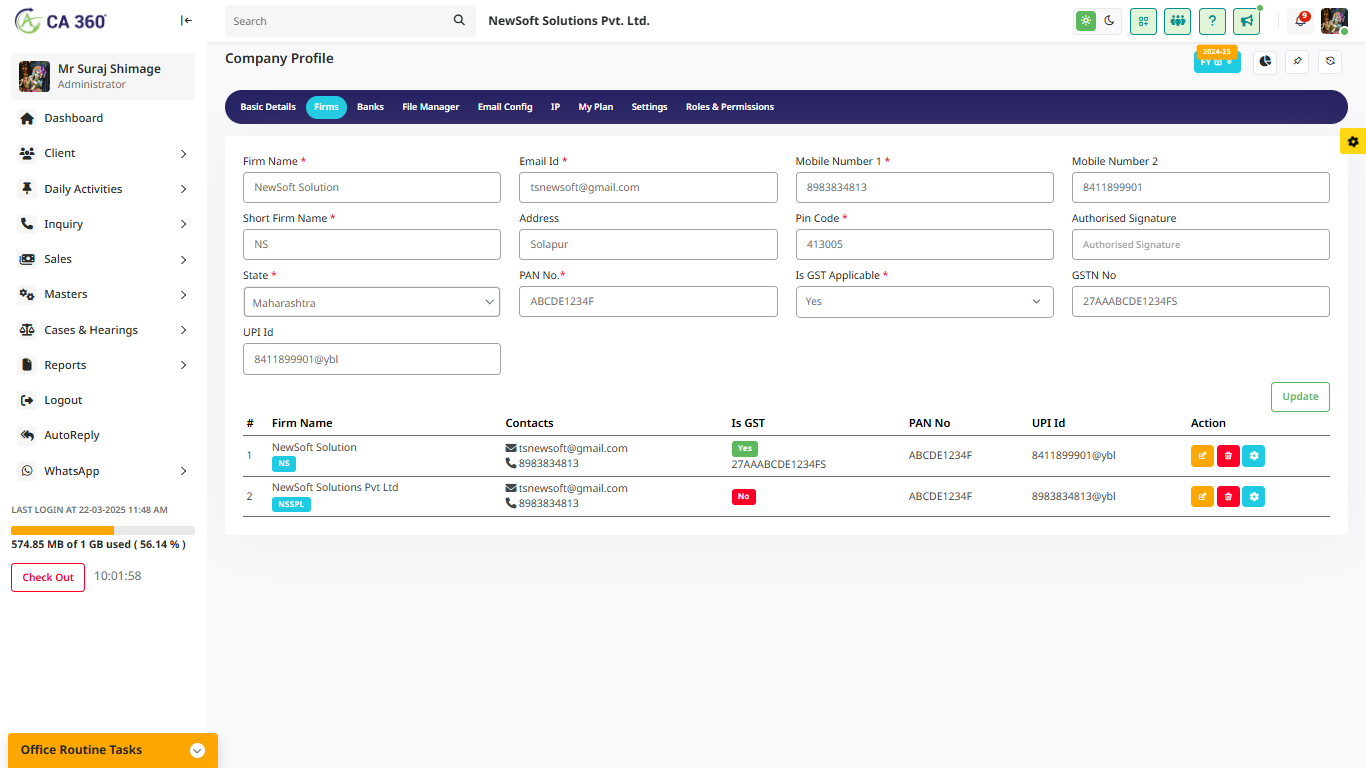
Firms Details
In this section, enter the Firms Details.
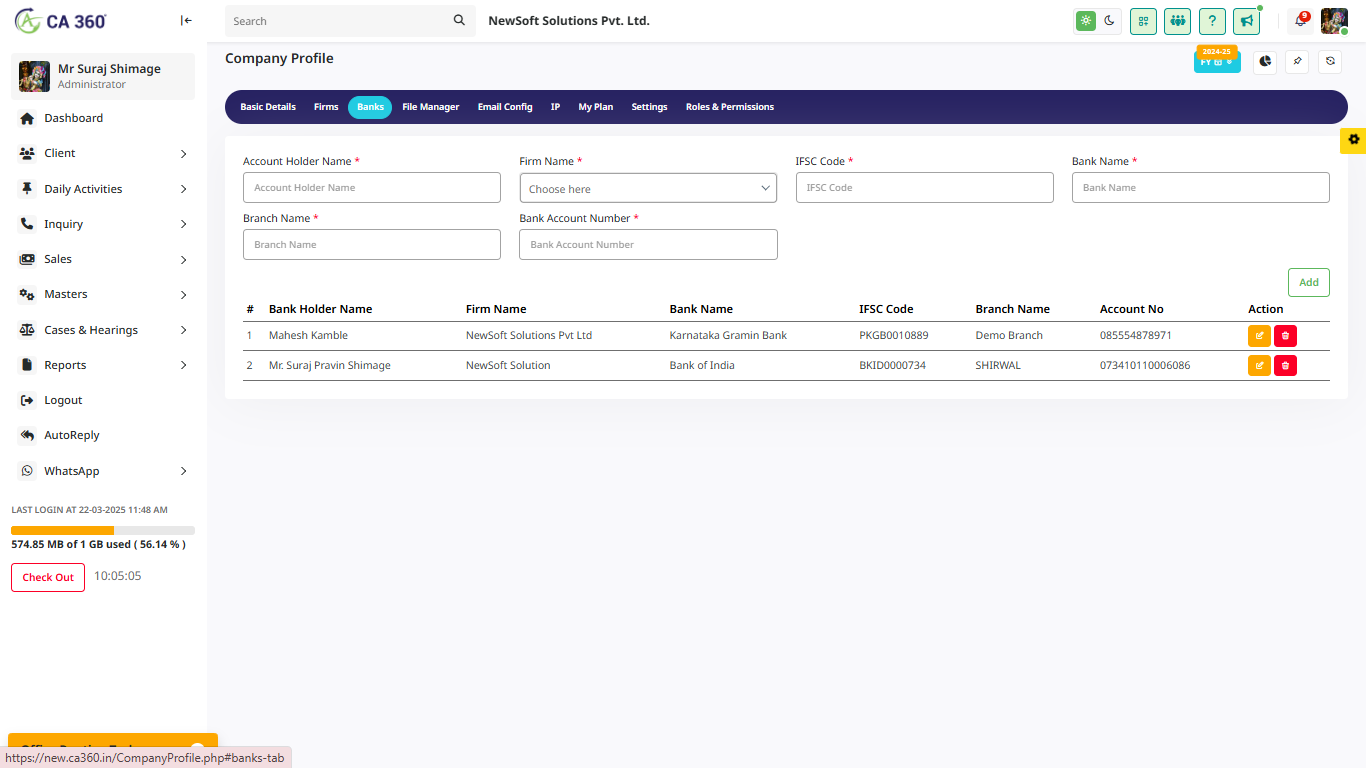
Banks Details
In this section, Enter the Required Bank Details.
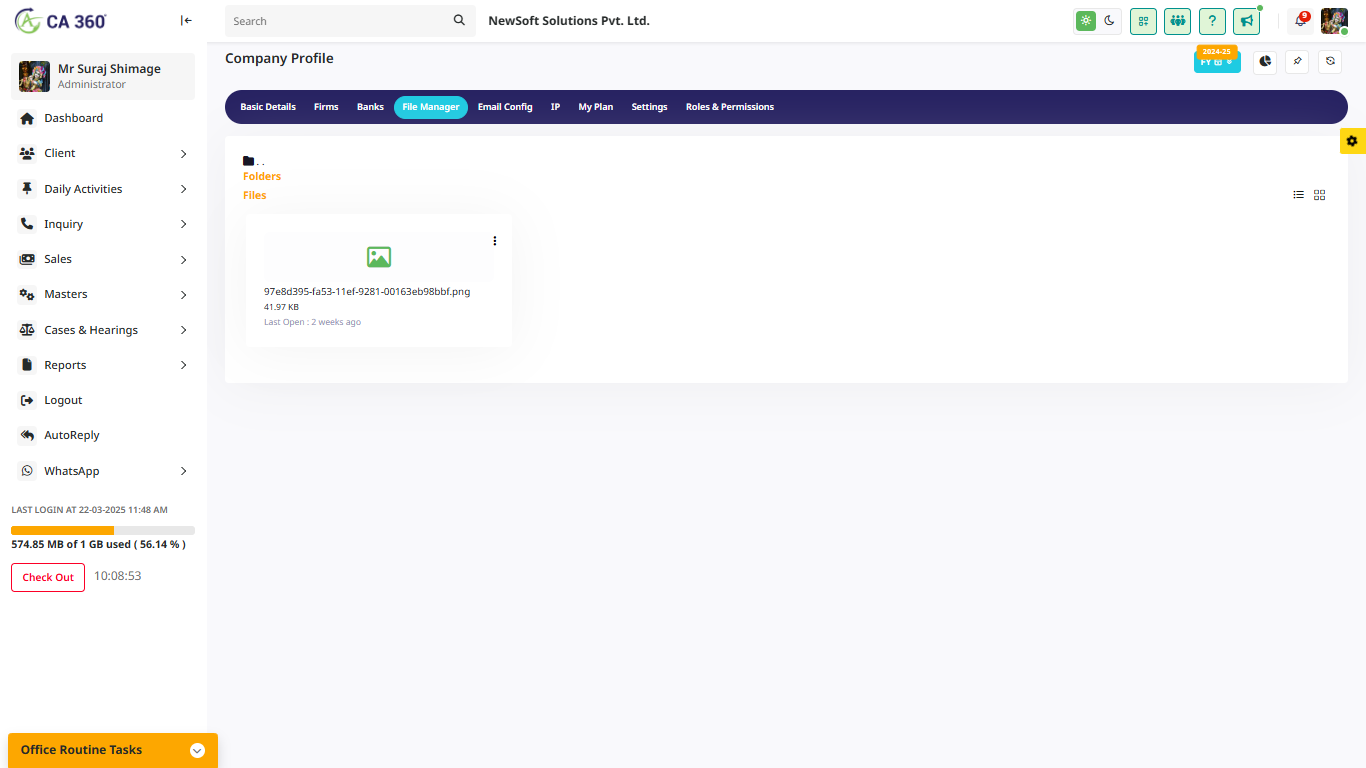
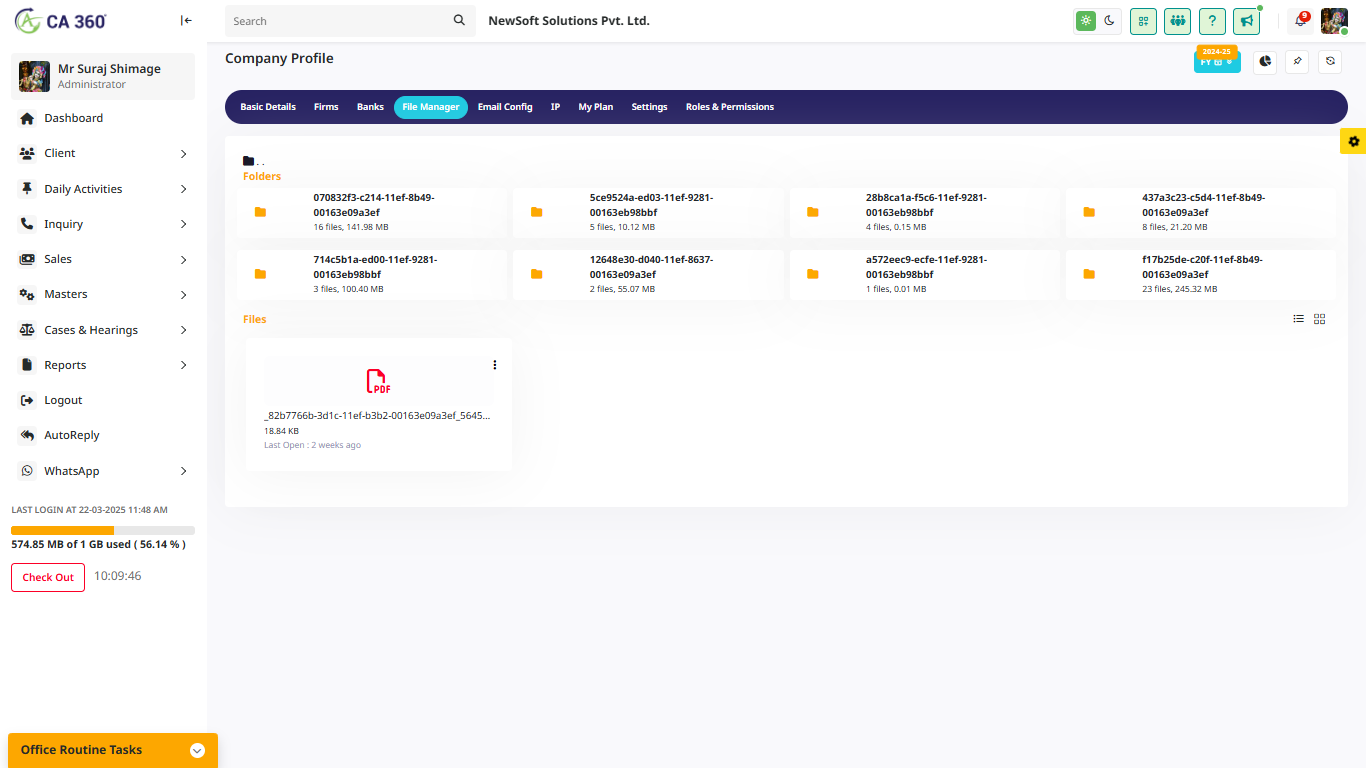
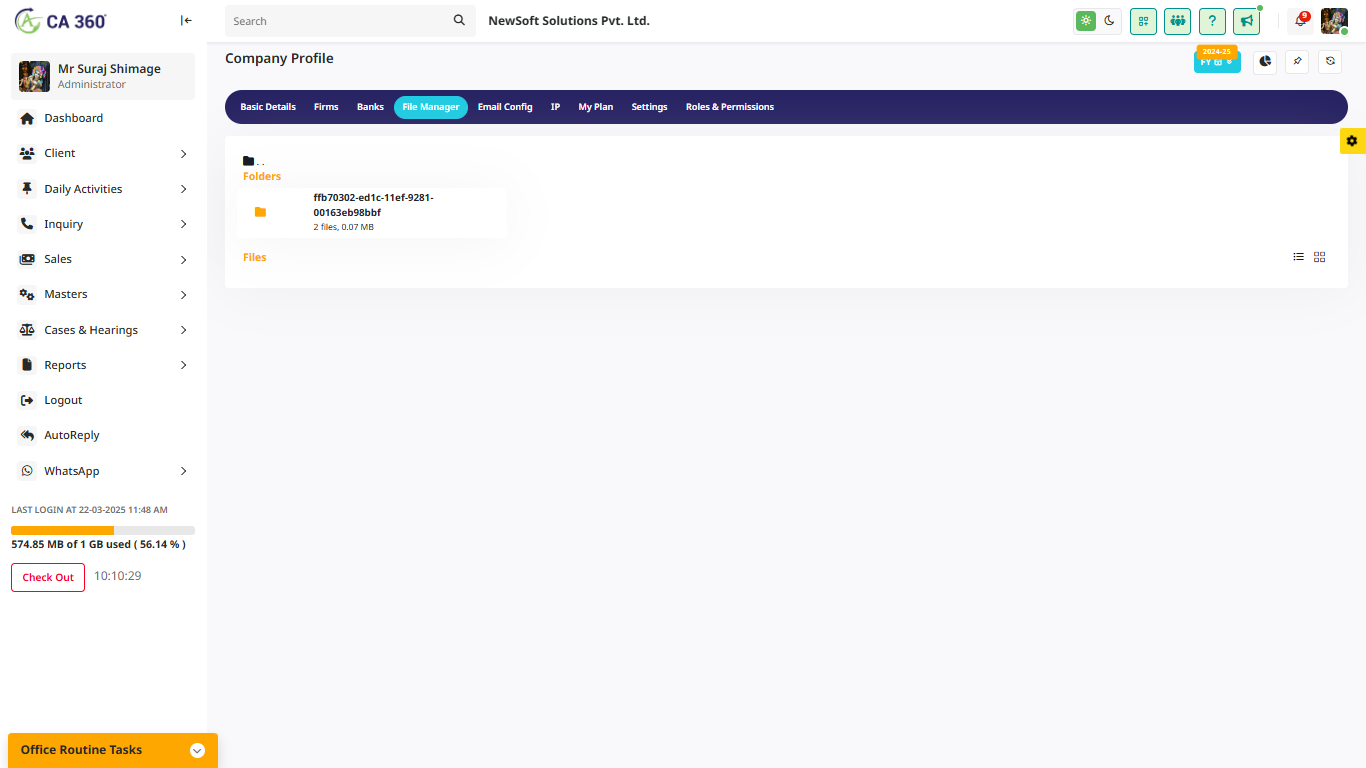
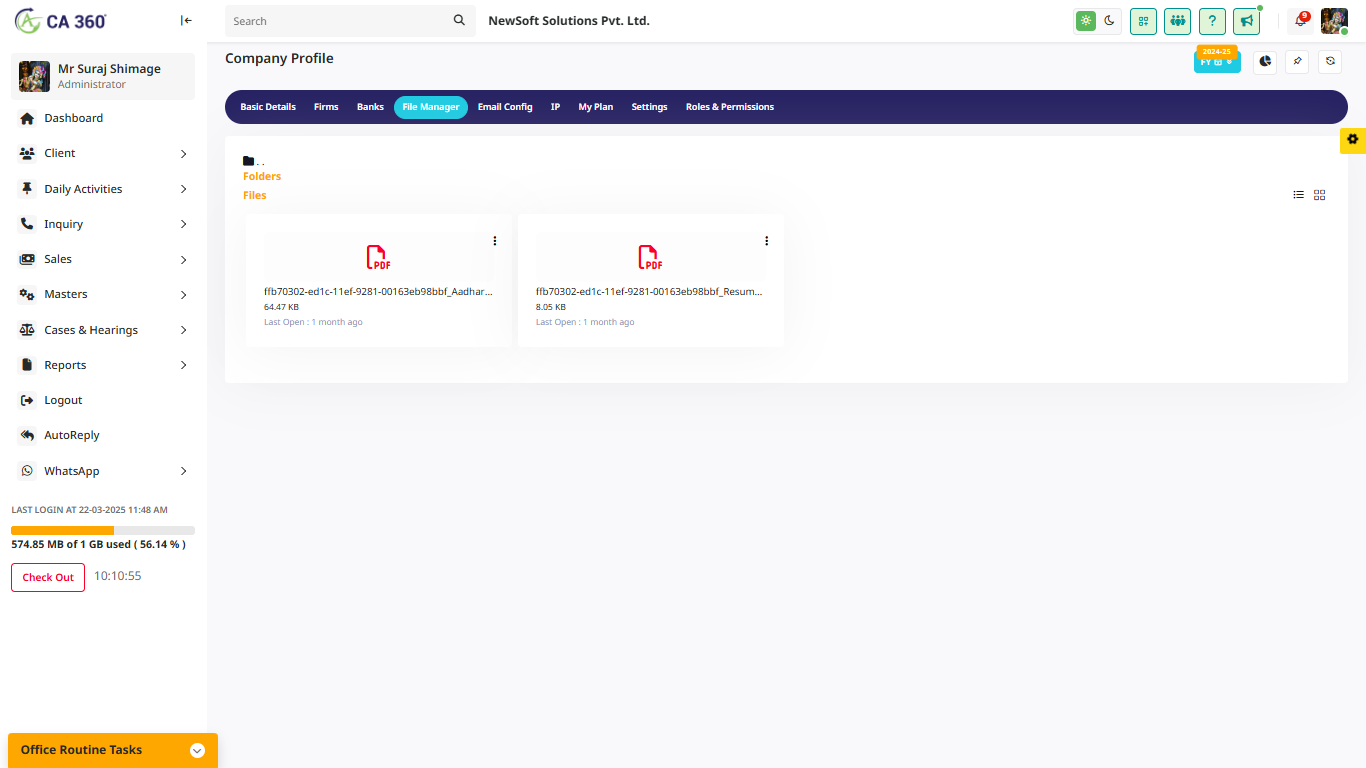
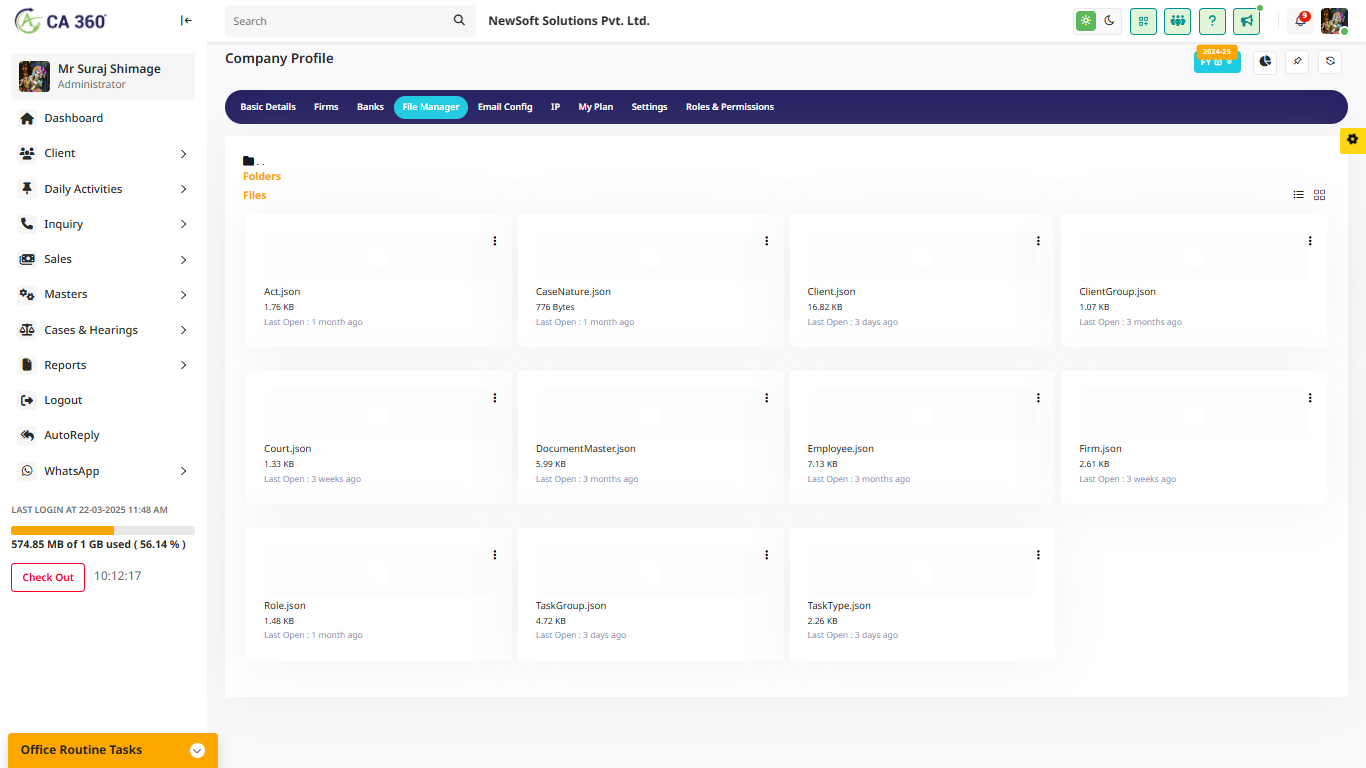
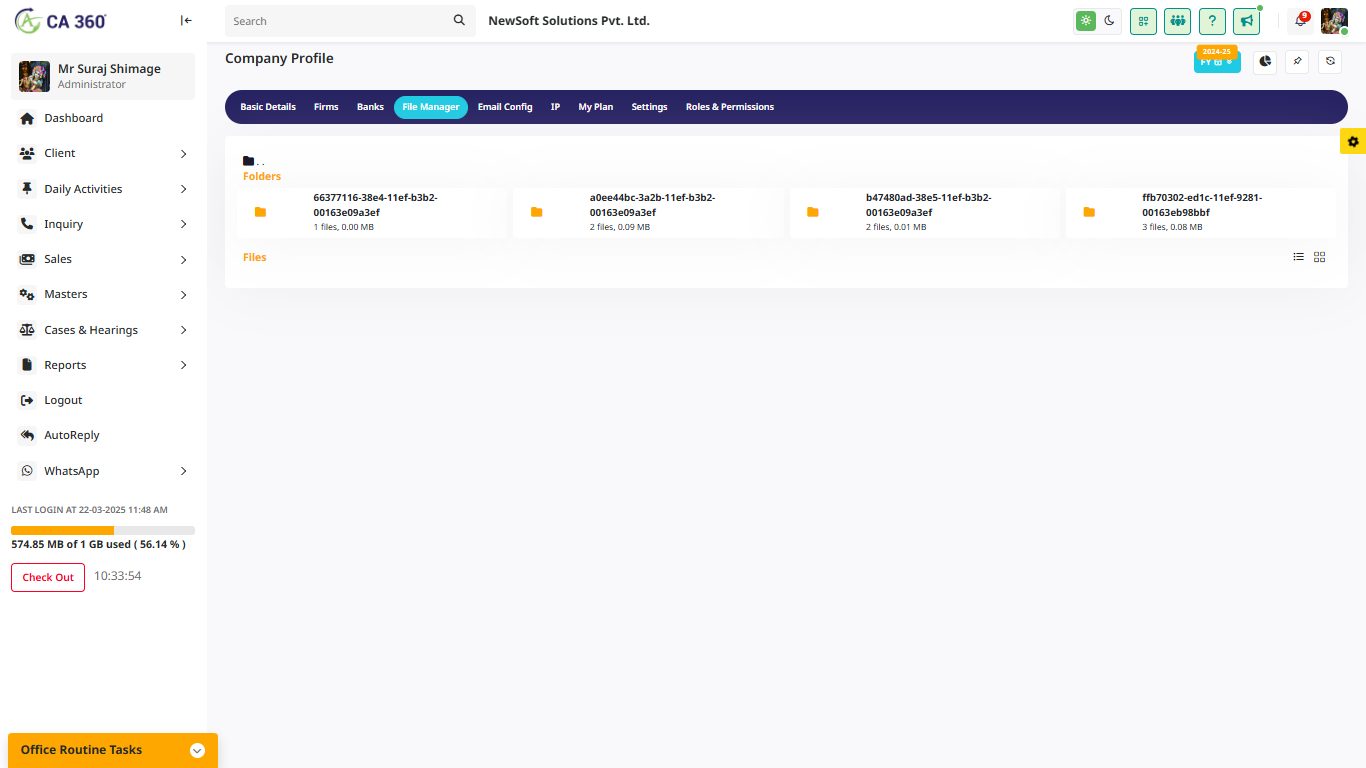
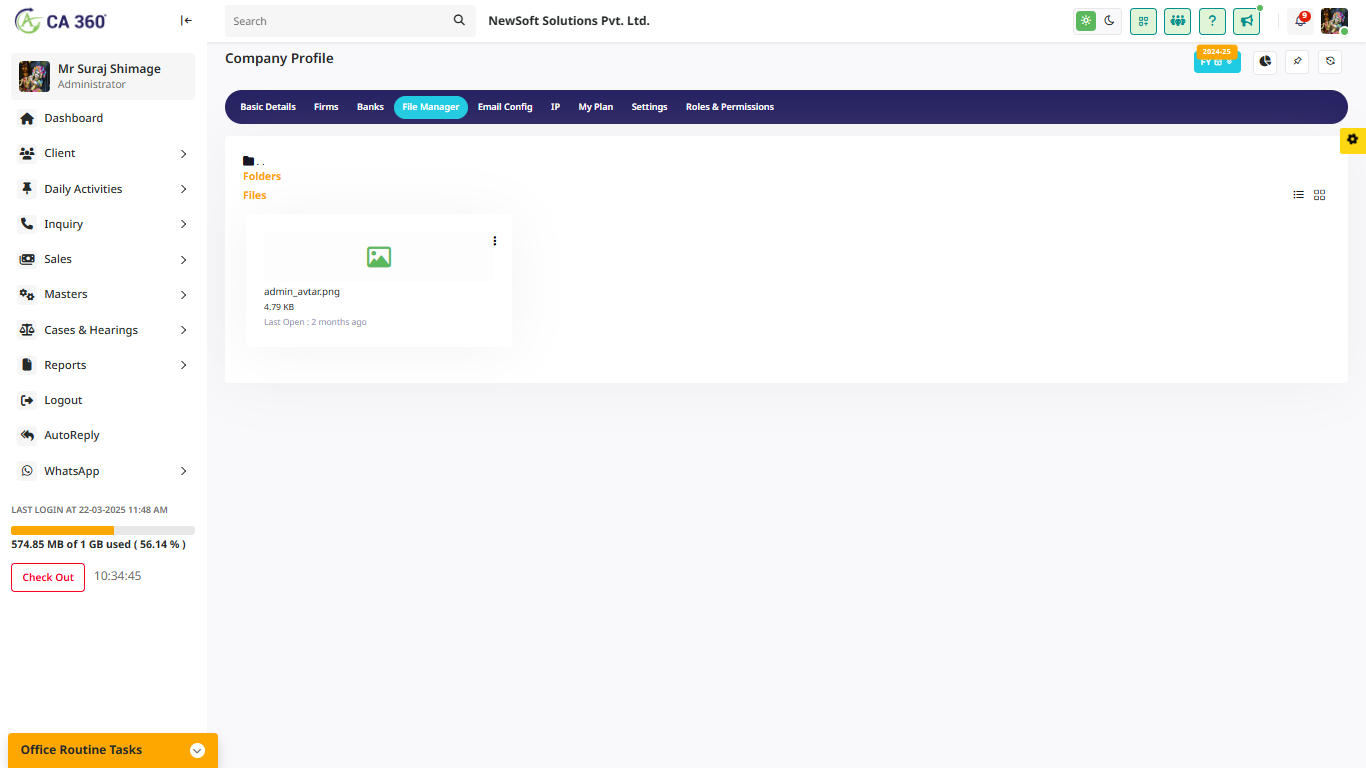
File Manager
In this section, data is stored in various categories, including client data, task data, and employee data. Additionally, the File Manager allows users to efficiently organize, upload, and manage important documents, ensuring secure and easy access to files related to clients, tasks, and employees.
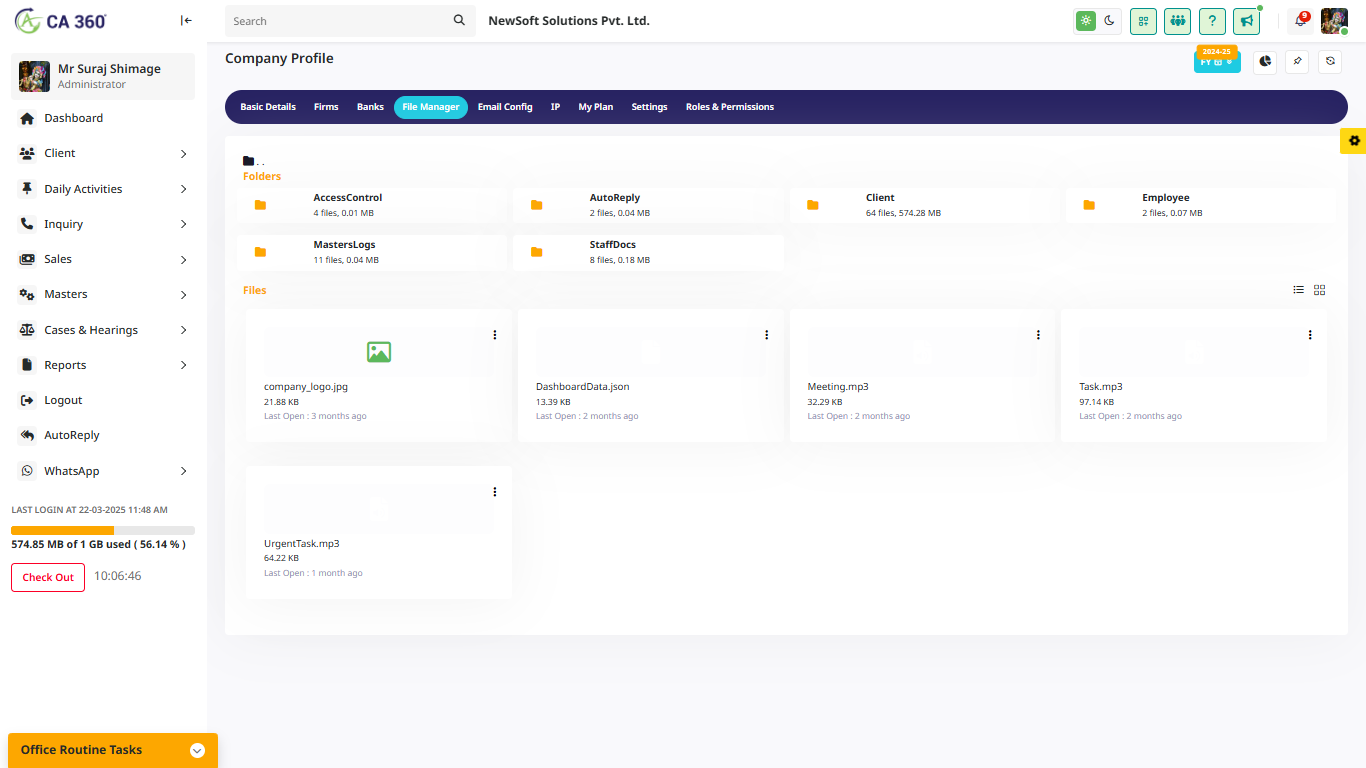
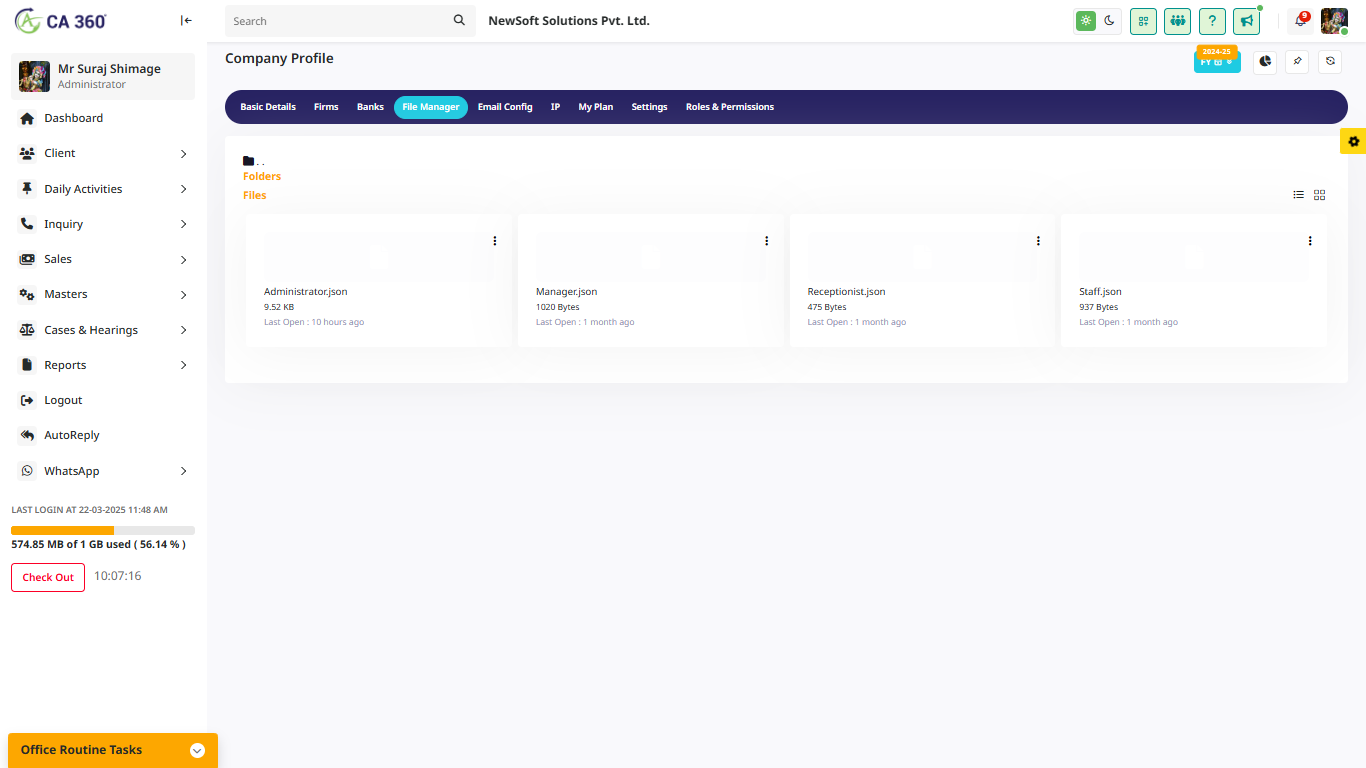
Access Control
In this section, the system securely stores complete data for the Administrator, Manager, Receptionist, and Staff, ensuring smooth operations and role-based access.
The File Manager in Access Control allows authorized users to manage documents efficiently. Administrators can organize, upload, and control access to files, ensuring data security. Managers and Receptionists can retrieve necessary documents based on their permissions, while staff members can access only relevant files. This structured file management system enhances security, maintains data integrity, and simplifies workflow.
AutoReply
In this section, you can upload and store the company logo for easy access. The File Manager's AutoReply feature ensures smooth management by automatically organizing and retrieving uploaded logos when needed. This helps maintain consistency across documents, reports, and other branding materials.
Client
In this section, the complete client documents are securely stored and managed. The File Manager module allows admins and managers to organize, access, and retrieve client-related files efficiently. It supports document categorization, quick search functionality, and secure storage, ensuring easy access to important records whenever needed.
Employee
In this section, all employee documents are securely stored and managed. The file manager allows easy access, organization, and retrieval of important records such as contracts, ID proofs, certificates, and other relevant documents. This ensures a well-structured and efficient document management system for employees.
Masters Logs
In this section, all MasterLogs data is securely stored and managed. The File Manager for MasterLogs allows users to efficiently organize, view, and retrieve log records. It helps in tracking system activities, monitoring changes, and ensuring data integrity. This feature enhances record-keeping, making it easier for admins and managers to review past actions and maintain a structured log history.
Staff Docs
In this section, all staff documents are securely stored and managed. The File Manager (StaffDocs) allows administrators and managers to upload, organize, and access important staff-related files, such as contracts, ID proofs, reports, and other essential documents. This ensures efficient document management, easy retrieval, and enhanced security for staff records.
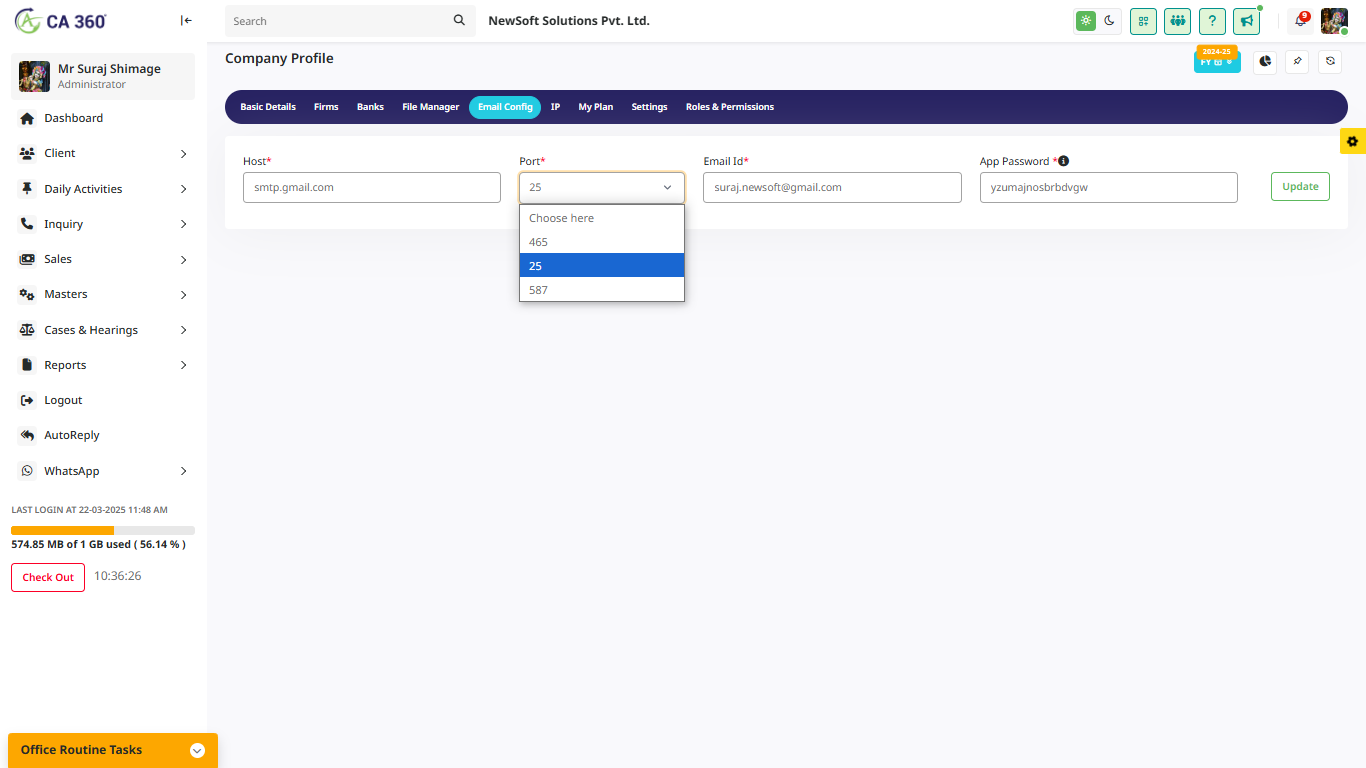
Email Config
In this section, you can configure email settings to ensure smooth communication within the system. The Email Configuration module allows admins to set up SMTP details, sender email addresses, and authentication settings. This ensures that emails such as notifications, alerts, and user communications are sent and received without any issues. Proper email configuration helps maintain reliable message delivery and enhances system efficiency.
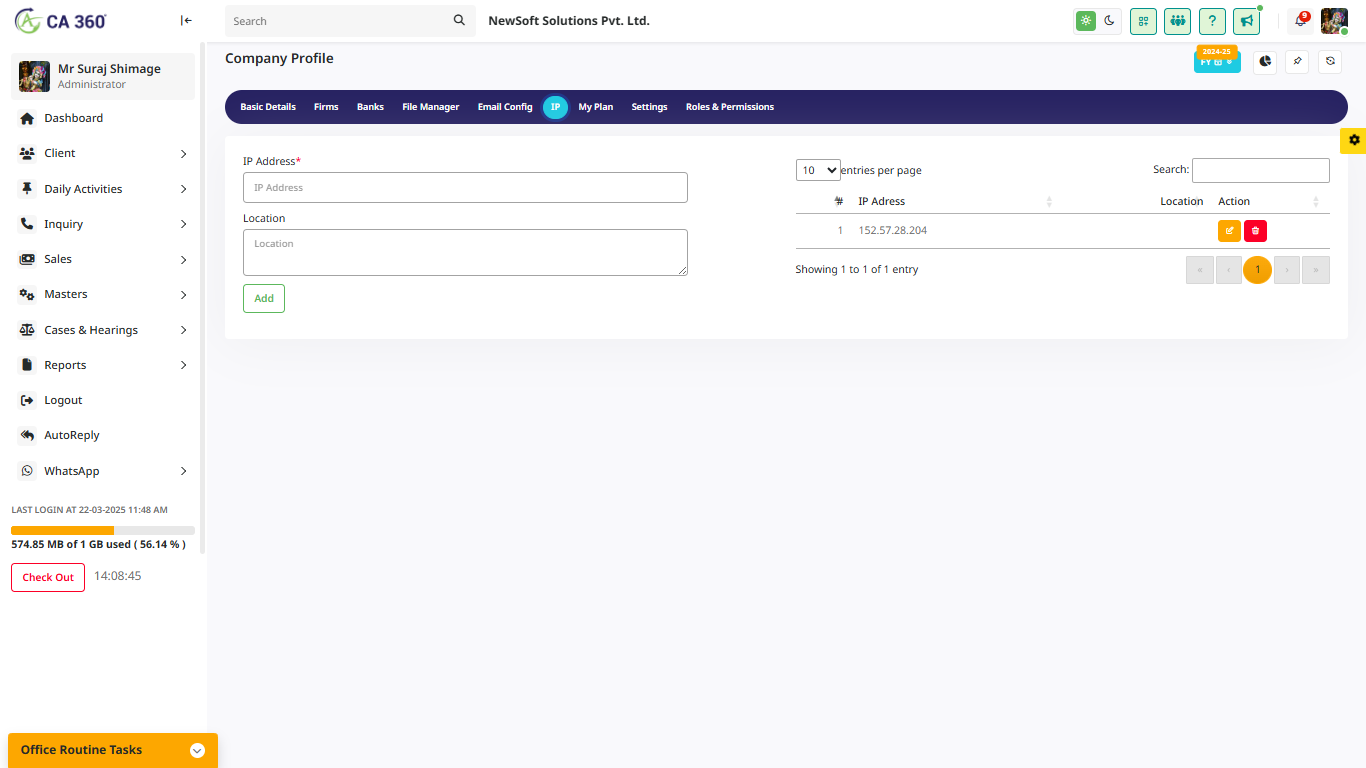
IP
In this section, IP (Internet Protocol) plays a crucial role in identifying devices and facilitating communication over a network. It enables data transfer between devices by assigning unique addresses, ensuring seamless connectivity and secure data exchange.
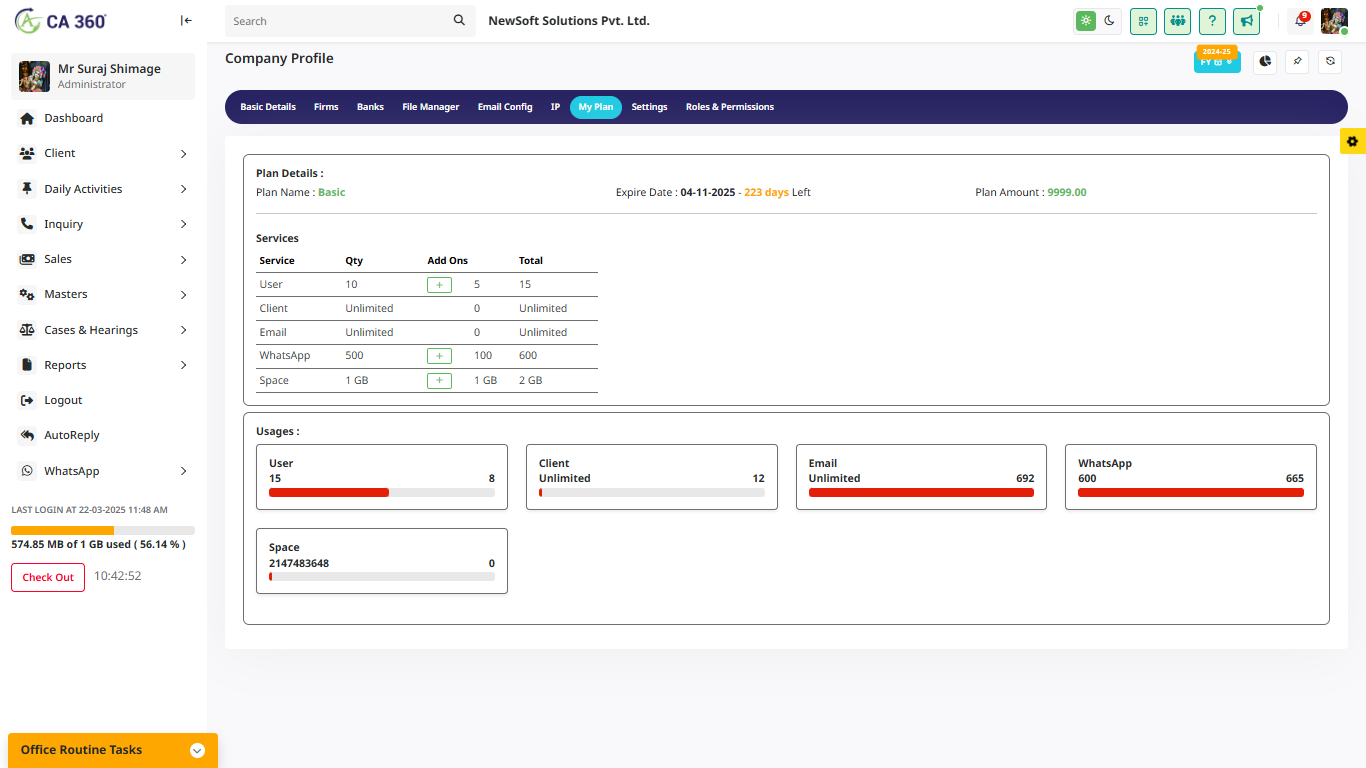
My Plan
In this section, provide space for integrating WhatsApp, user management, and message handling. This feature will allow seamless communication, enabling users to send and receive messages directly within the platform. It will also facilitate efficient user interactions, quick task updates, and improved collaboration, ensuring a smoother workflow.


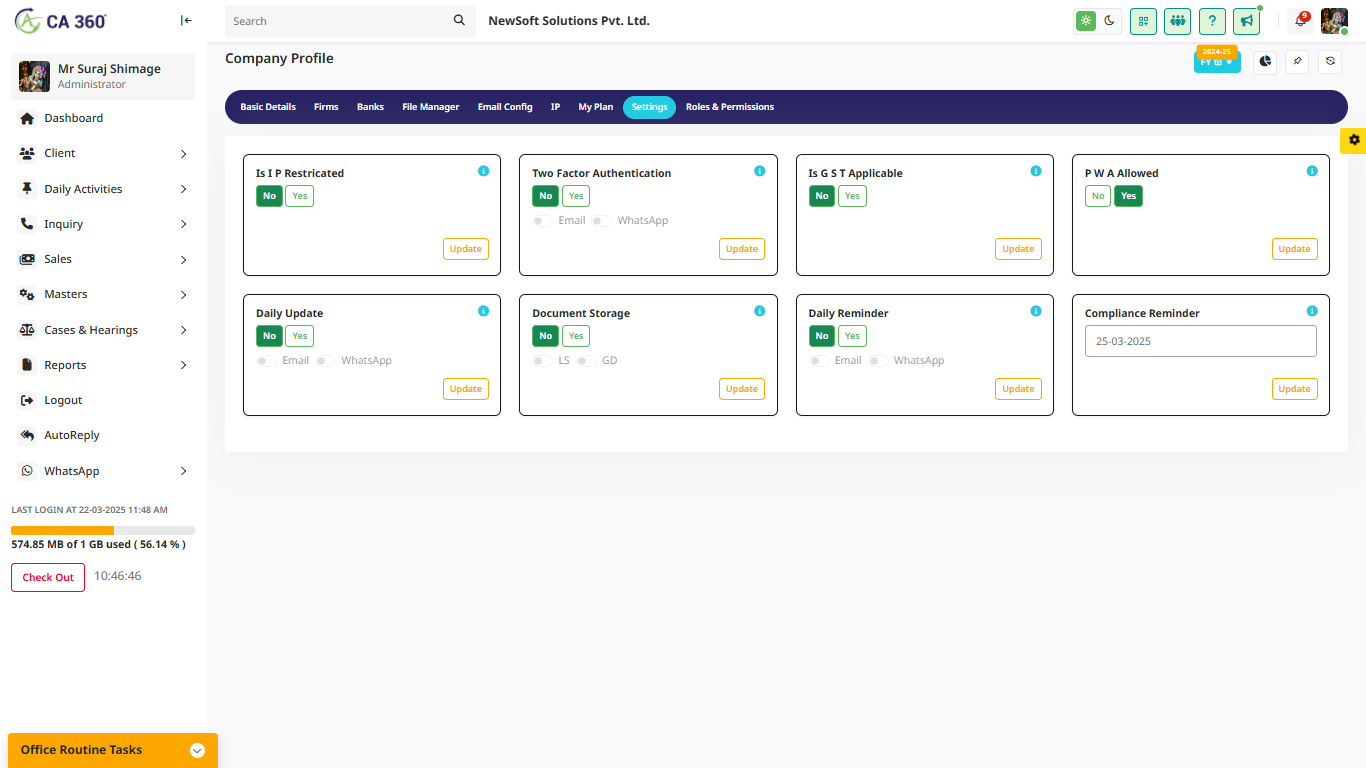
Setting
This section provides various security and configuration settings, including IP restriction, Two-Factor Authentication, GST applicability, and PWA (Progressive Web App) support. Additionally, it allows administrators to manage user permissions, Yes or No specific features, configure notification preferences, and set up data backup options, ensuring a secure and customized user experience.
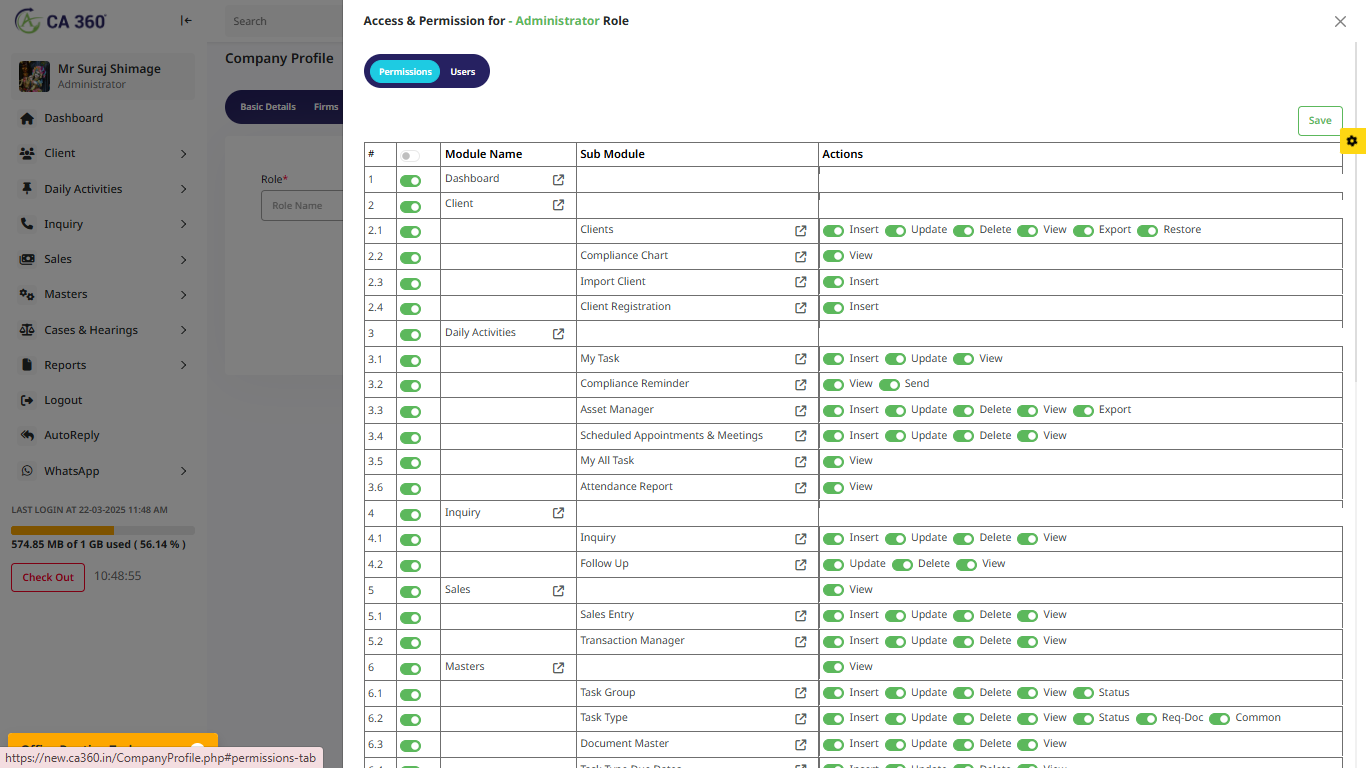
Roles And Permissions
This section allows the admin to enable or disable roles, granting or restricting access based on responsibilities. The admin has full control over the project, while managers can be given complete or limited access as needed. Additionally, the admin can create custom roles and assign specific permissions. By clicking on the permissions option, a form opens where the admin can enable or disable access for each role. This ensures a structured access control system, allowing only authorized users to perform certain actions, enhancing security and workflow management within the project.

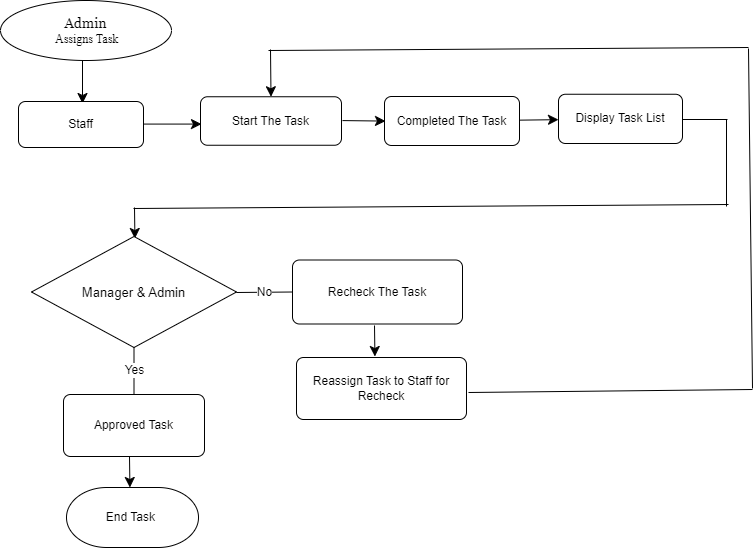
The Office Routine Tasks section in CA 360° ensures that daily operations are well-structured and efficiently managed. These tasks are assigned based on roles and are displayed on the logging dashboard to keep users updated with their responsibilities.
Admin Responsibilities:
Manager Responsibilities:
Staff Responsibilities:
Assistant Responsibilities:
Task Workflow Process:
1. Task Assignment : Admin assigns routine tasks to relevant users2.Task Execution : Users complete their tasks and update progress in the system.
3.Task Monitoring : Managers and admins oversee and review task completion.
4.Task completion : Approved tasks are marked as completed and stored for reference.
Welcome to the Client section of CA360. This section provides easy access to all client-related functionalities, including:
- Clients – Manage and register client groups.
- Compliance Chart – Track and monitor client compliance status.
- Import Client – Bulk import client data efficiently.
- Client Registration – Register and manage new clients.
Client Registration
Register new clients in CA360 with a streamlined three-step process:
- Client Type & Personal Information – Select client type (Regular or Provisional) and enter details.
- Application Details – Specify the applicable year.
- Job Allocation – Assign tasks to appropriate staff members.
Active
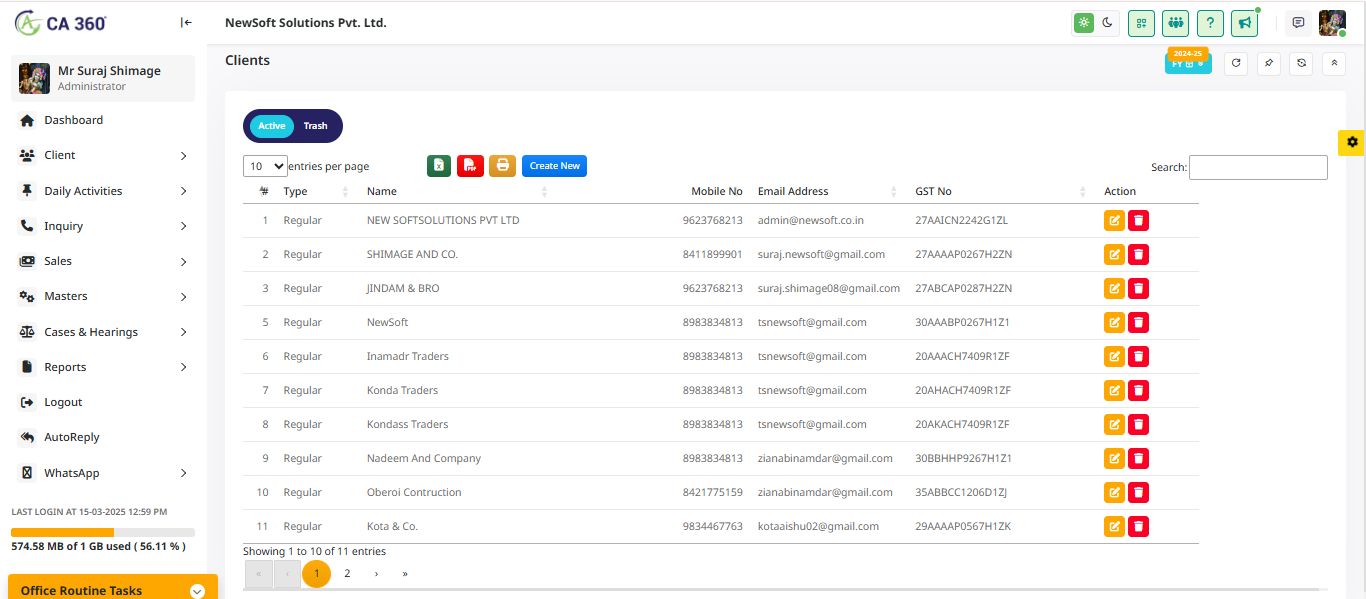
In this section, a data table displaying the list of active clients is shown. To register a new client, click the Create New button, which will open the registration form.
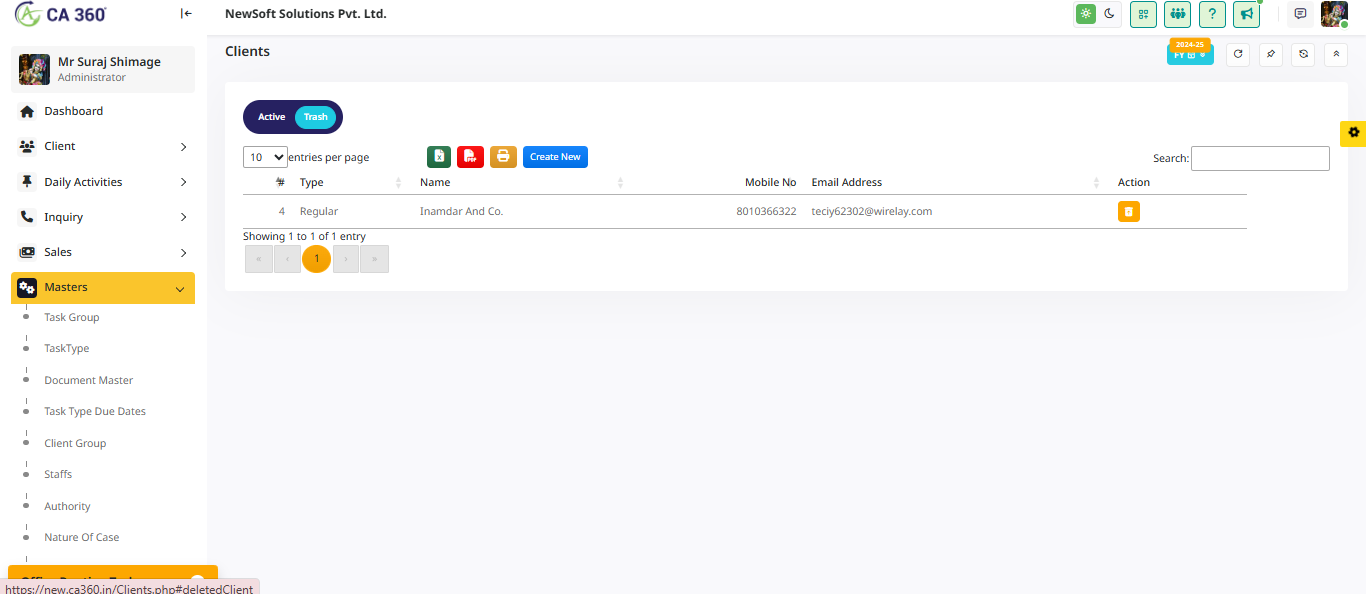
Trash
In this section, a data table displaying the list of Trash clients is shown.
Basic Details
To register a new client, click the Create New button to open this form. Start by filling in the basic details and then complete the remaining required information.

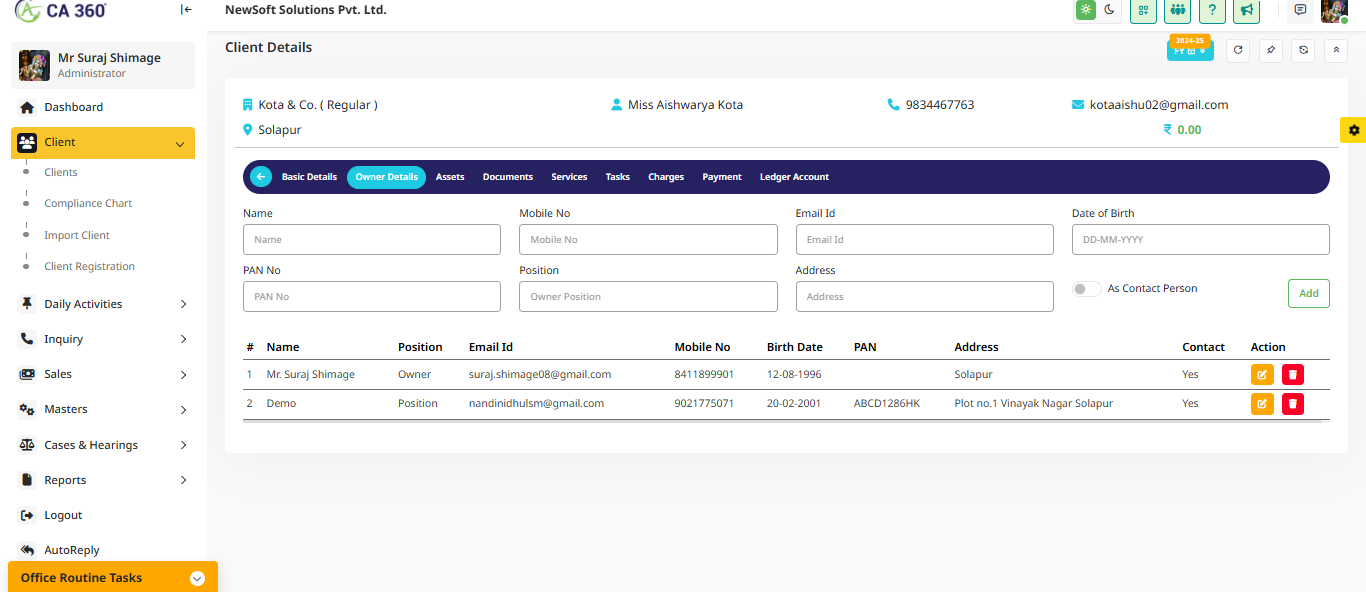
Owner Details
In this section, enter the owner's details, including their name, mobile number, email ID, and any additional information.
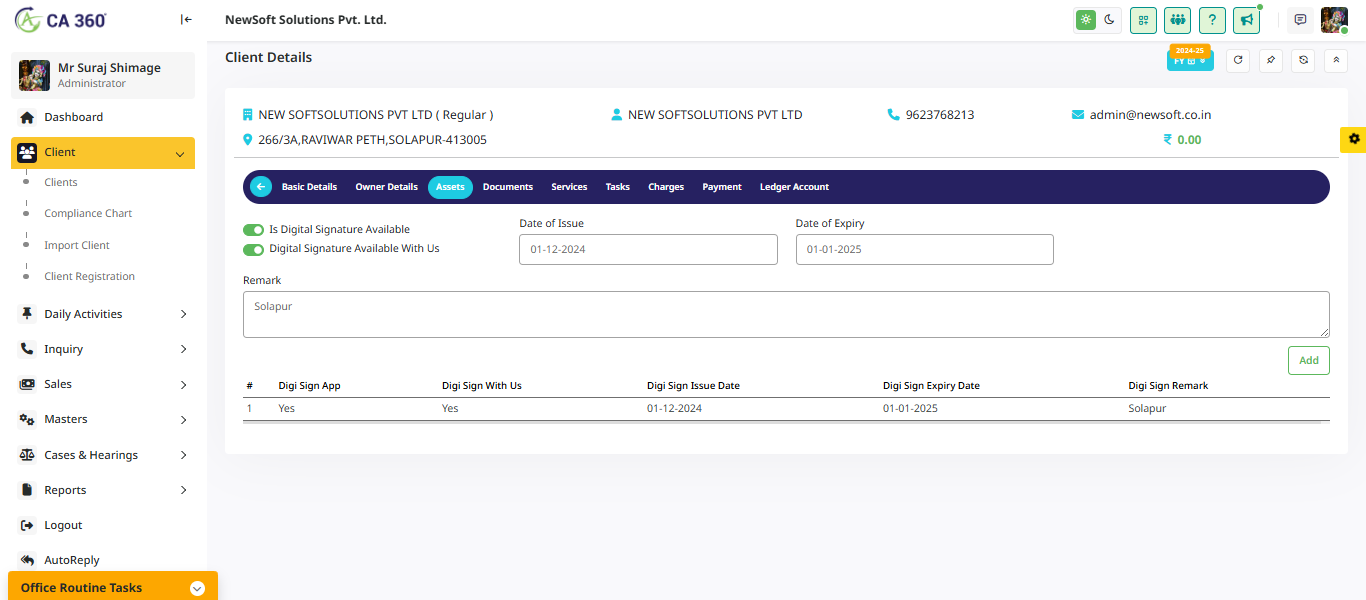
Assets
In this section, check if a digital signature is available or verify the Digital Signature Available With Us. Then, review the date of issue, date of expiry, and any remarks. Finally, click the Add button to save the details.
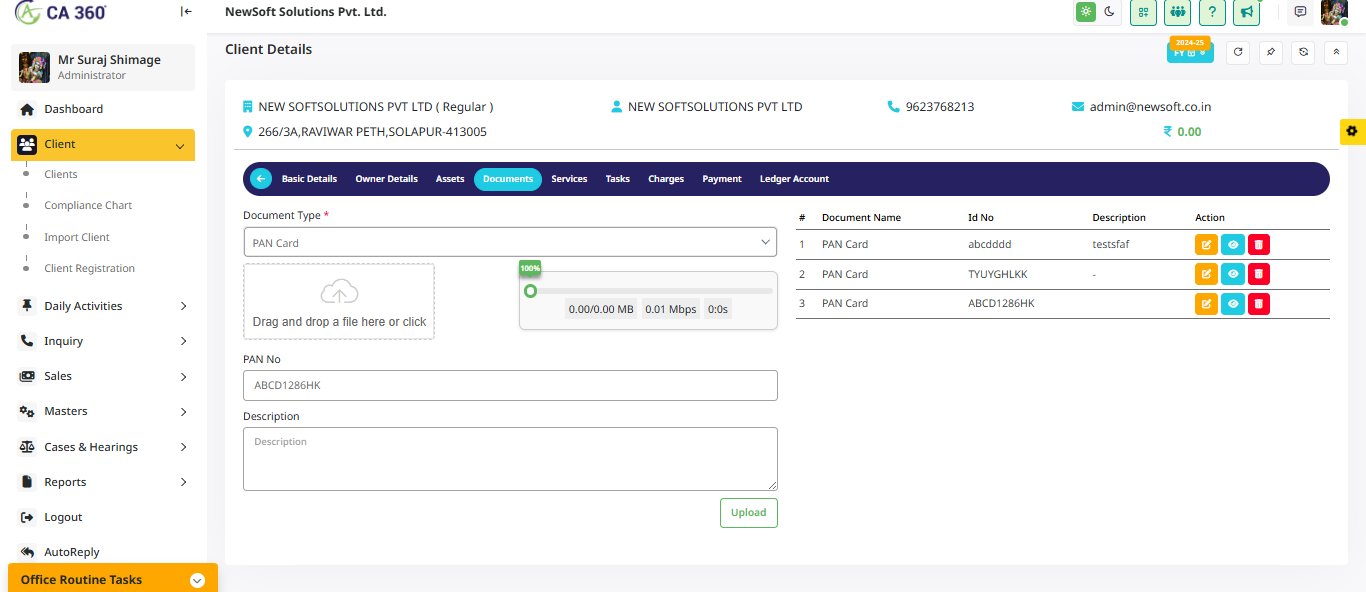
Documents
In this section, select the document type, such as Aadhaar Card, PAN Card, certificates, and more. After selecting the document type, upload the file by dragging and dropping it. Then, enter the ID number and provide a description to complete the upload process.
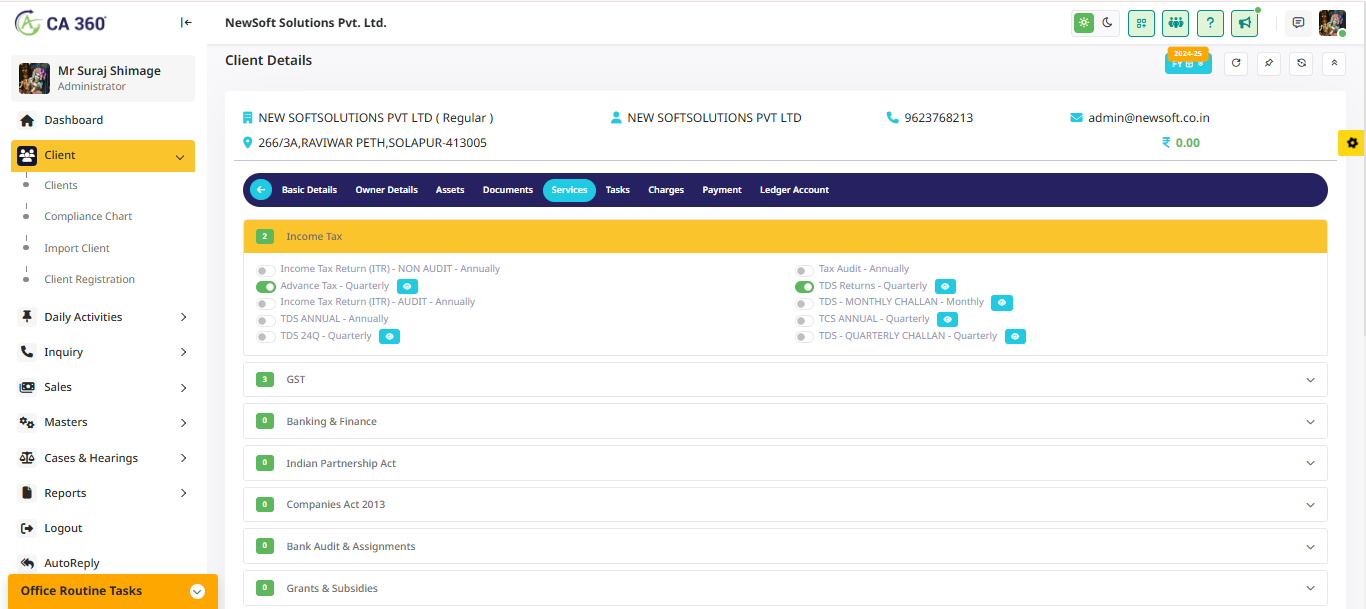
Services
In this section, various services are displayed, including Income Tax, GST, Banking, Finance, and more.
Tasks
In this section, various tasks are displayed, including task type, frequency, multi-step processes, and allocated users. You can also take action by clicking the relevant button.

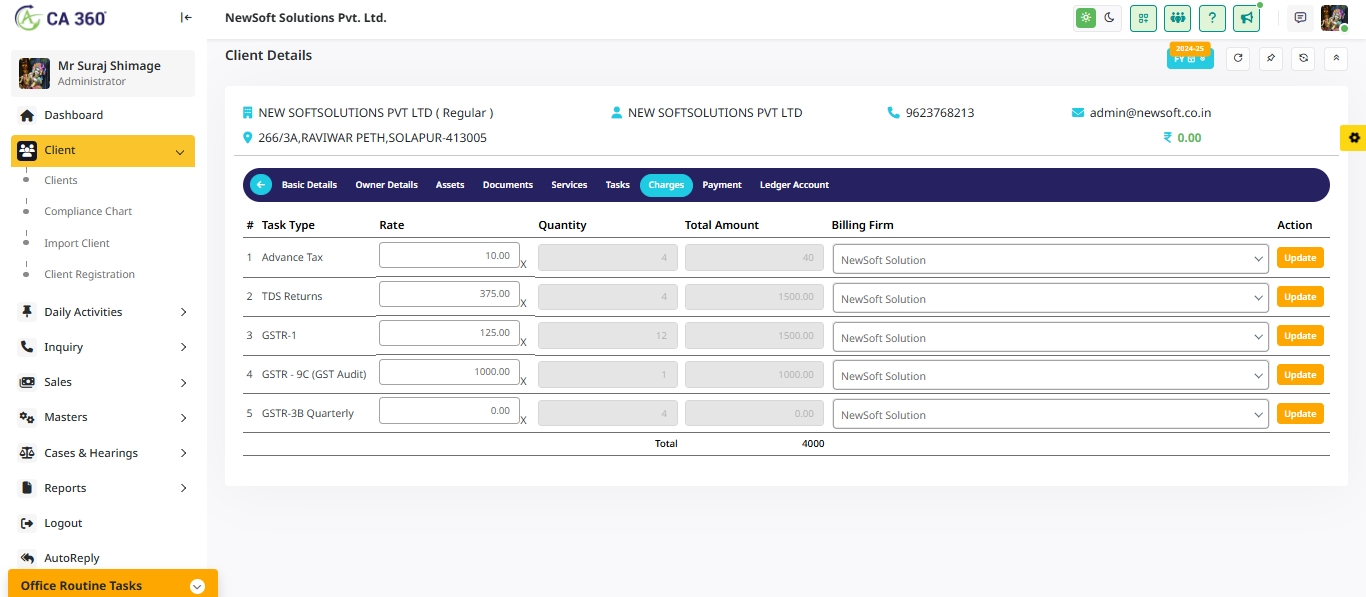
Charges
In this section, details such as task type, rate, quantity, total amount, and billing firm are displayed. Click the action button to update the information.
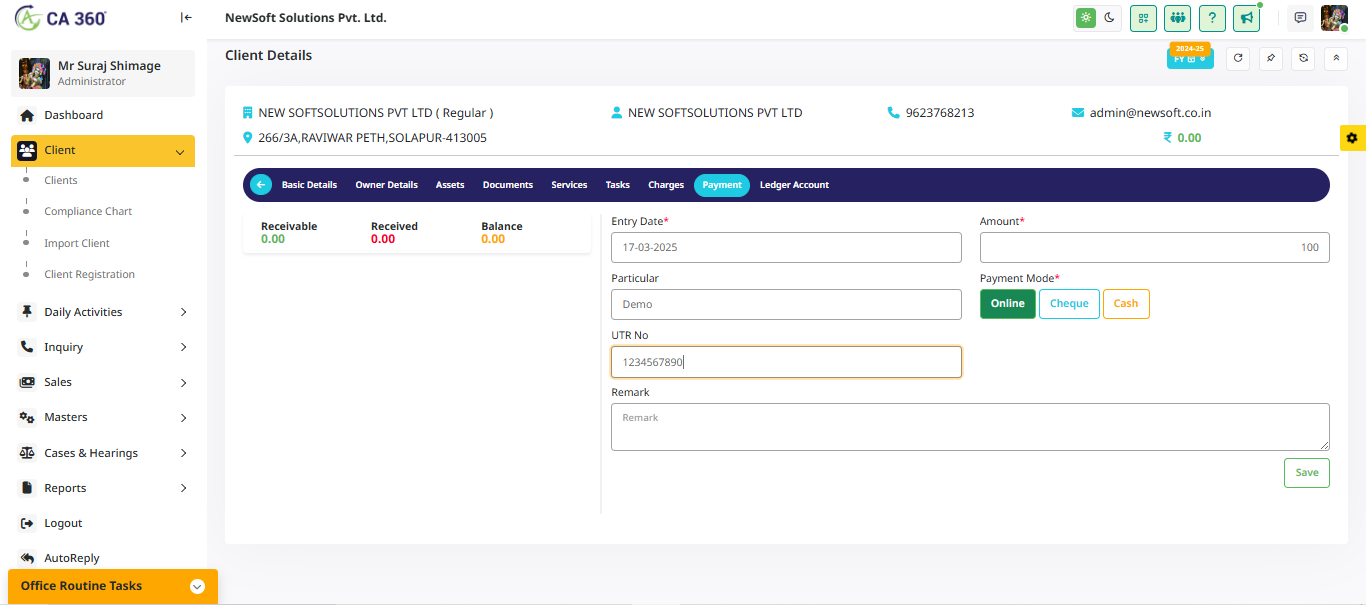
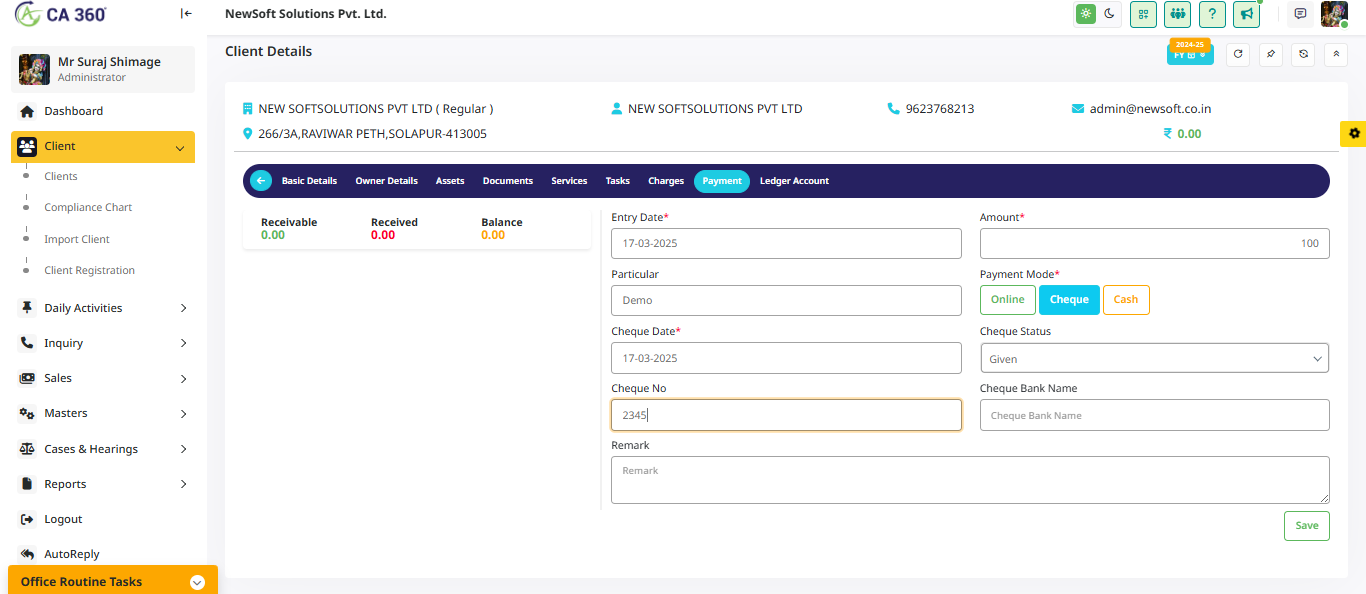
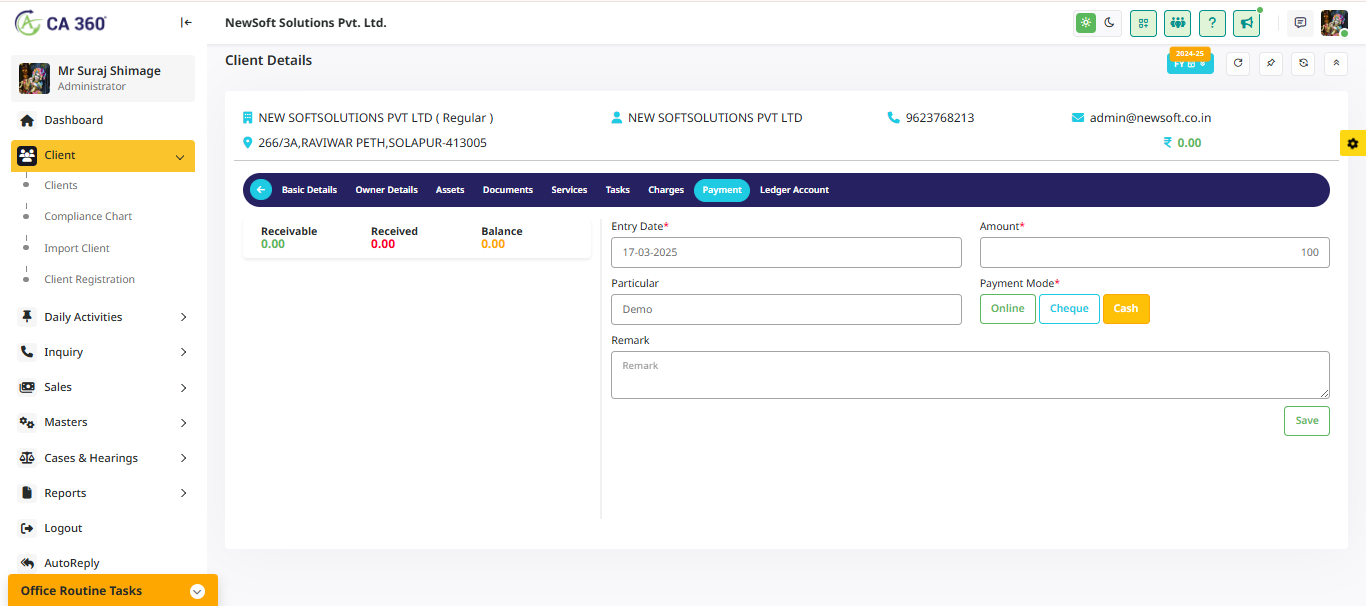
Payment
In this section, various payment methods are displayed, including online payment, cheque, and cash.
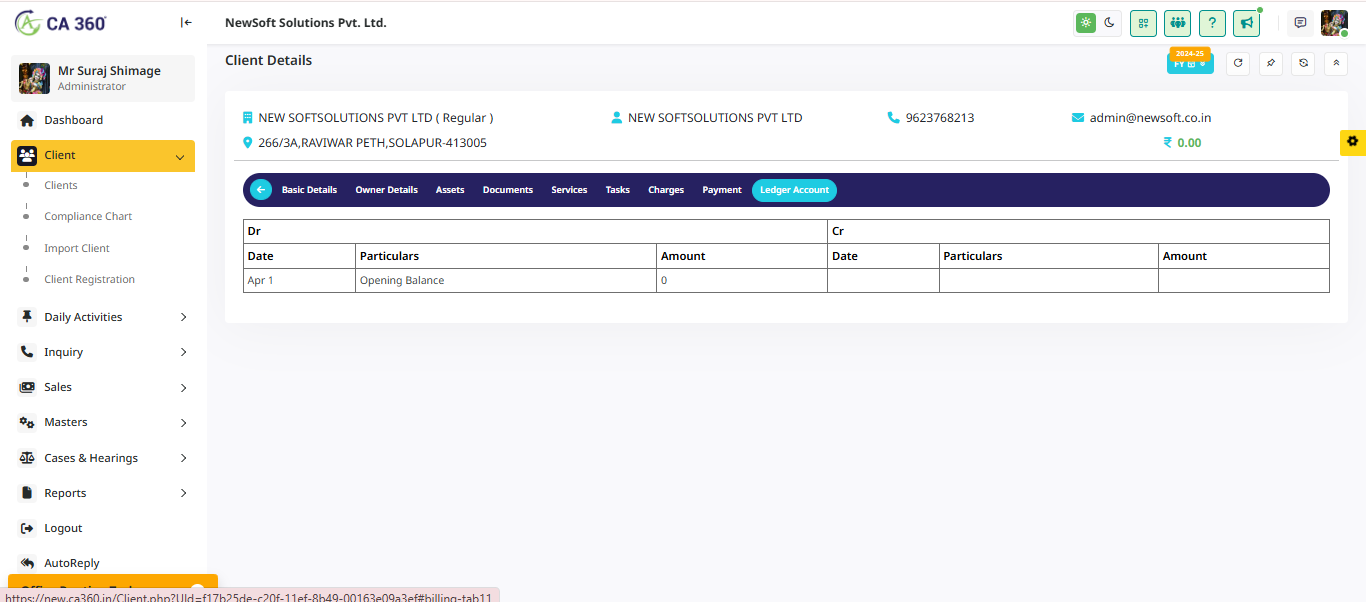
Ledger Account
This section displays the complete details of the ledger account.
Compliance Chart
Easily track the compliance status of all registered clients. Select By client or group, and Select the Client Name and also Select the financial year, and click the Show button to generate a detailed compliance chart. The compliance chart provides a structured overview of all tasks, including GSTR filings,TDS returns, and GST registrations, ensuring timely completion and compliance management.

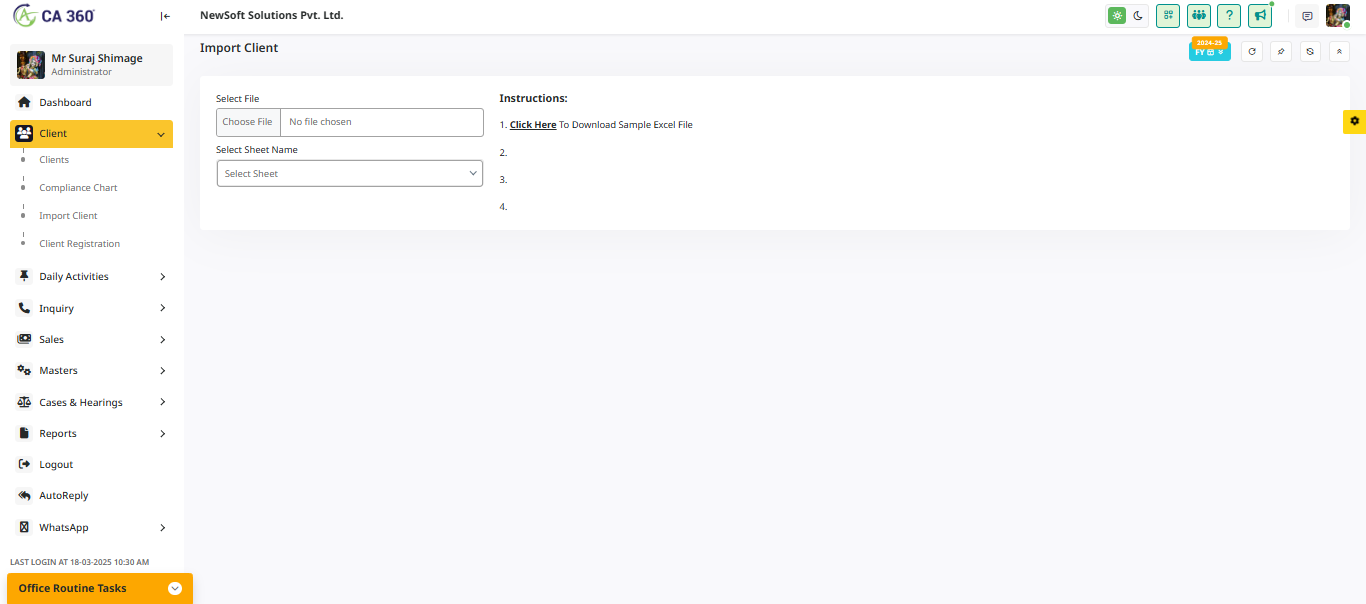
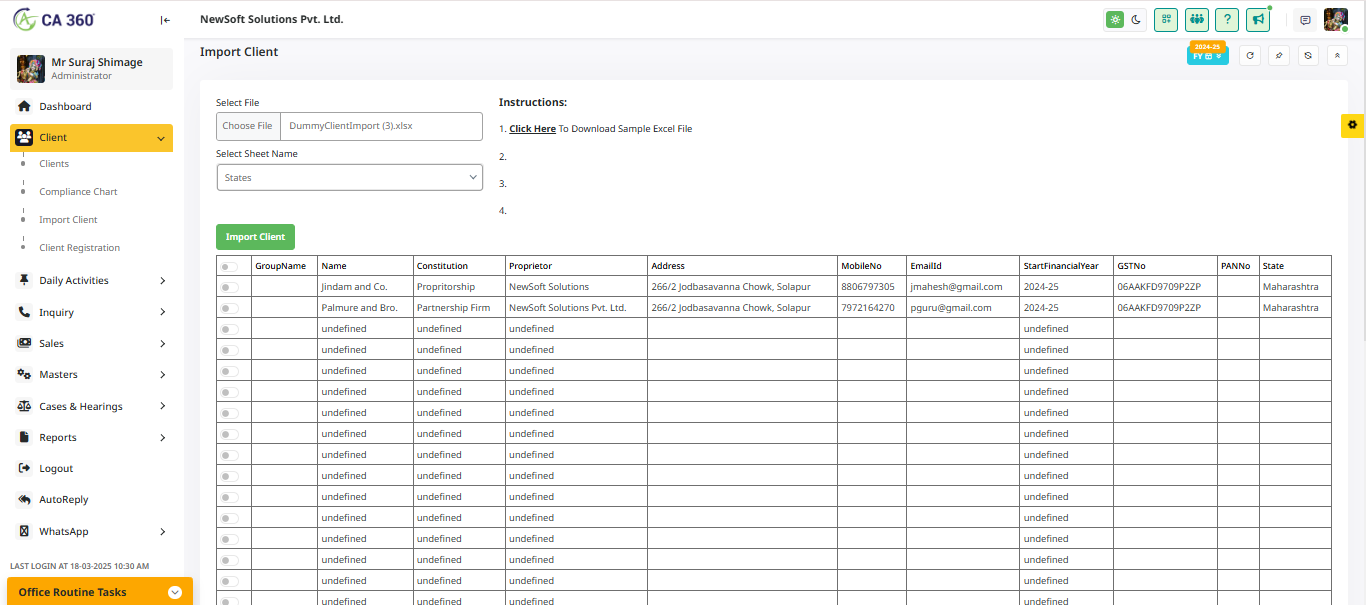
Import Client
In this section, users can import client details seamlessly. First, read the instructions carefully, then click on the provided link to download the sample Excel file.
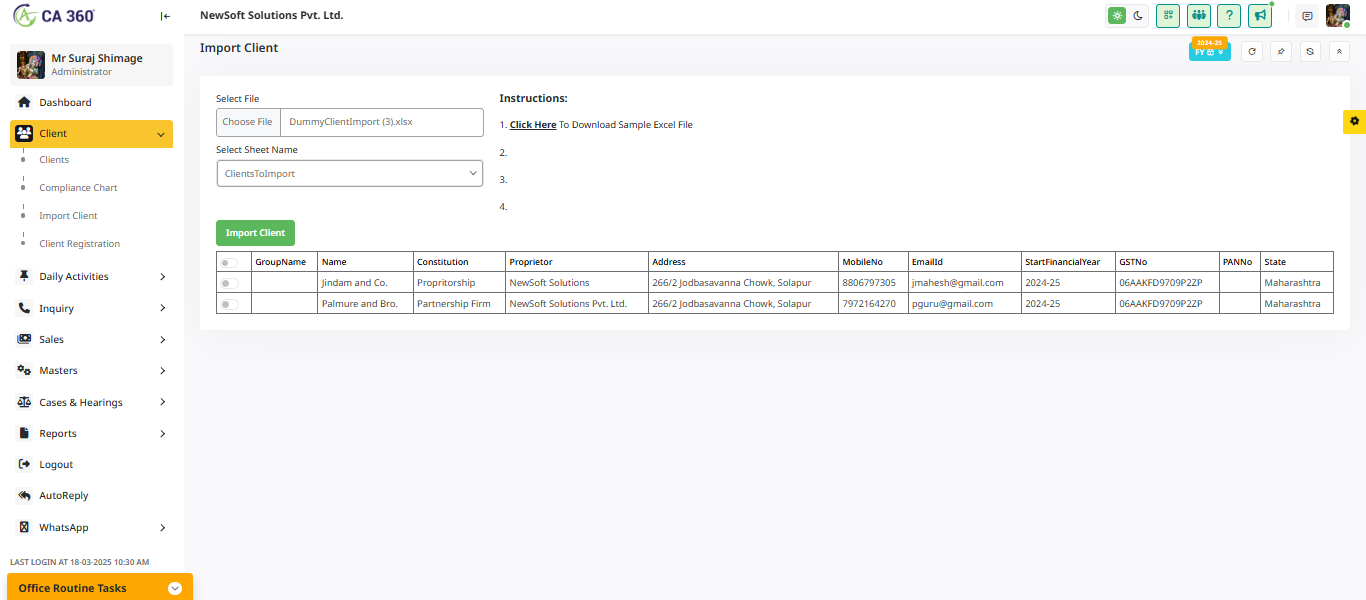
In this section, after downloading the Excel sheet, click on Select File to upload the downloaded excel file. Then, choose the sheet name from the uploaded file, and the complete list of clients will be displayed.
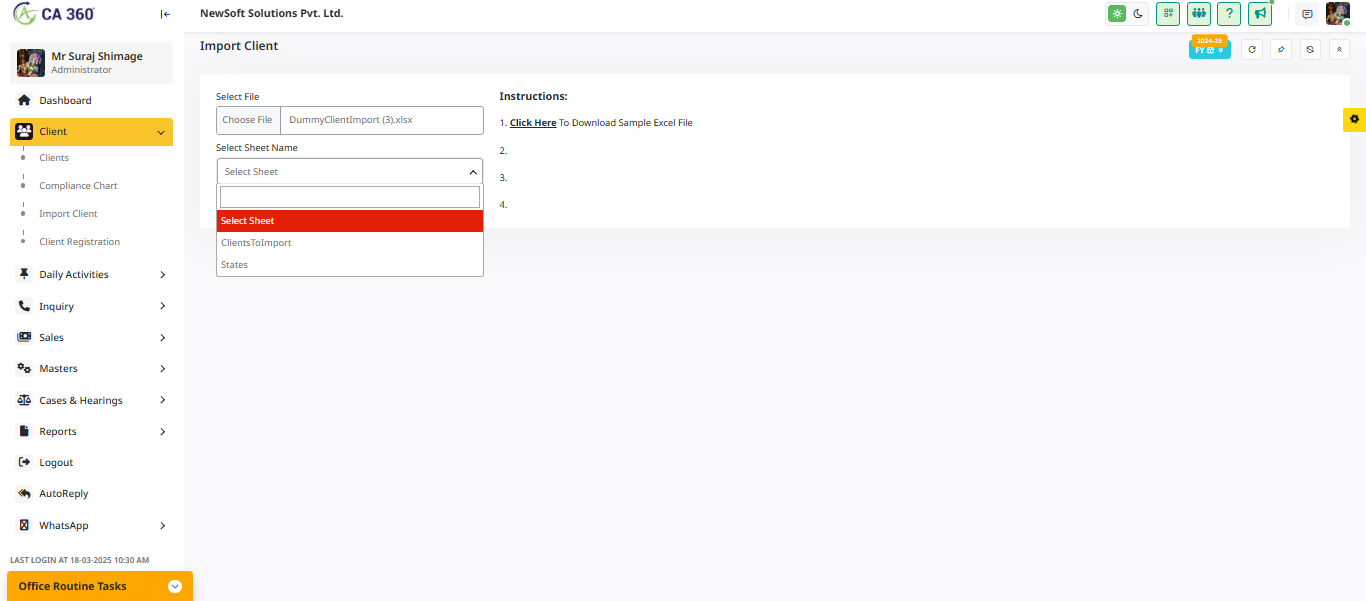
Clients to Import
States
Client Registration
In this section, you can register new clients. Click on Client Registration to open the Registration form.

The Daily Activity section helps you efficiently manage and track tasks in CA360. You can assign new tasks, update existing ones, and monitor progress through categorized lists:
- Approved List – View tasks that have been reviewed and approved.
- Task Completed List – Check all completed tasks.
- Recheck List – Review tasks that need further verification.
Additional features in this section include:
- Managing and tracking payments via the Payment List.
- Monitoring employee workload through the Employee Wise Work List.
- Receiving compliance reminders to stay updated on regulatory requirements.
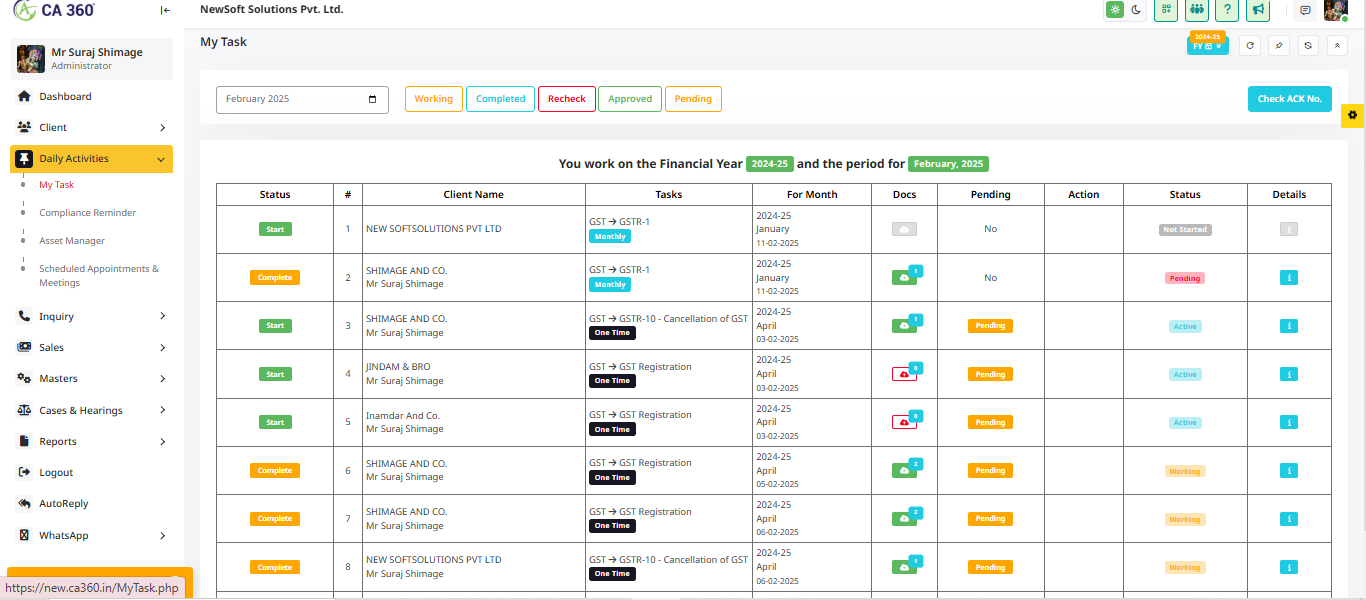
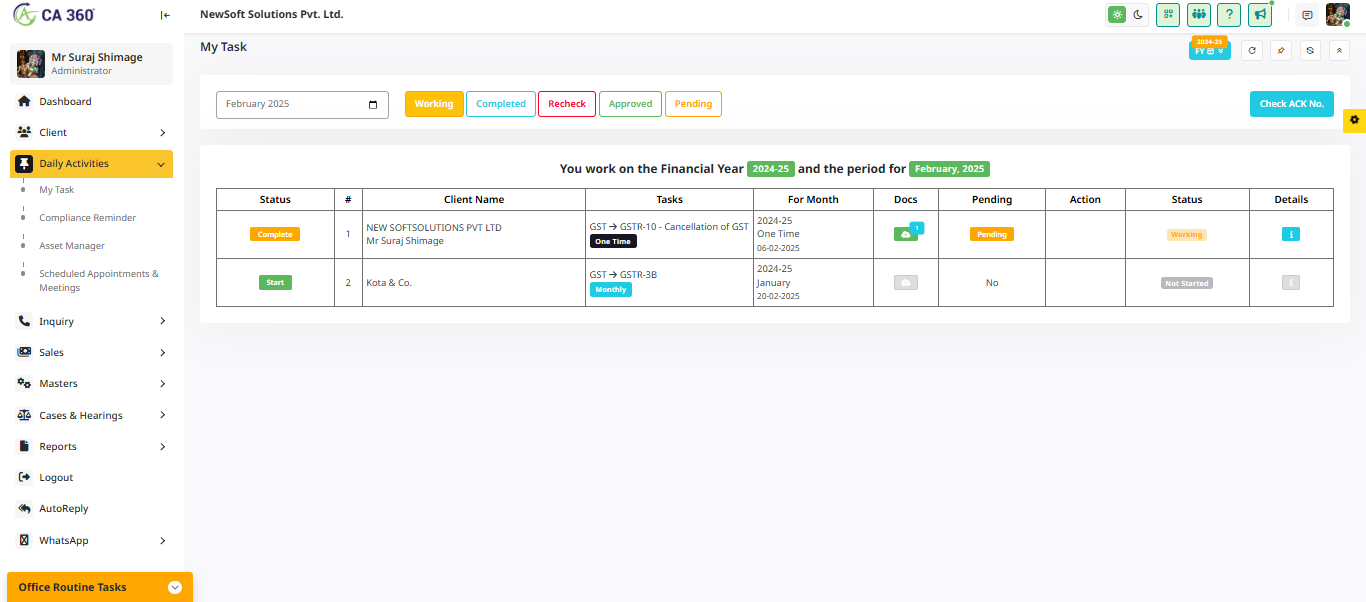
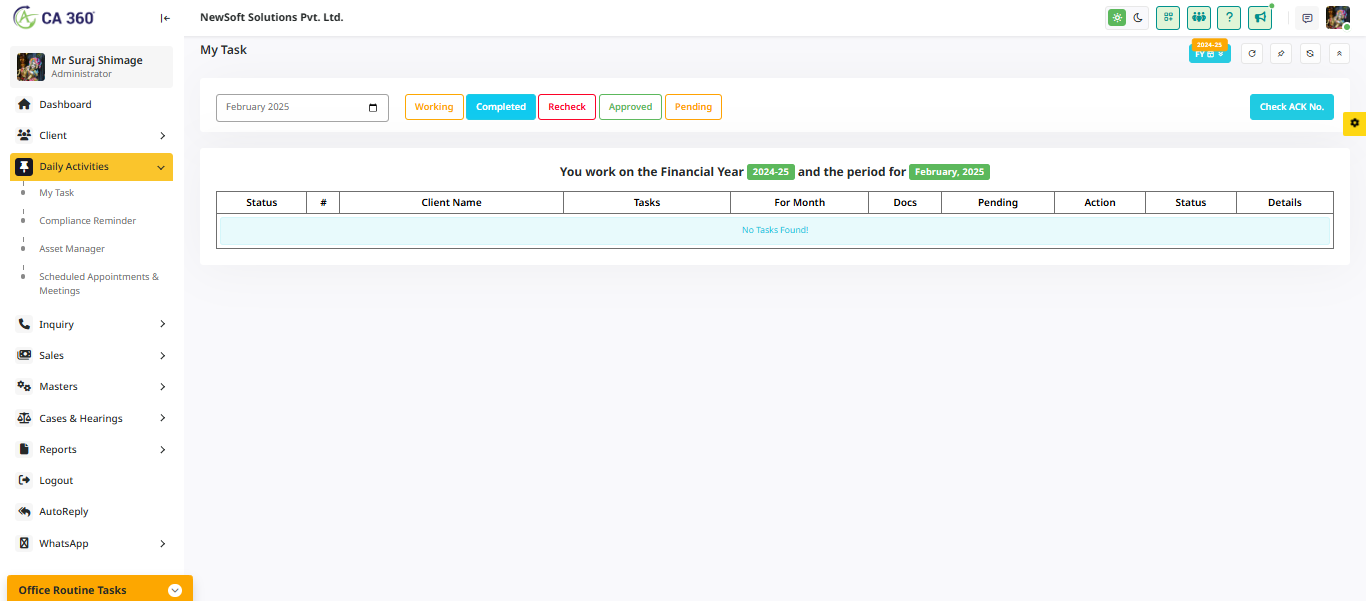
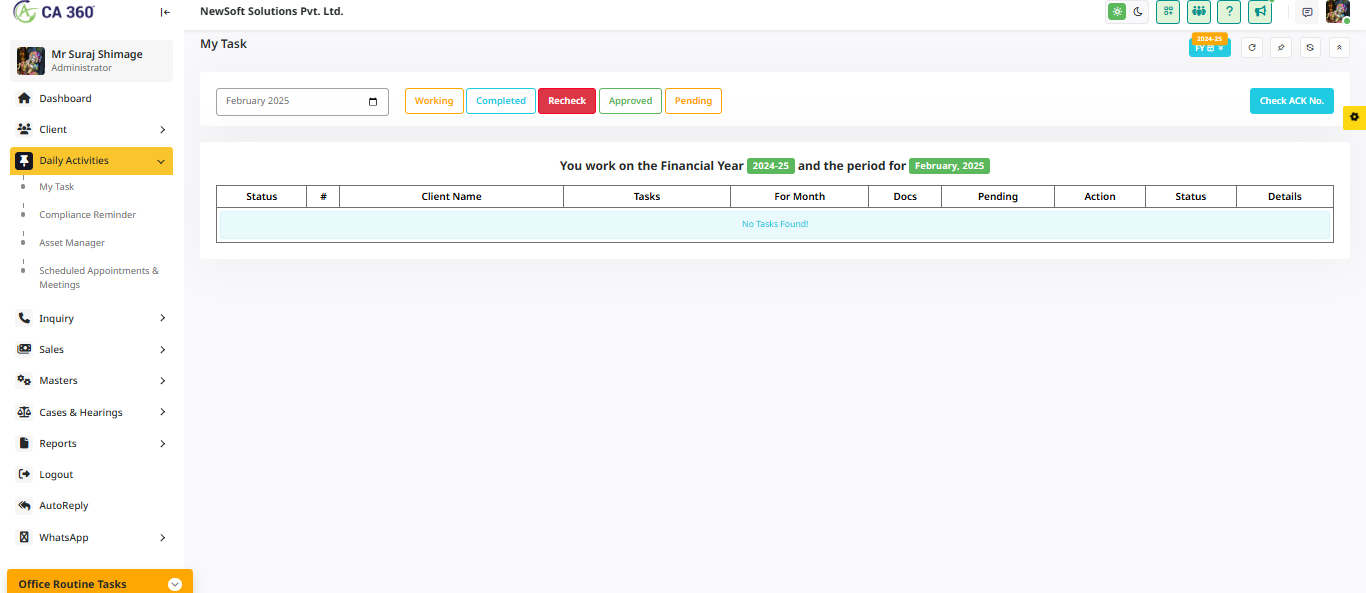
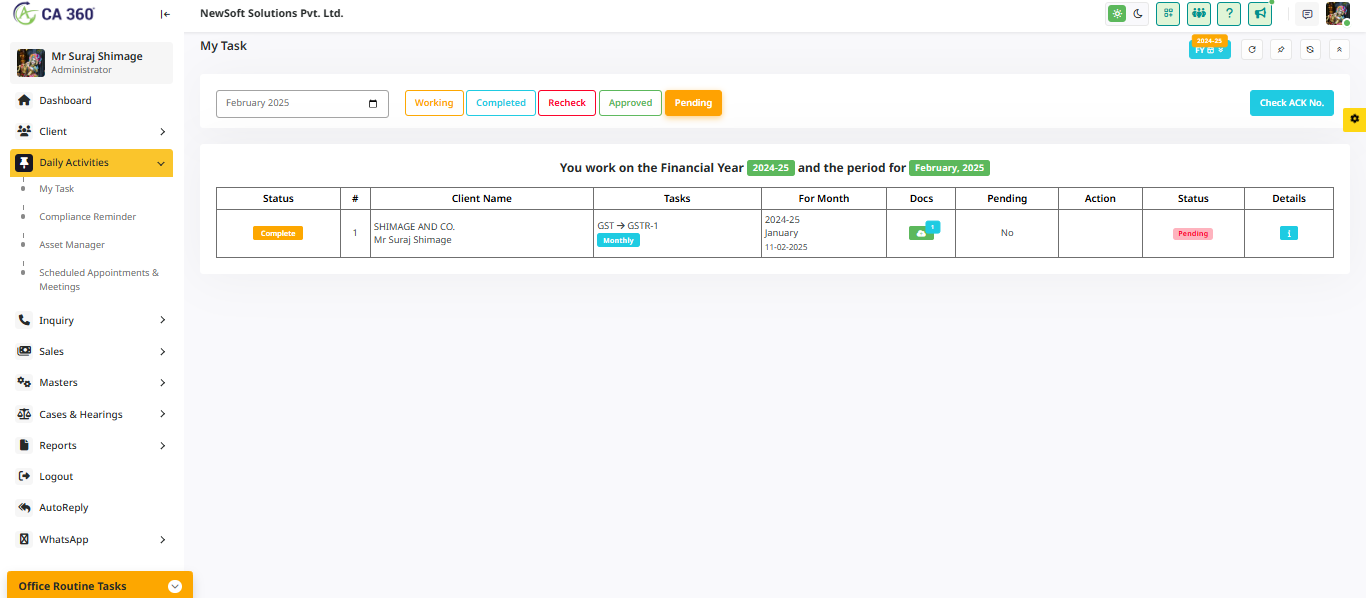
My Task
The My Task section allows you to manage and track tasks assigned to you. Tasks are categorized as:
- Working – Tasks that are currently in progress and awaiting completion.
- Completed – Tasks that have been successfully finished and approved.
- Recheck – Tasks that require further review or verification.
- Approved – Tasks that have been reviewed and officially approved.
- Pending – Tasks that are yet to be completed or processed.
The Task Completed List ensures a clear overview of completed work, keeping track of all documented tasks.
Working
In this section, specify when the provided task is in progress.
Completed
In this section, specify when the provided task is completed.
Recheck
In this section, specify when the provided task needs to be rechecked.
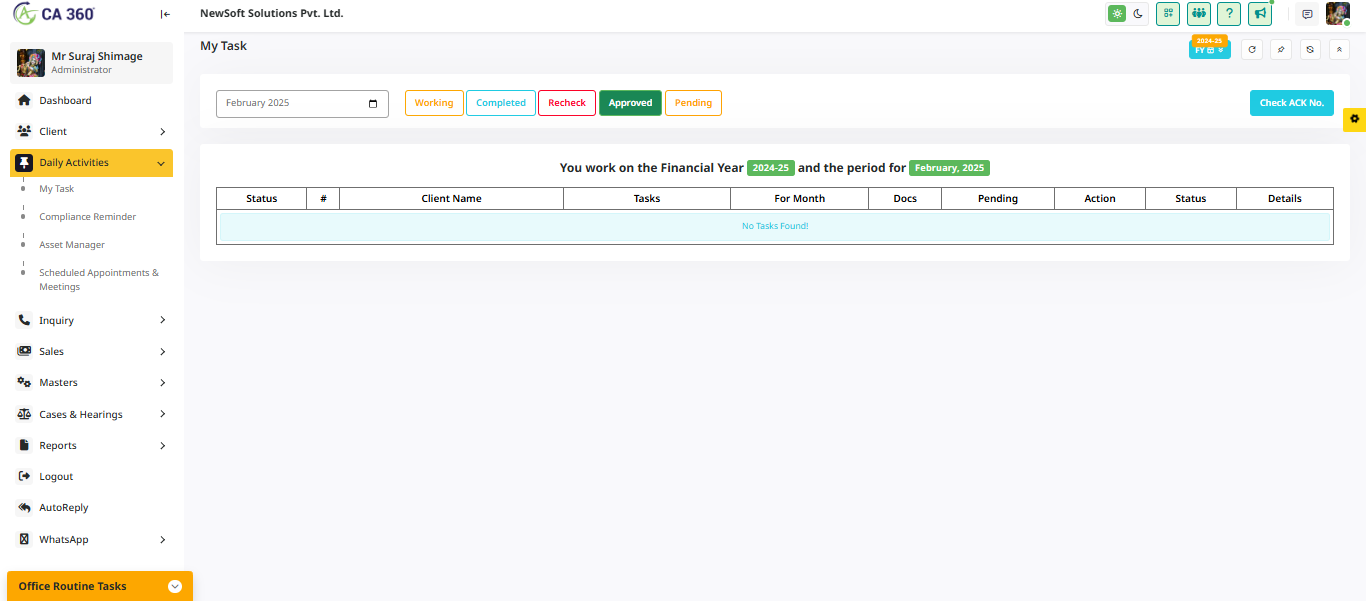
Approved
In this section, indicate when the provided task has been approved.
Pending
In this section, specify when the task is marked as pending.
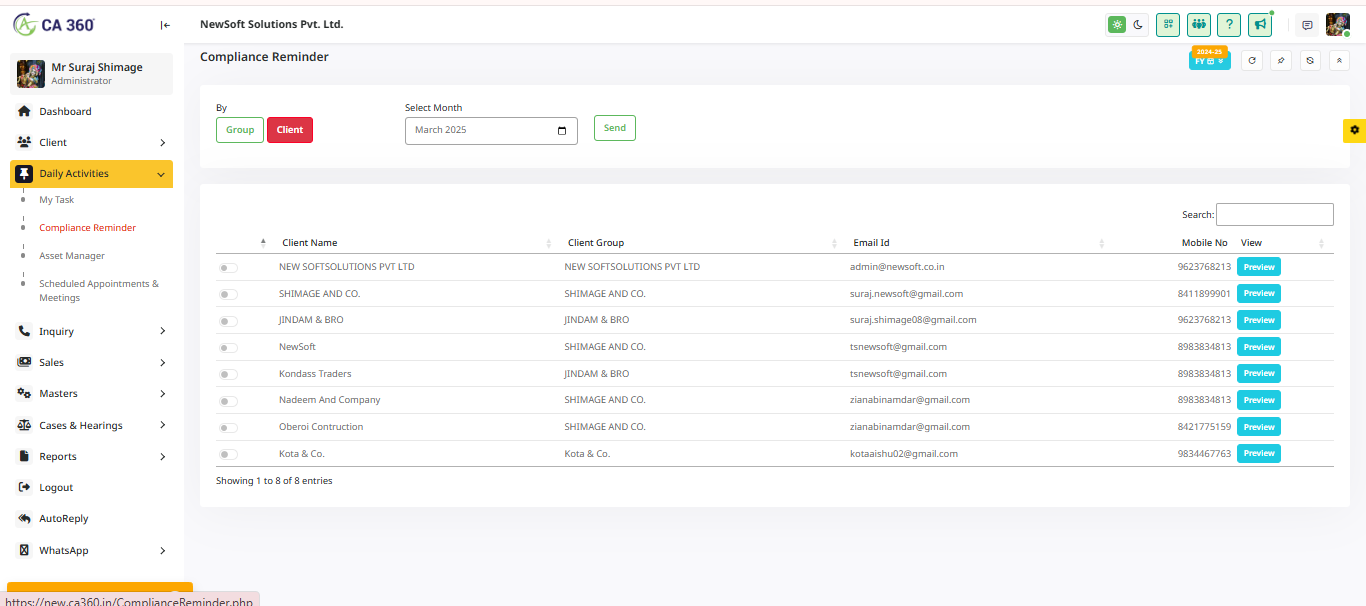
Compliance Reminder
With this feature, you can notify clients in groups about the required documents. Simply select clients from the list, and the system will automatically send reminder emails for document submission.
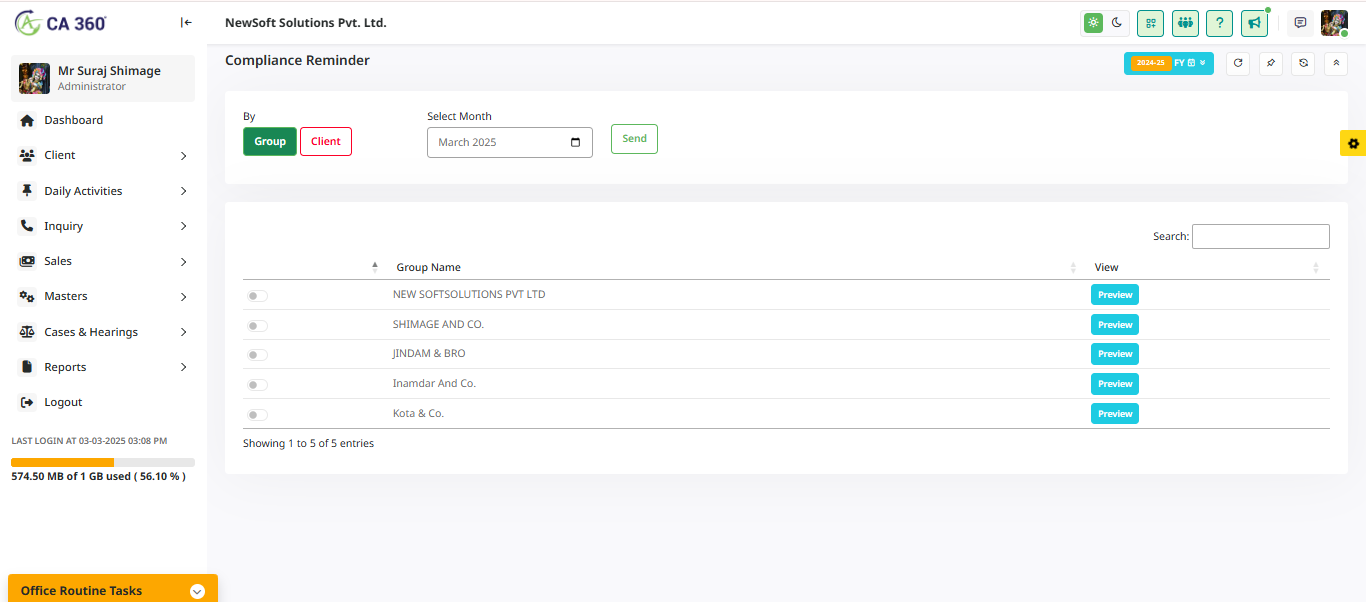
With this feature, you can notify clients in client about the required documents. Simply select clients from the list, and the system will automatically send reminder emails for document submission.
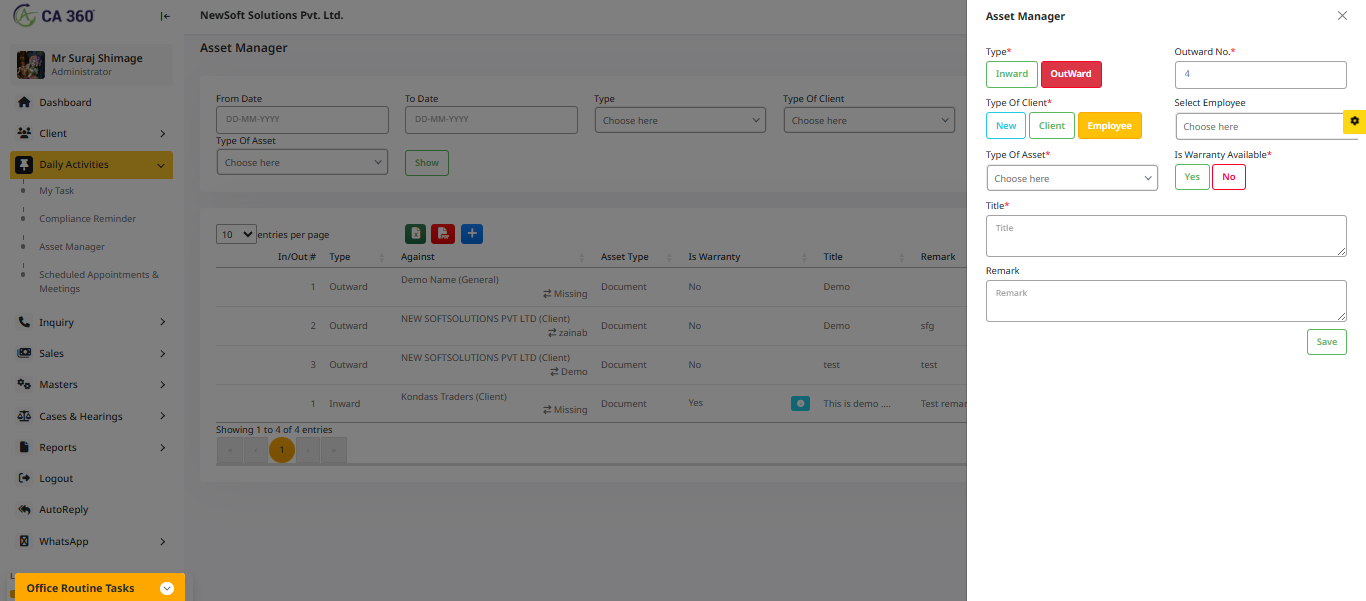
Asset Manager
The Asset Manager allows you to efficiently track and manage assets within the system. You can monitor asset details, assign them to specific users or departments, and ensure proper documentation.
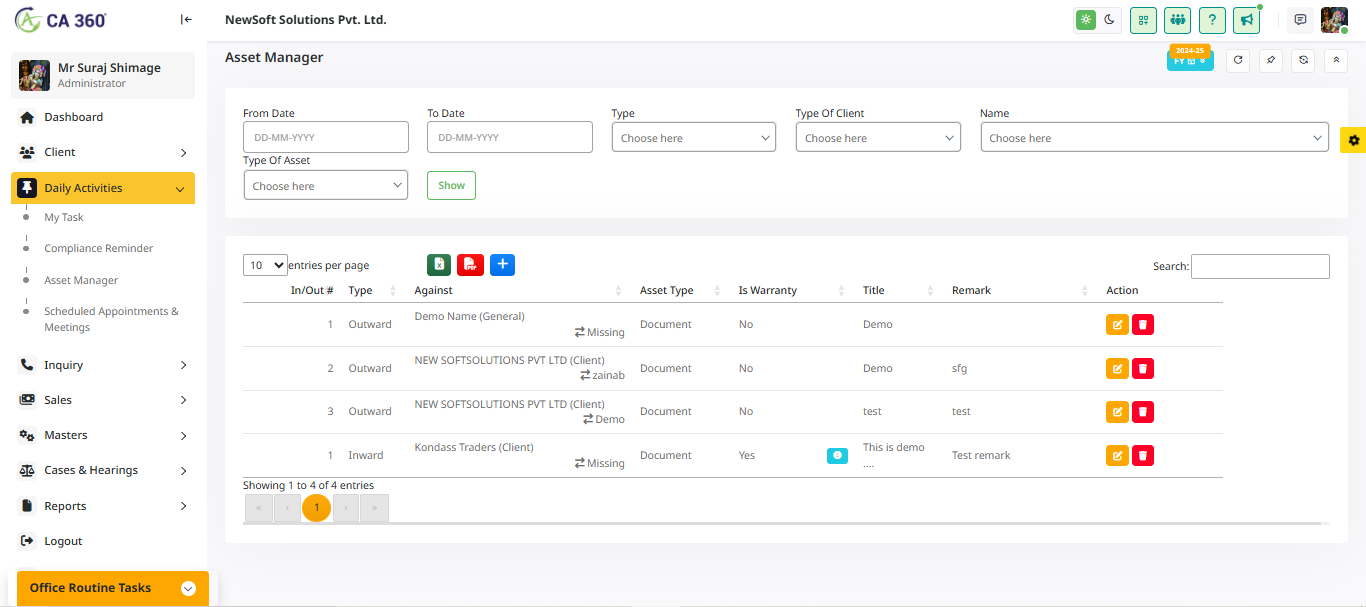
Asset Manager
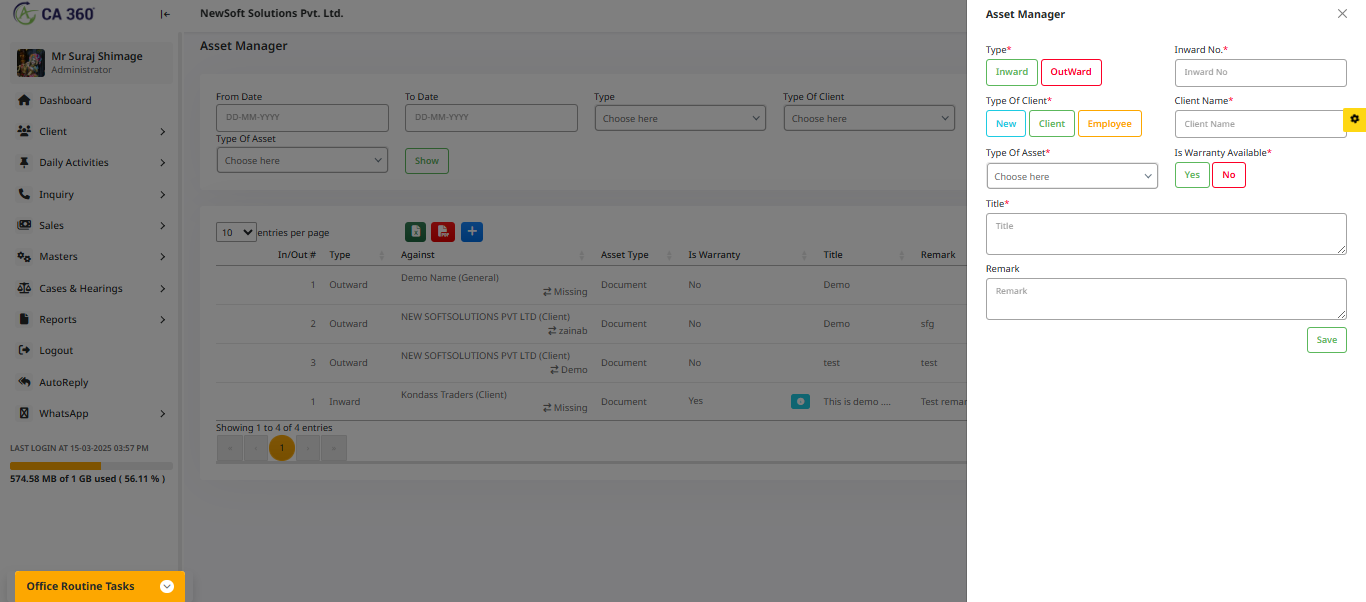
Inward
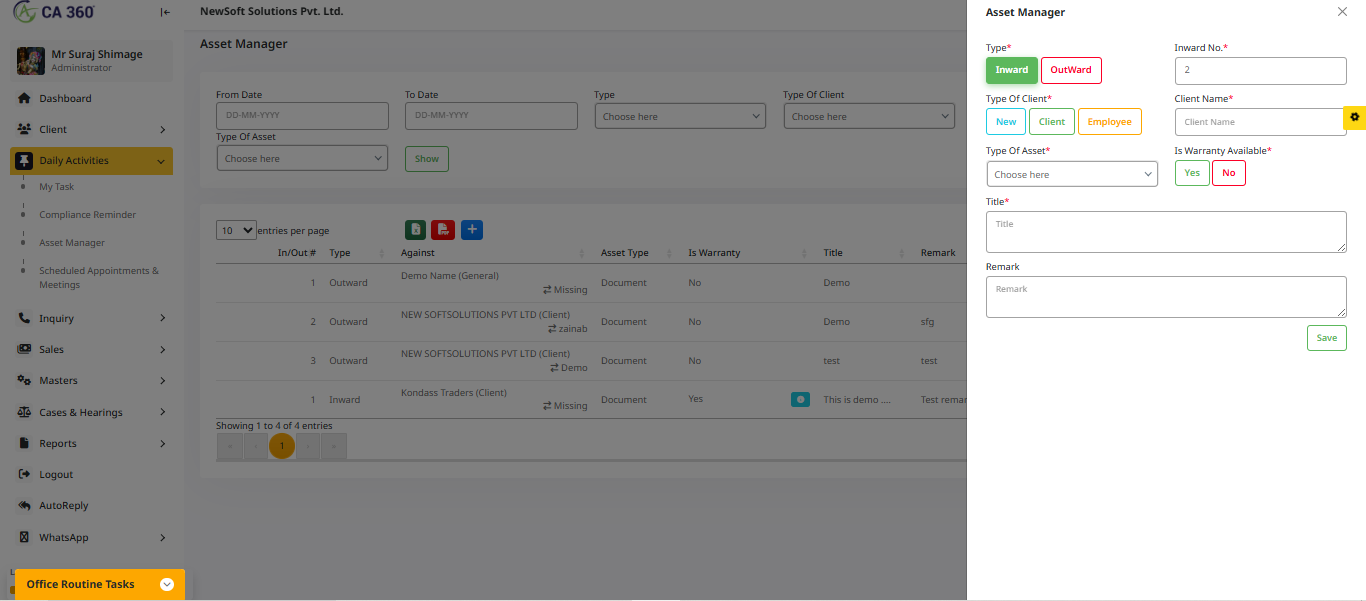
Outward
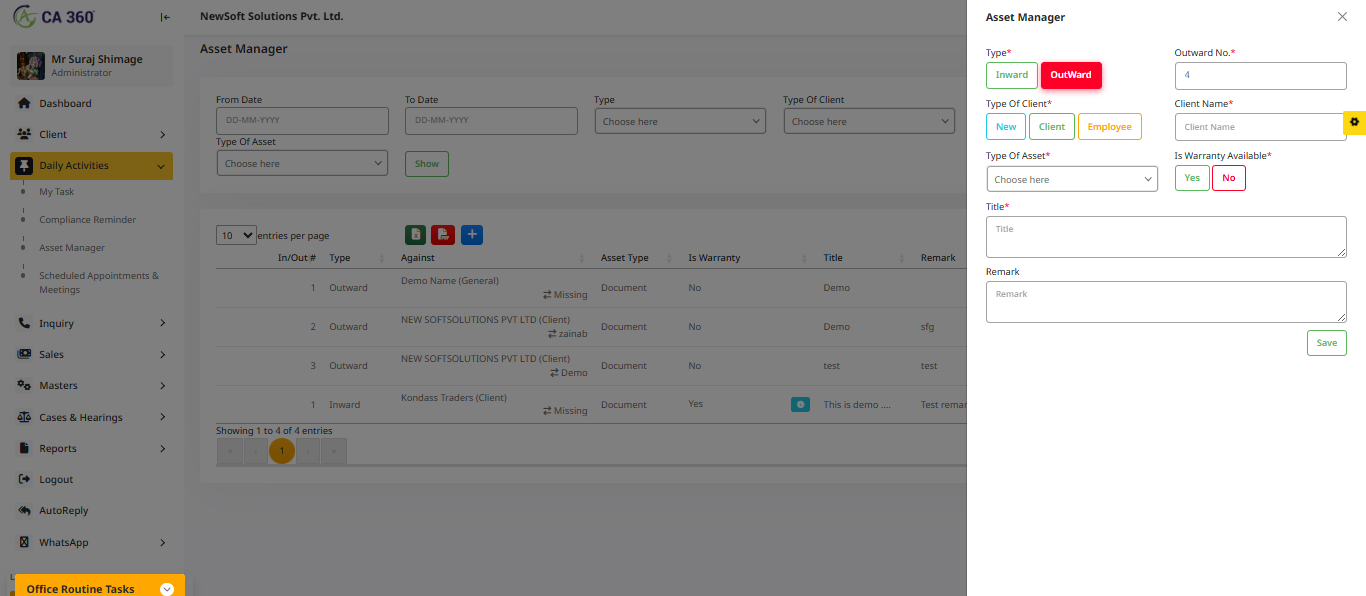
New
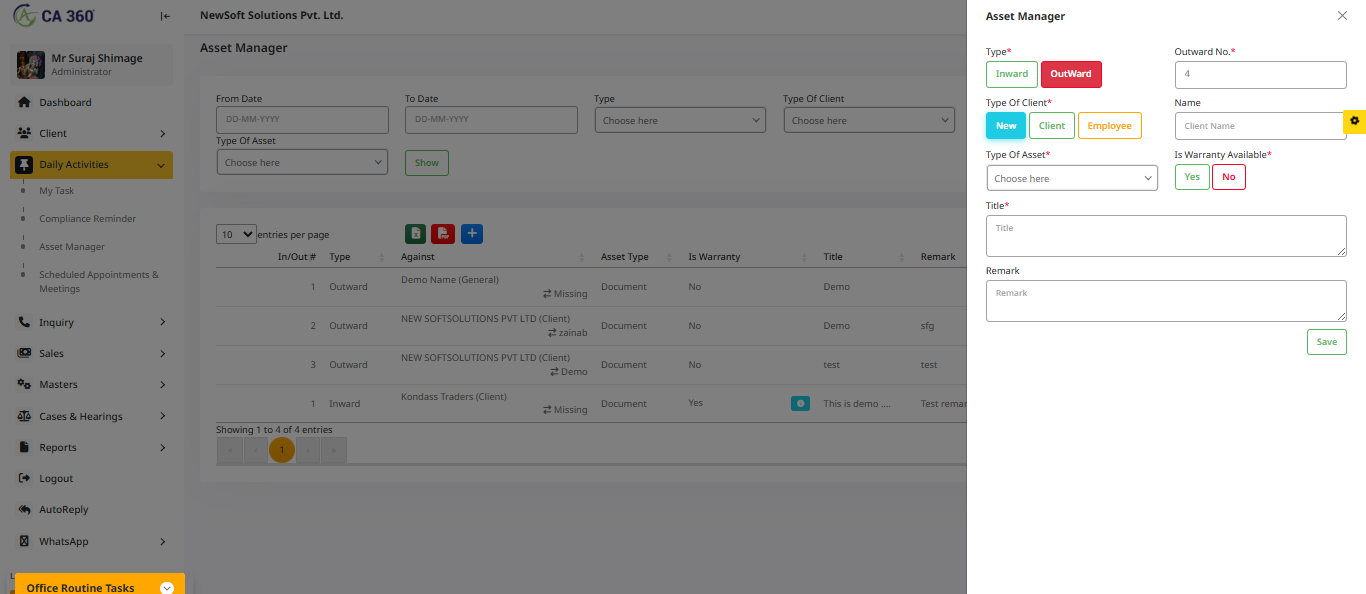
Client
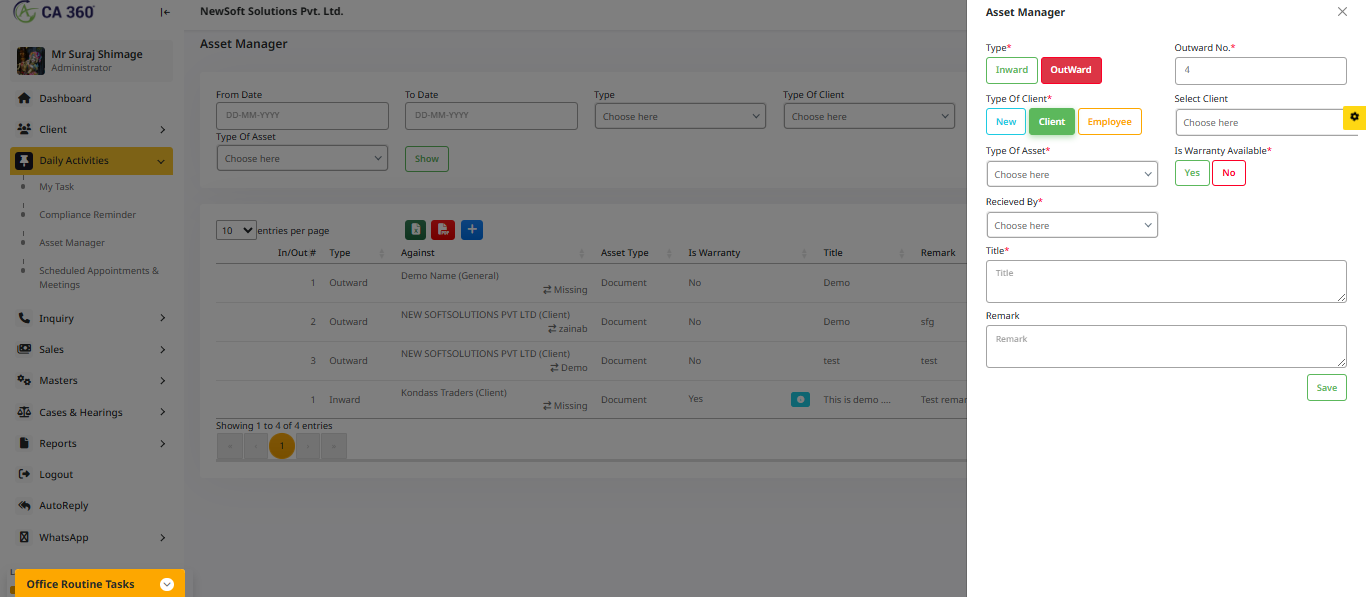
Employee
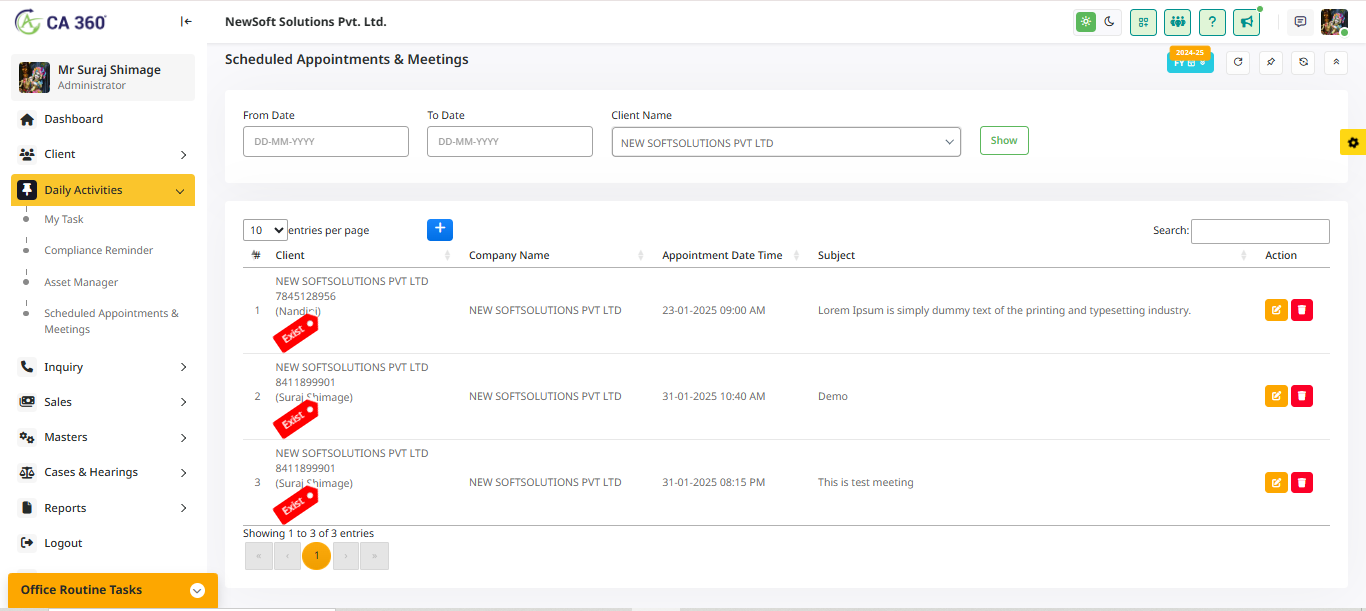
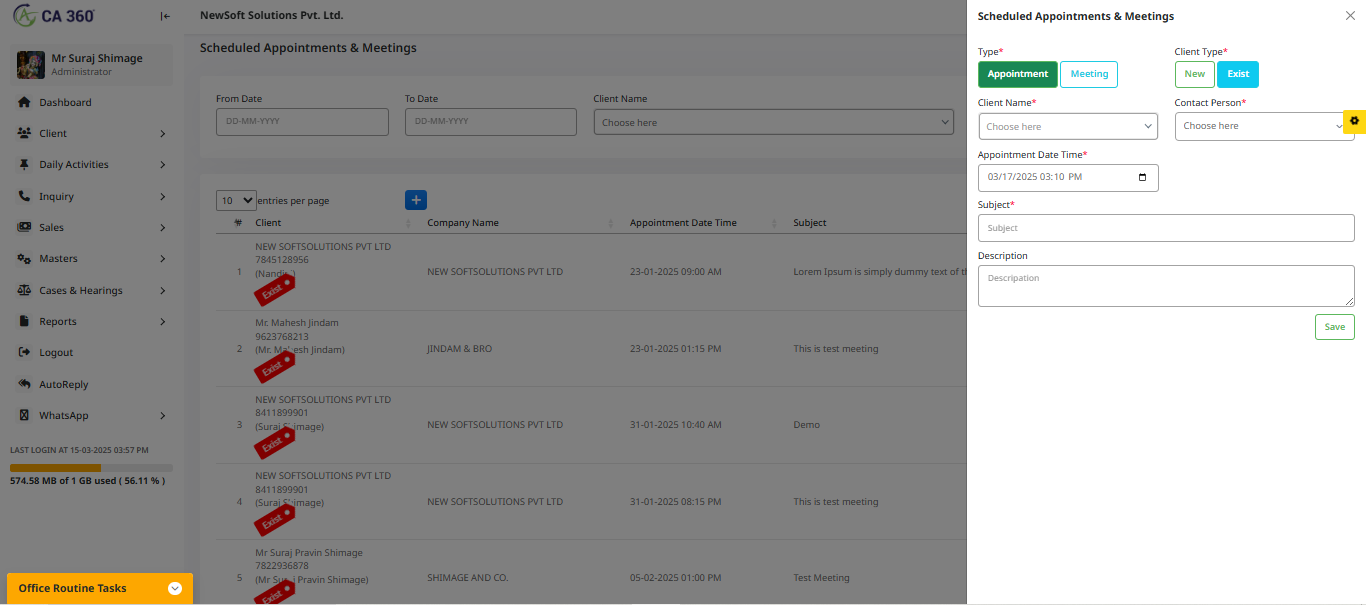
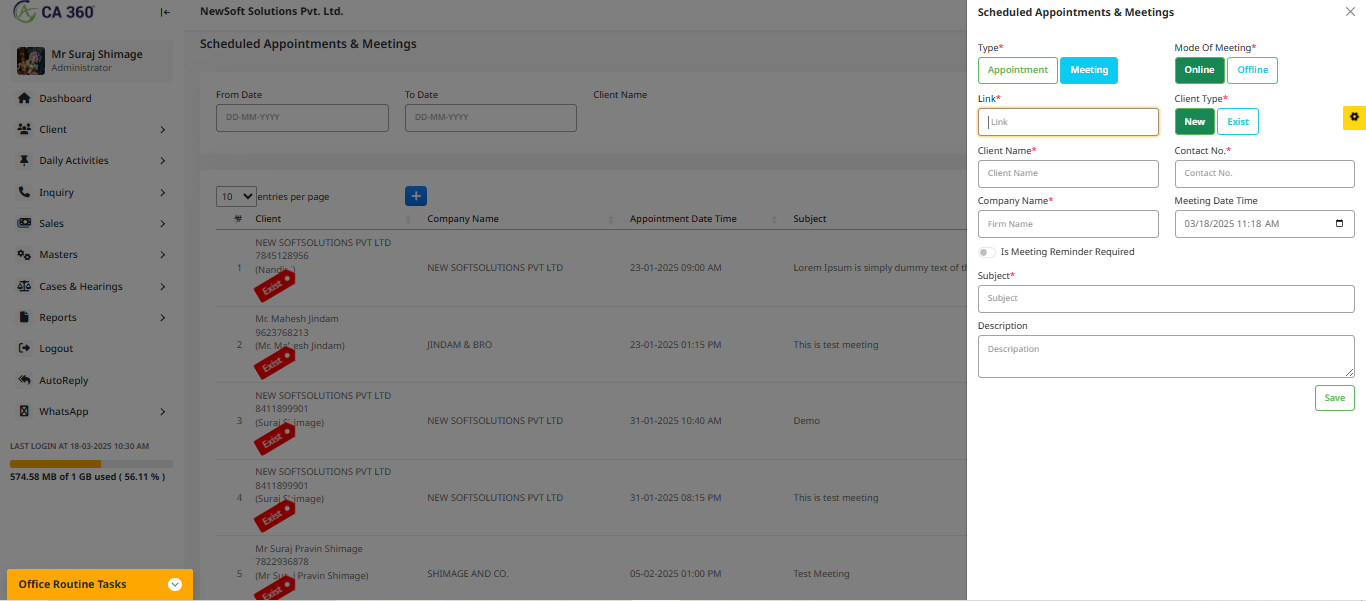
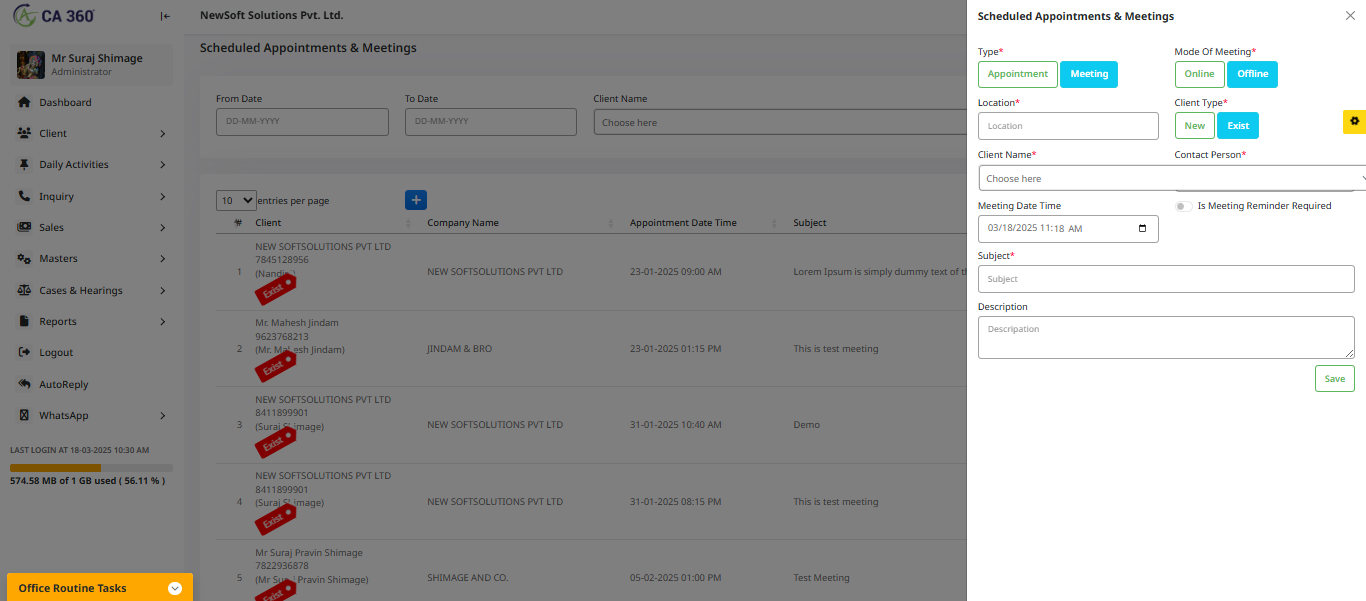
Scheduled Appointments And Meetings
The Scheduled Appointments and Meetings feature allows you to efficiently plan, track, and manage meetings within the system. You can schedule appointments, set reminders, and assign participants to ensure smooth coordination and timely follow-ups.
scheduled Appointments And Meetings
Appointment Online
Appointment Offline
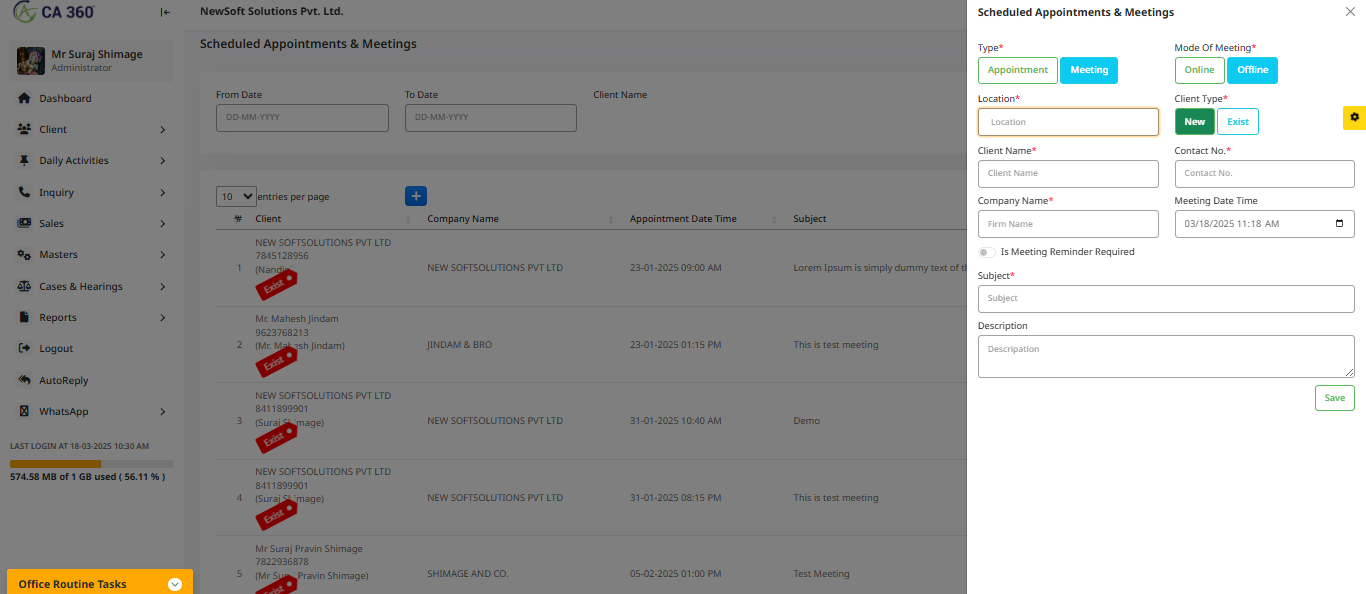
Client New
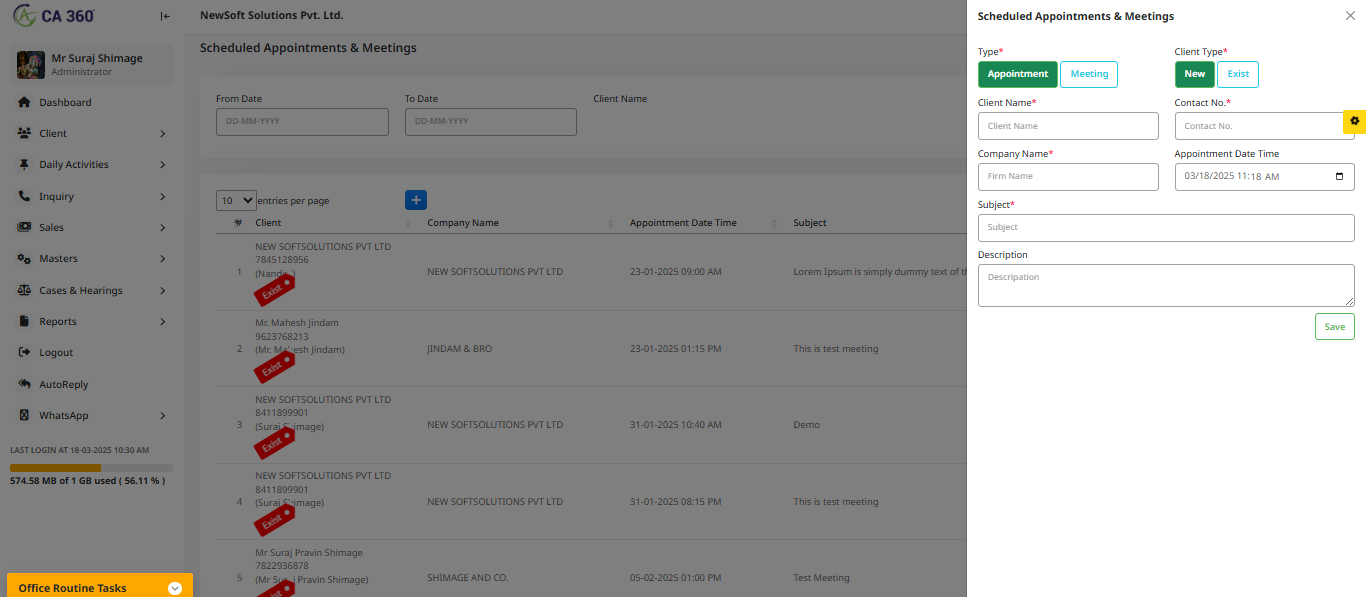
Client Exist
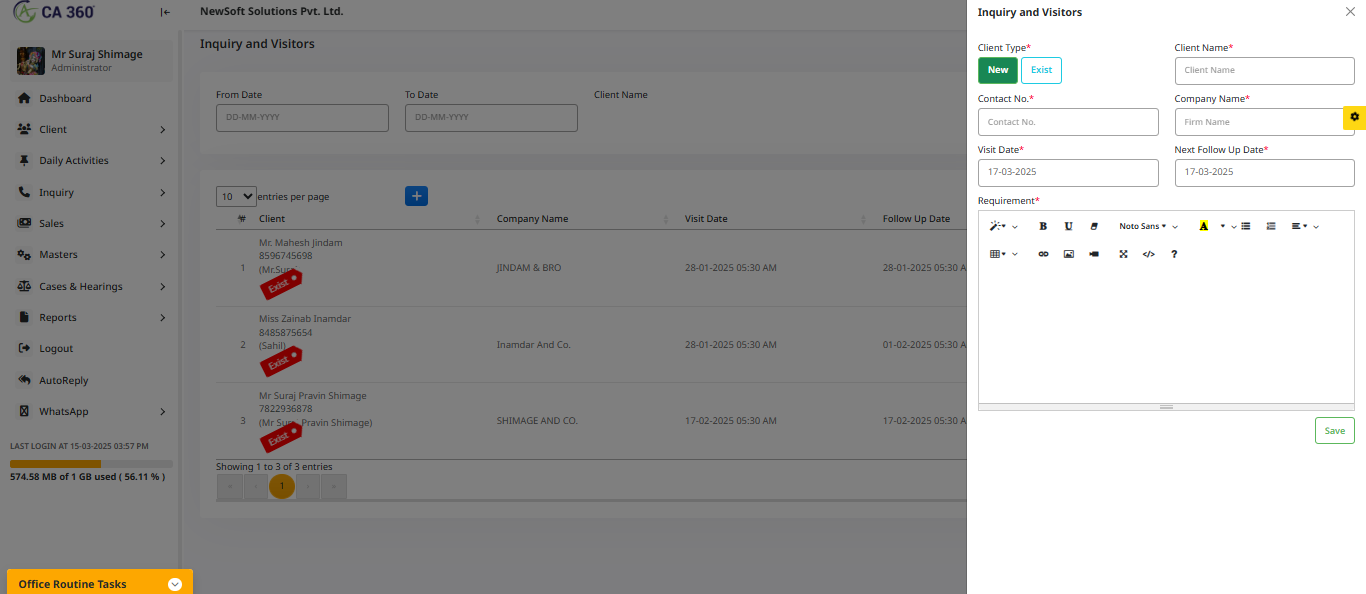
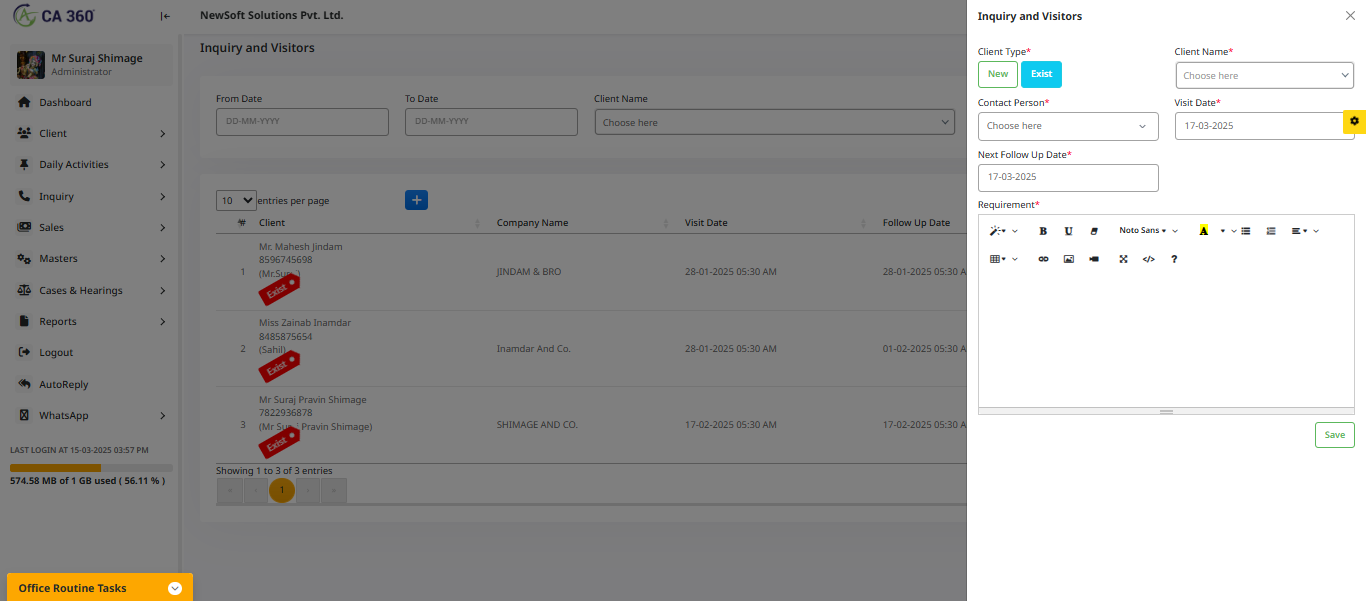
In the CA360 Inquiry And Visitors section, you can manage client inquiries efficiently. Click the (+) button to open the right-side inquiry form and enter details. Based on the client type selection, different fields will appear.
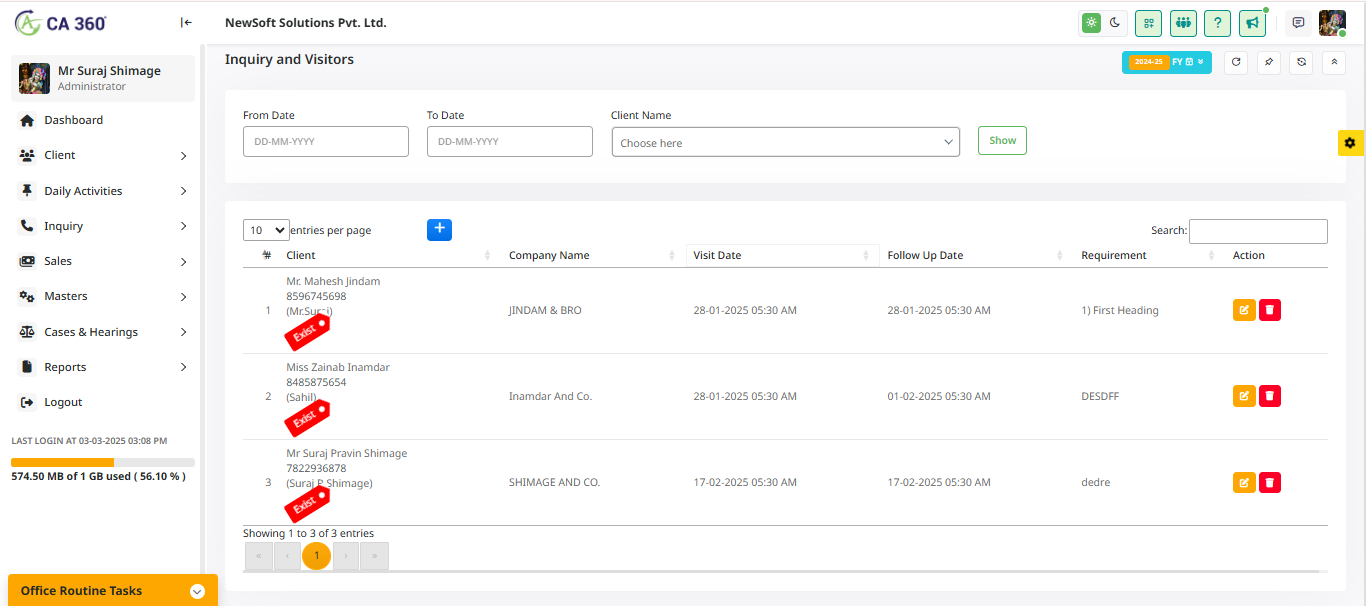
New
Exist
New Client
If you select New Client, the following fields will be available:
- Client Name – Enter the name of the new client.
- Contact Number – Provide the client's phone number.
- Company Name – Specify the client's company.
- Visit Date – Select the date of the client's visit.
- Next Follow-up Date – Choose the next follow up date.
- Requirement – Describe the client's requirements.
Existing Client
If you select Existing Client, the form will display:
- Client Name – Choose from the existing client list.
- Contact Person – Select a contact from a dropdown list.
- Visit Date – Enter the visit date.
- Next Follow up Date – Specify the next follow up date.
- Requirement – Provide details of the client's requirement.
This system ensures seamless tracking of inquiries and follow ups, improving efficiency in client management.
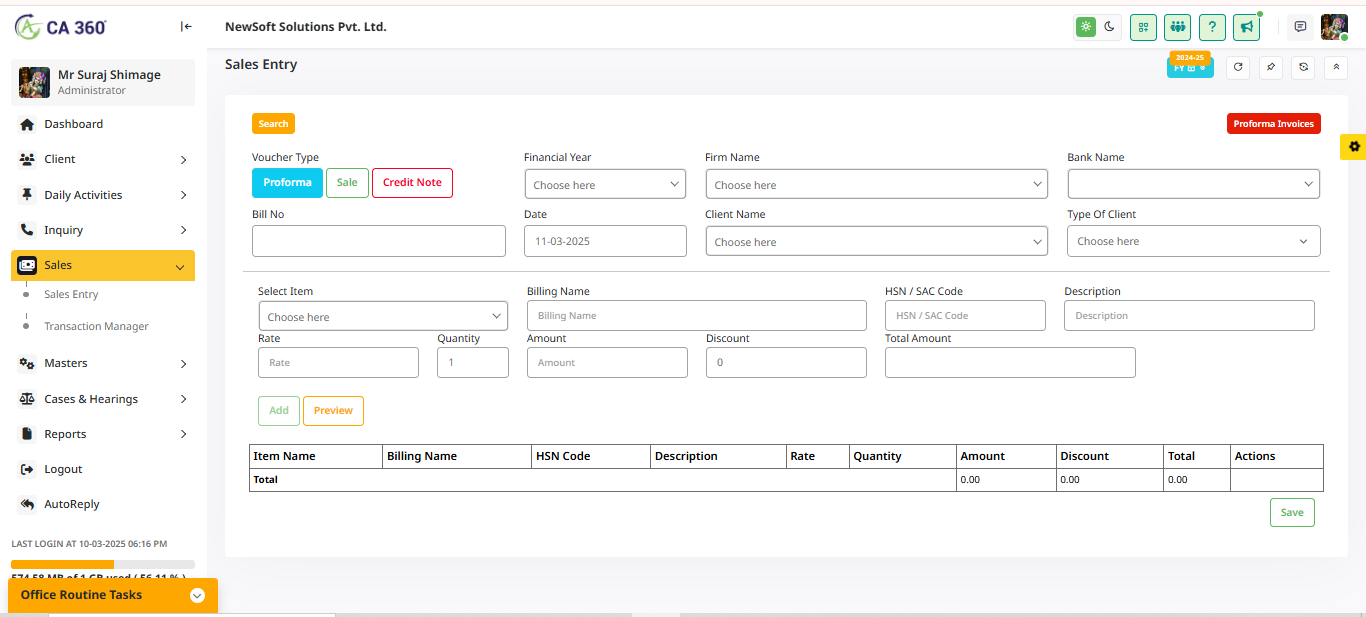
The Sales Entry module in CA360 allows users to record and manage sales transactions efficiently. Users can generate sales entries with different voucher types, including Proforma, Sale, and Credit Note.
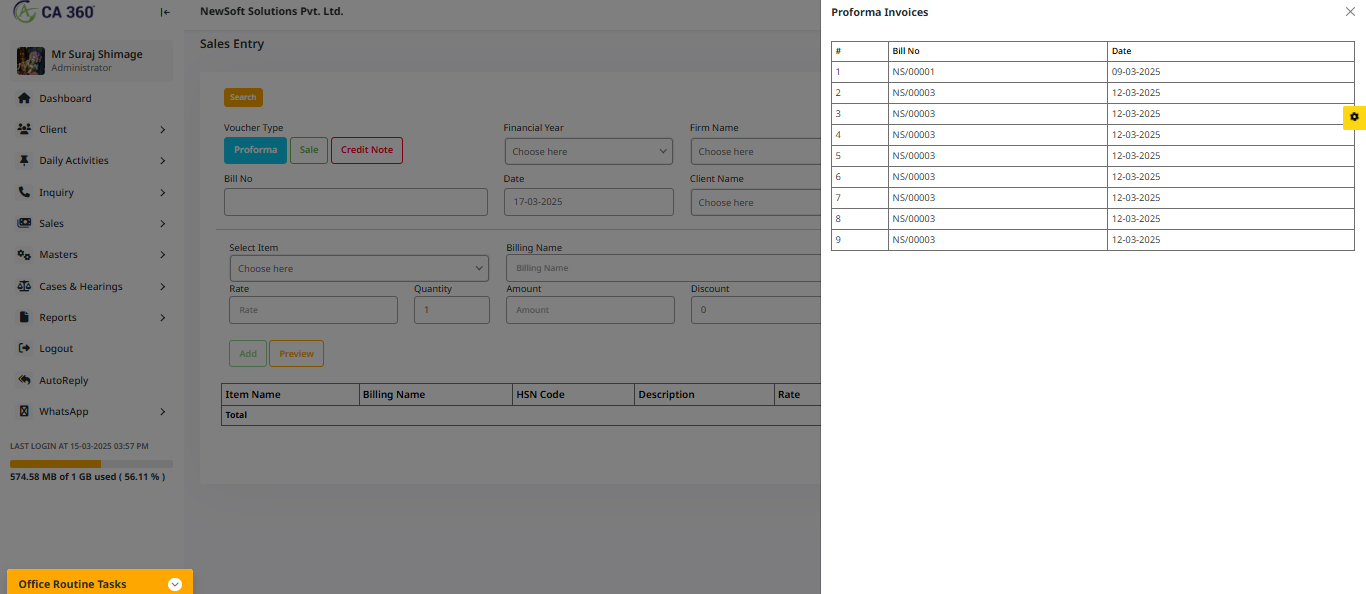
Invoices Preview

Proforma Invoices
How to Use Sales Entry:
- Click on Sales Entry under the Sales menu.
- Select the Voucher Type:
- Proforma - Generate a preliminary sales invoice.
- Sale - Record an actual sale.
- Credit Note - Issue a credit note for a refund or return.
- Enter the necessary details:
- Bill No – Unique identifier for the sale.
- Financial Year – Select the financial year.
- Firm Name – Choose the firm issuing the invoice.
- Bank Name – Select the bank related to the transaction.
- Date – Select the sales entry date.
- Client Name – Choose the client for whom the sale is being recorded.
- Type of Client – Select whether the client is new or existing.
- Choose the items for the sale:
- Select the Item Name from the dropdown list.
- Enter the Billing Name (if applicable).
- Enter the HSN / SAC Code and Description.
- Specify the Rate, Quantity, Discount, and the system will calculate the Total Amount.
- Click the Add button to include the item in the sales entry.
- To preview the entry before finalizing, click the Preview button.
- Review the item list at the bottom of the page and ensure all details are correct.
- Once verified, click the Save button to finalize the sales entry.
Additional Features:
- Use the Search button to find previous sales entries.
- The Proforma Invoices button allows quick access to pending proforma invoices.
- Click the Full Screen button for a better viewing experience.
Transaction Manager
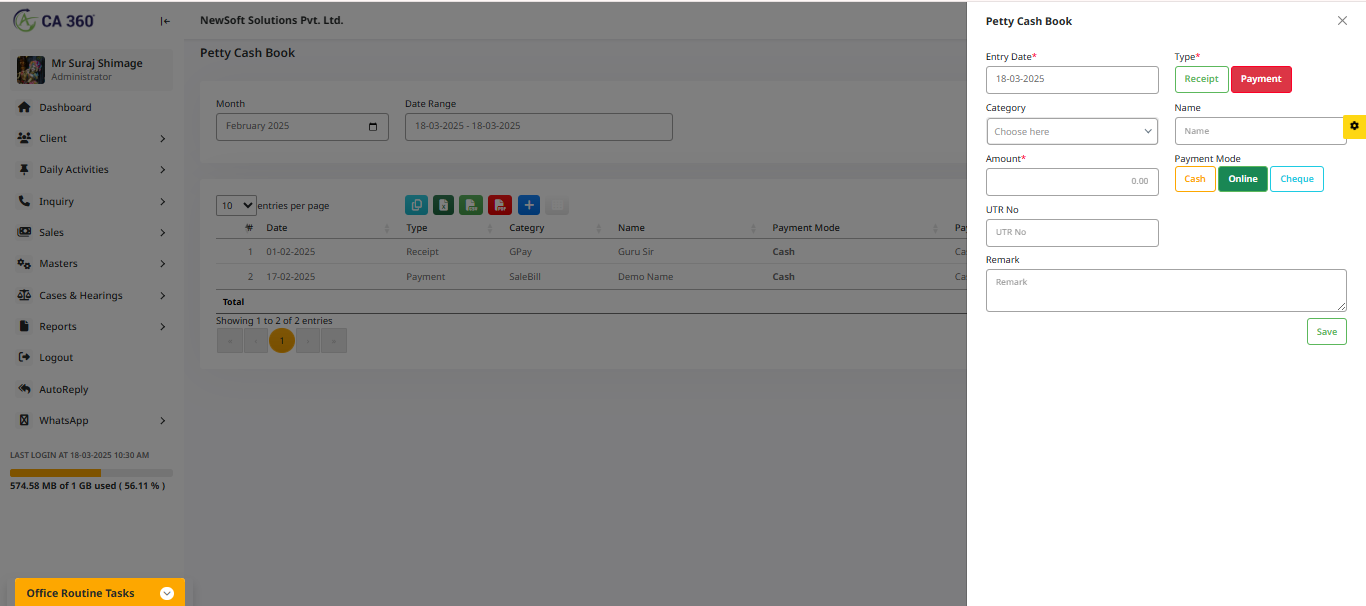
The Petty Cash Book module in CA360 is used to track small cash transactions for daily business expenses. It allows users to add, manage, and monitor petty cash expenditures efficiently.
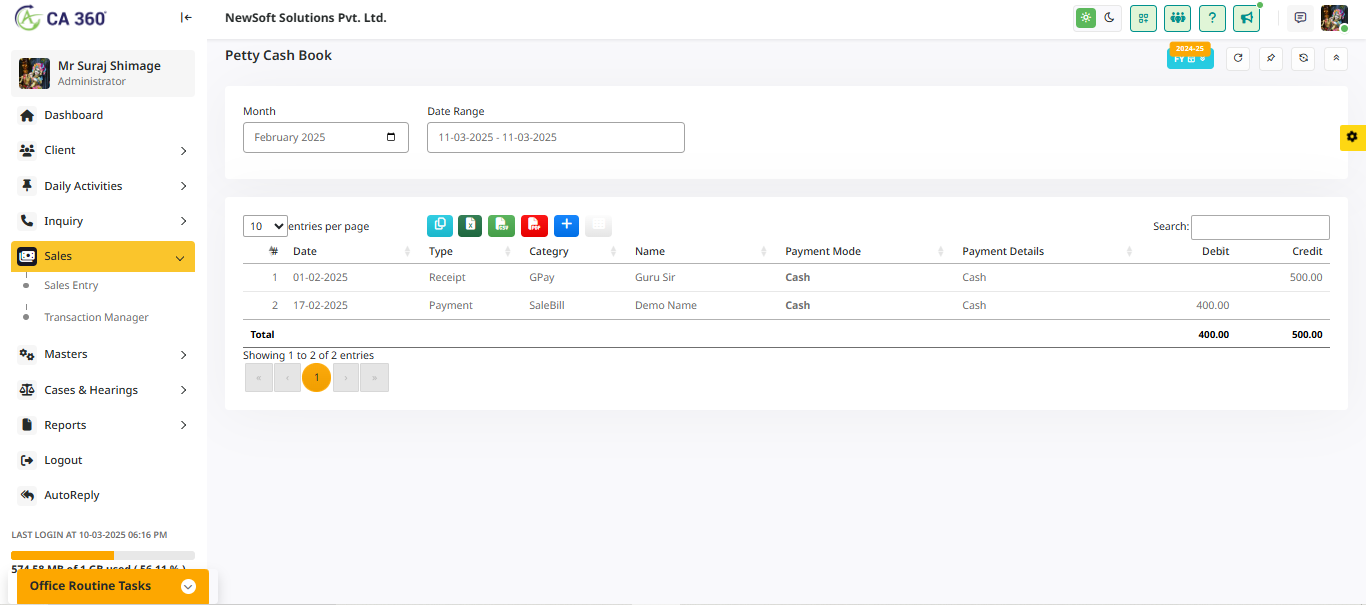
Petty Cash Book
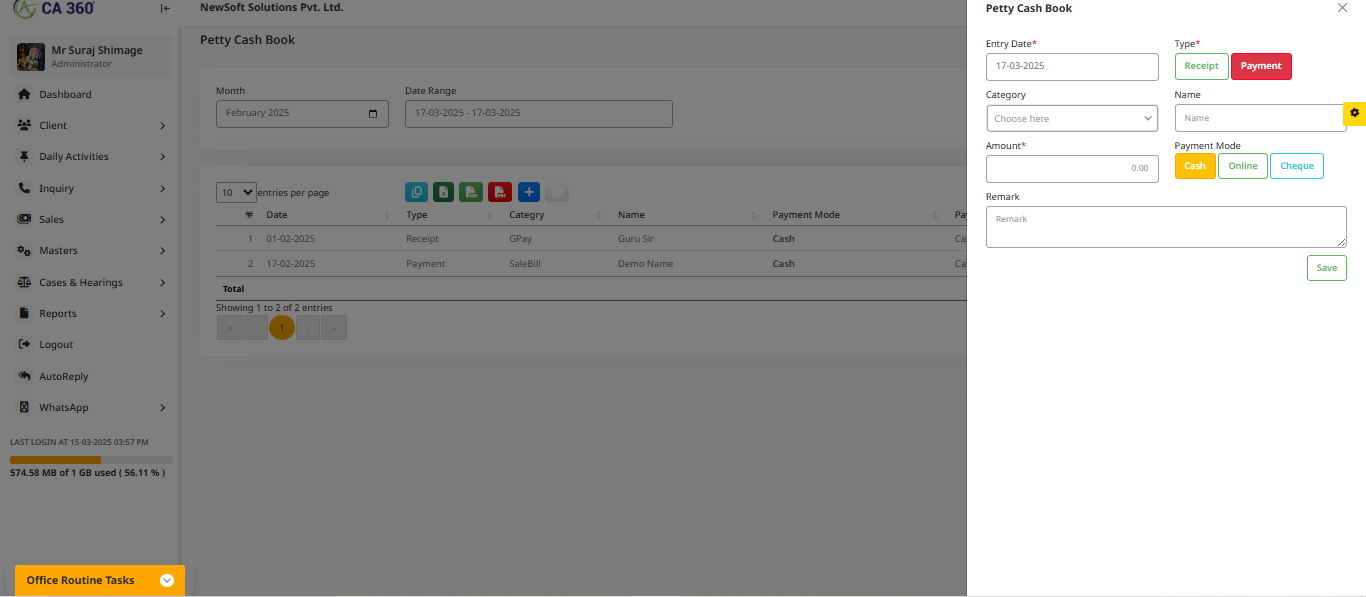
Petty Cash Book online
Petty Cash Book Cheque
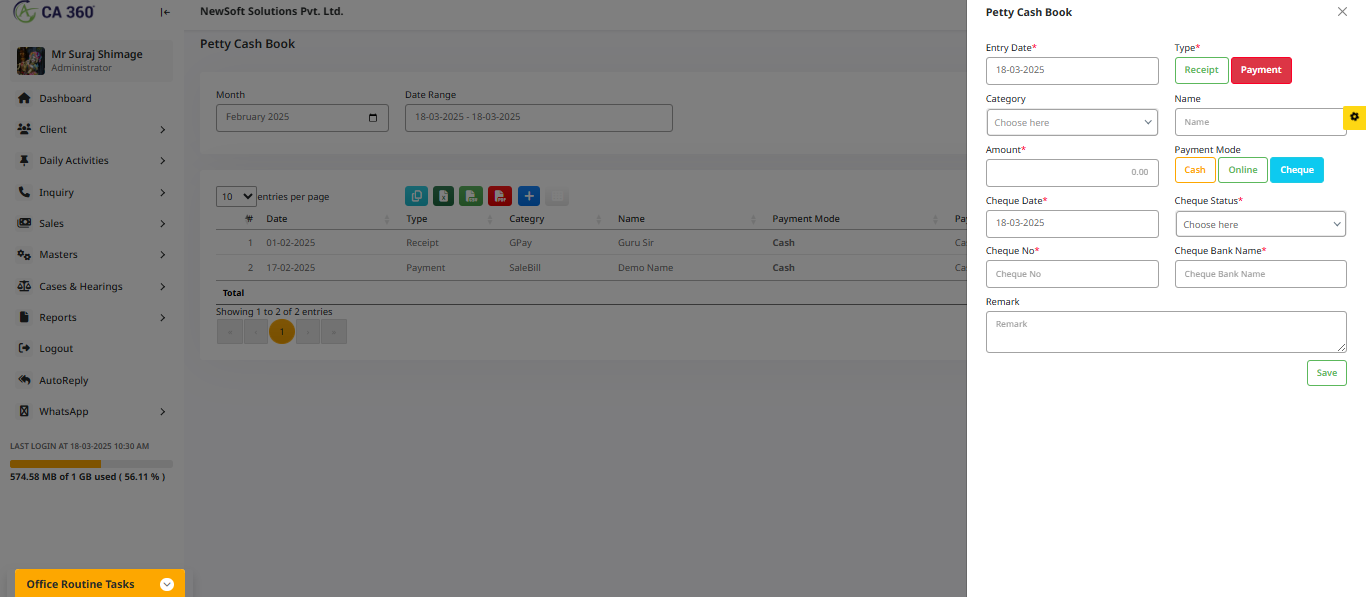
Month And Date Range Selection:
Petty Cash Book online
Petty Cash Book Cheque
Month And Date Range Selection:
Petty Cash Book Cheque
Month And Date Range Selection:
Month And Date Range Selection:
Adding a New Petty Cash Entry in CA360
Open the Petty Cash Entry Form:Fill in the Petty Cash Details:
Choose the Payment Mode:
- Cheque Date – Date of the cheque.
- Cheque No. – Enter the cheque number.
- Cheque Bank Name – Name of the bank issuing the cheque.
- Cheque Status – Dropdown list with options:
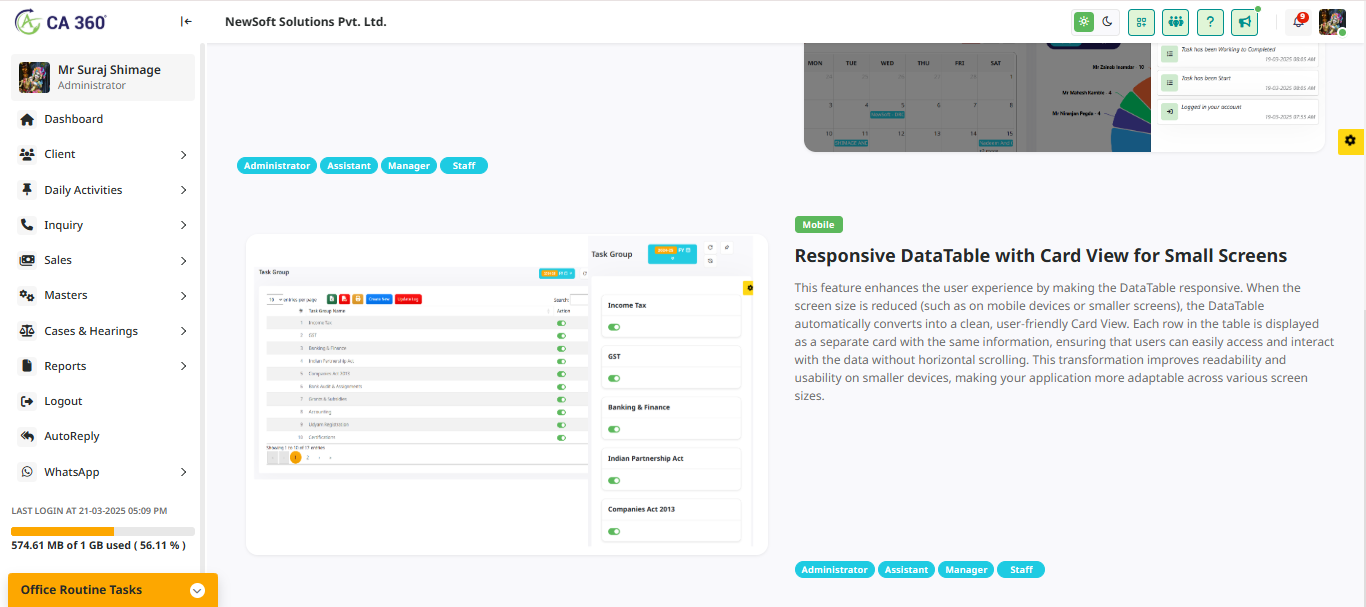
Masters : This section allows you to set up and register various forms, including: Task Group , Task Type , Document Master , Task Type Due Dates, Client Group, Staff, Authority, Nature Of Case, Act, Staff Registration and more.This feature ensures that all critical information is well-organized, making it easy to manage and retrieve whenever needed. Additionally, you can seamlessly integrate and utilize CA360 for enhanced functionality and streamlined operations.
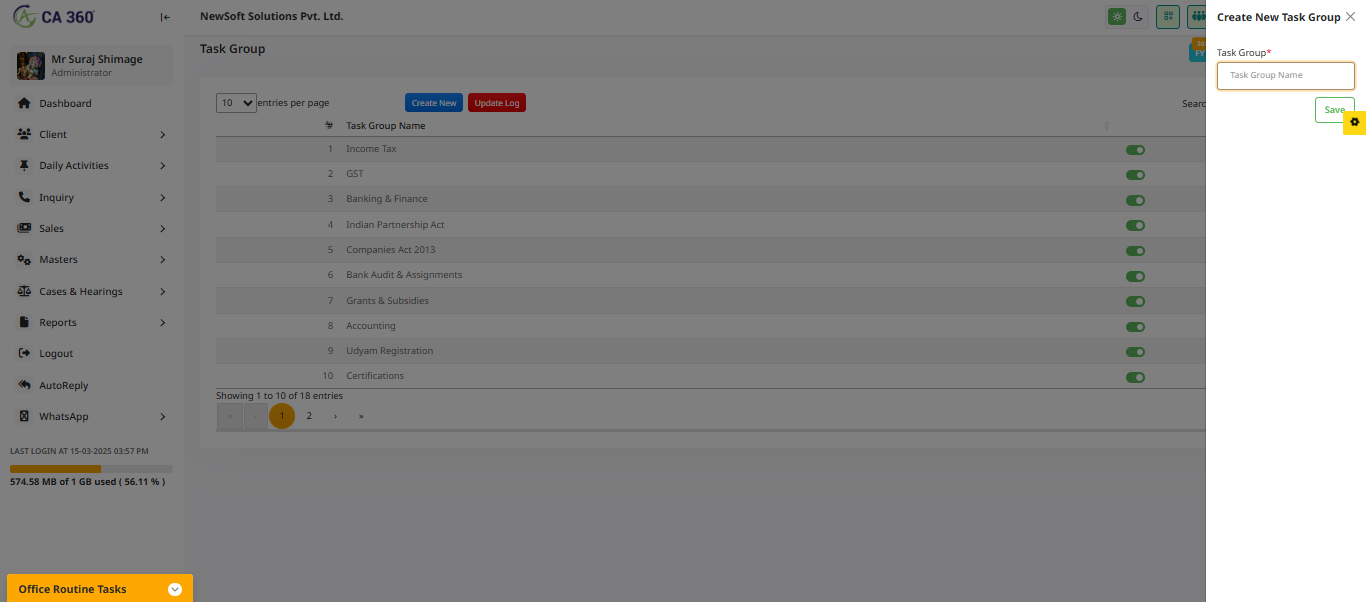
Task Group :
In this section, you can create and manage task groups to efficiently categorize tasks. Organizing tasks into specific groups allows for better tracking, streamlined workflow, and improved task management.
How It Works: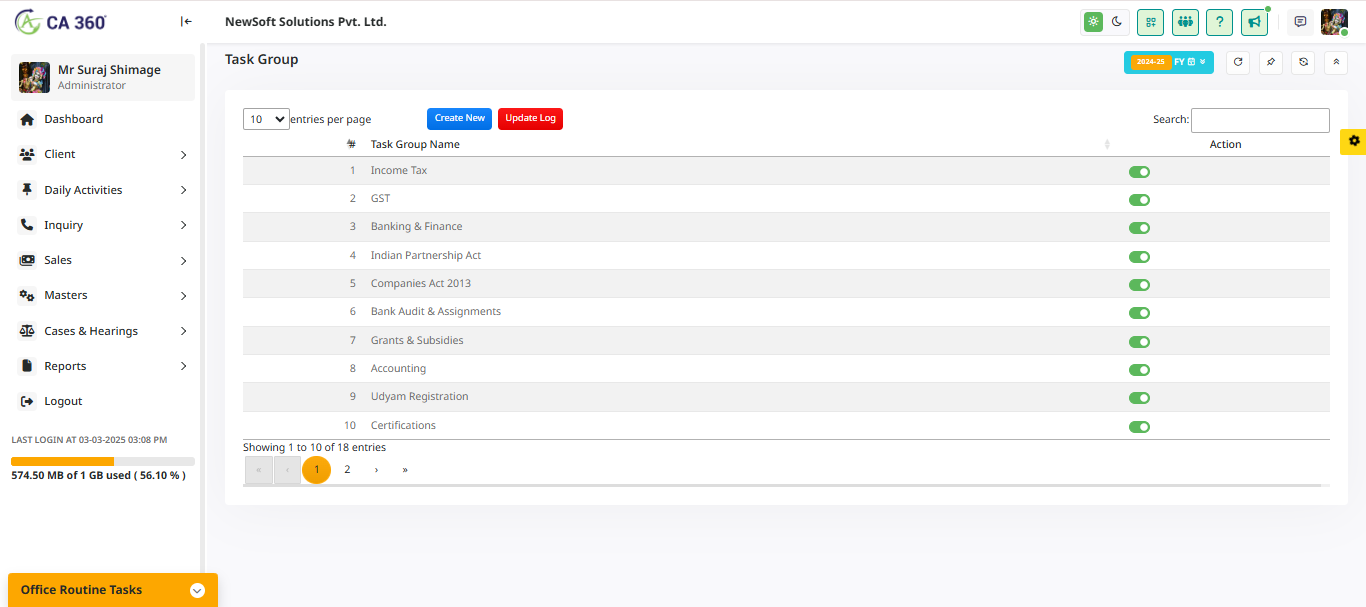
Create New Task Group
Provide a name for the new task group and save it.
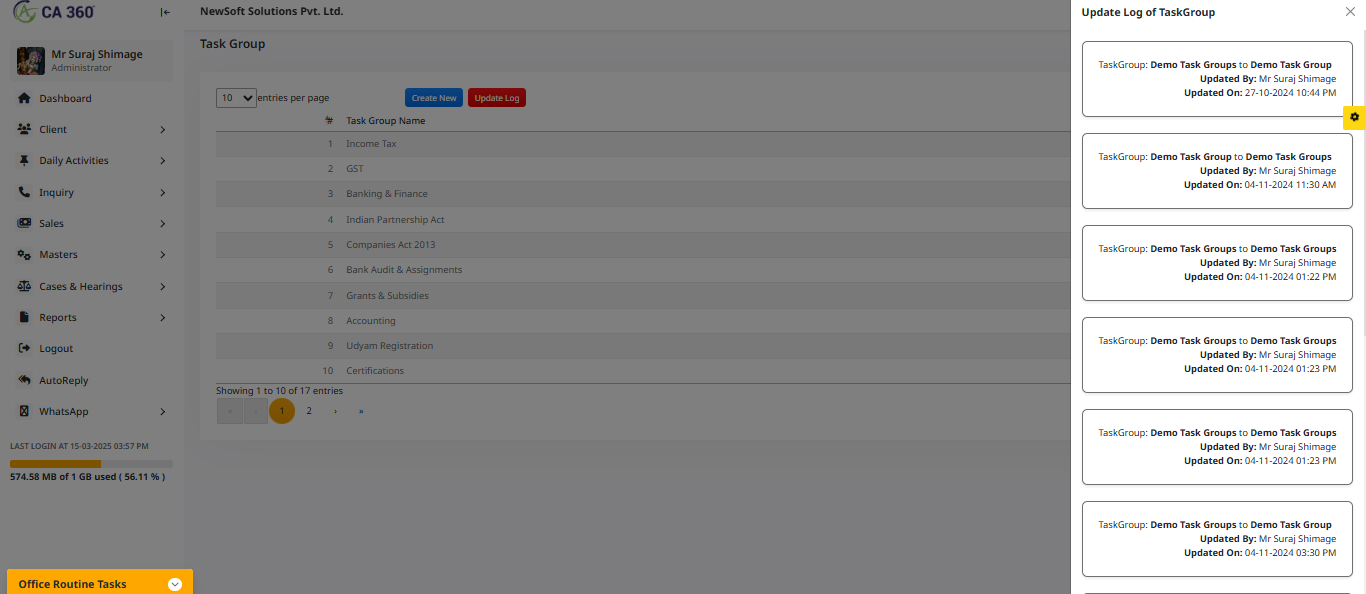
Update Log of Task Group
This section displays the update log of the task group, including the name of the person who updated it and the date and time of the update.
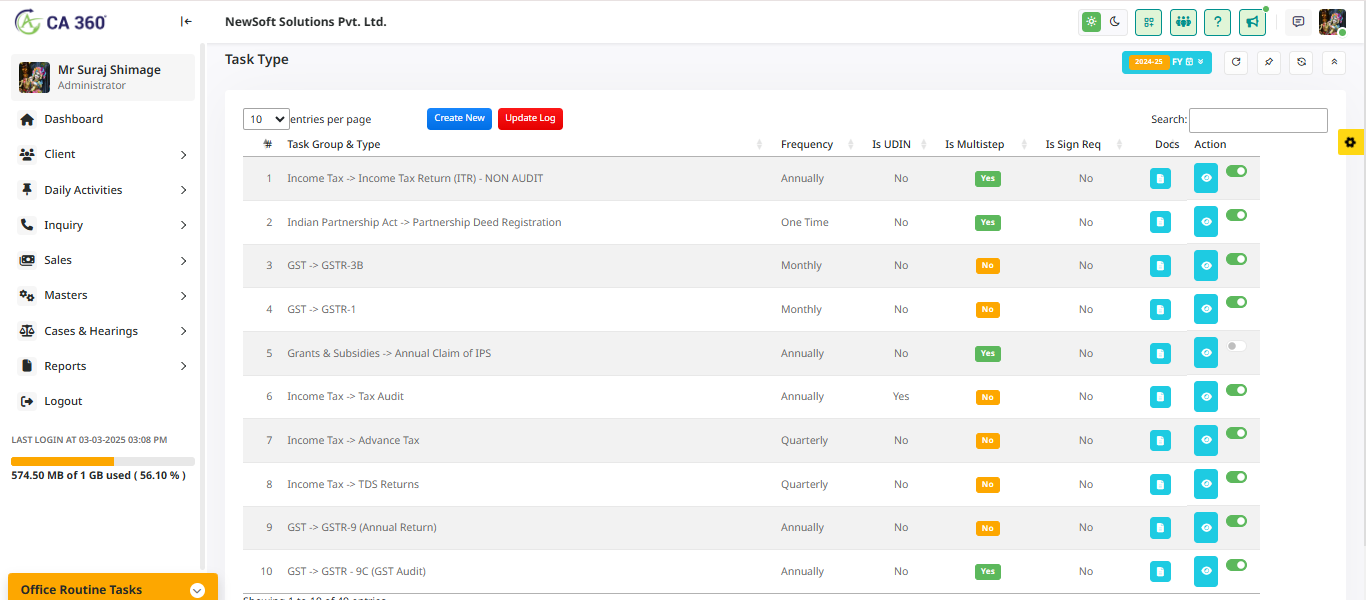
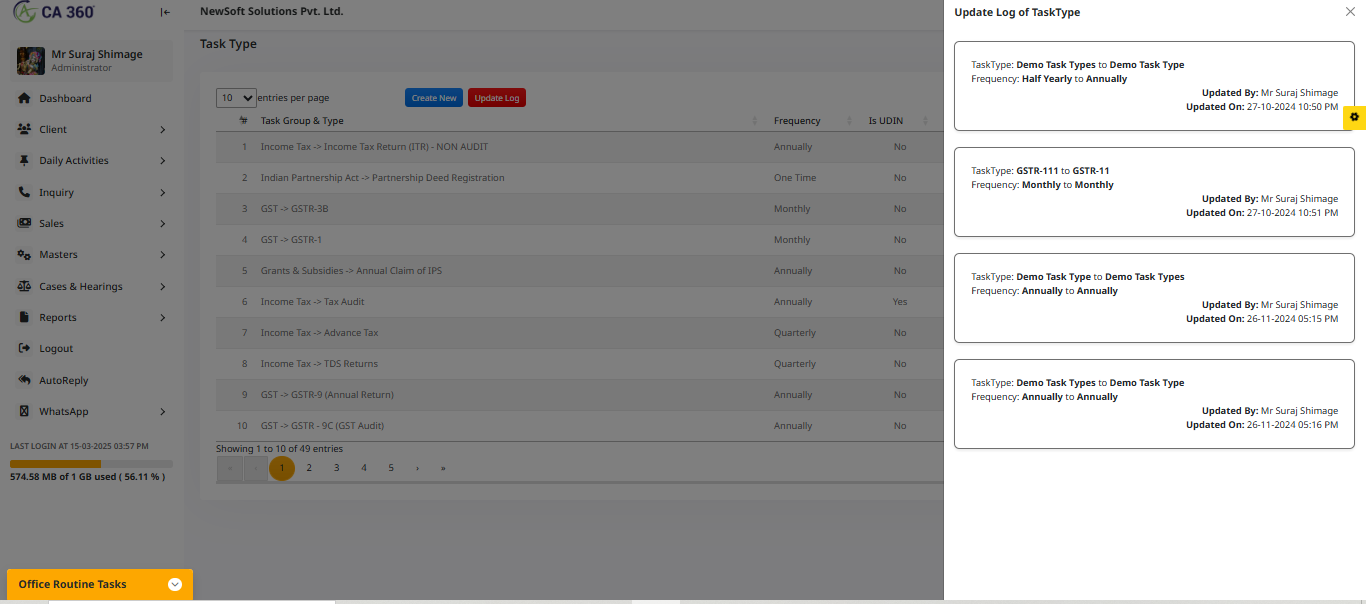
Task Type :
The Task Type section allows you to define and categorize tasks based on their nature and frequency. This helps streamline task management by ensuring each task is assigned the appropriate duration and classification.
Features And Functionality:
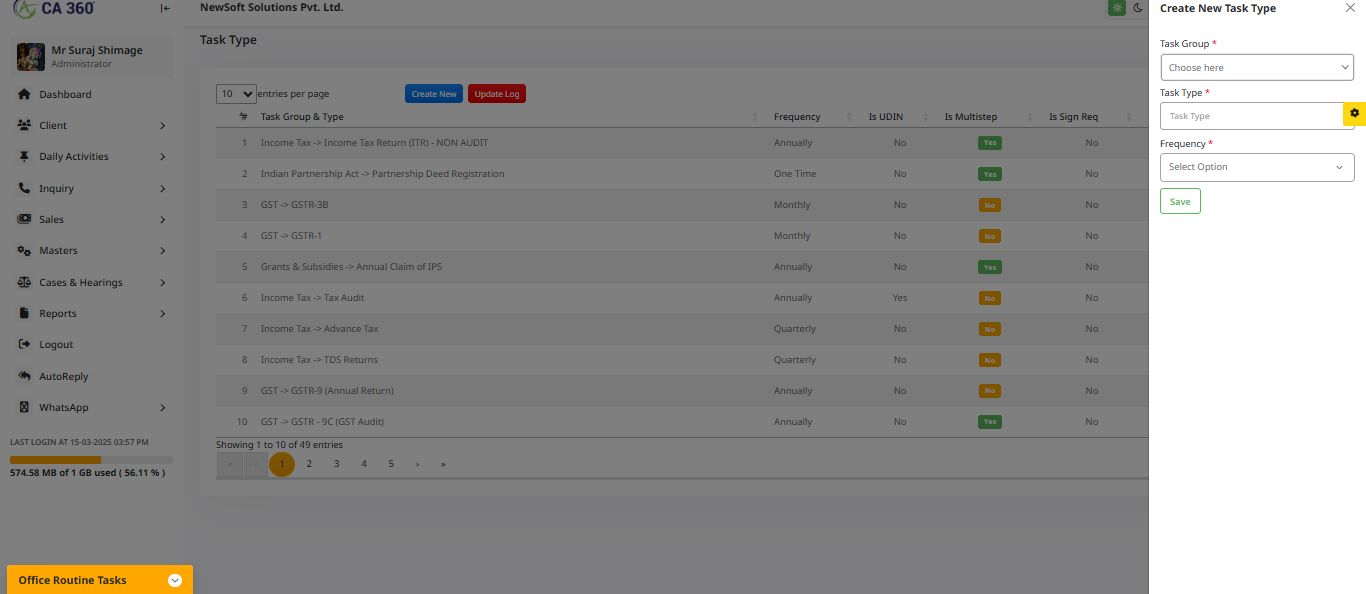
Create New Task Type
In this section, create a new task type by selecting the task group, entering the task type, choosing the frequency, and saving it.
Update Log of Task Type
This section shows the update log for the task type, including the name of the person who made the update, along with the frequency, date, and time of each update.
Document Master :
The Document Master section allows you to upload, manage, and organize important documents efficiently, ensuring easy accessibility for future use.
Features And Functionality :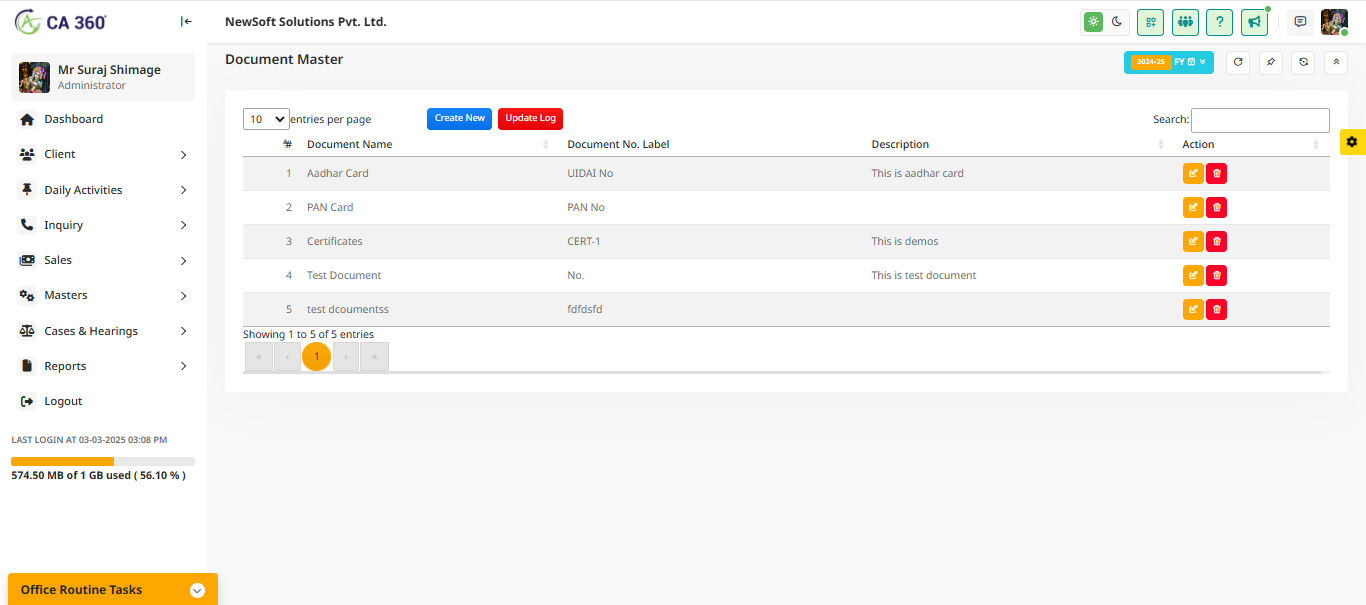
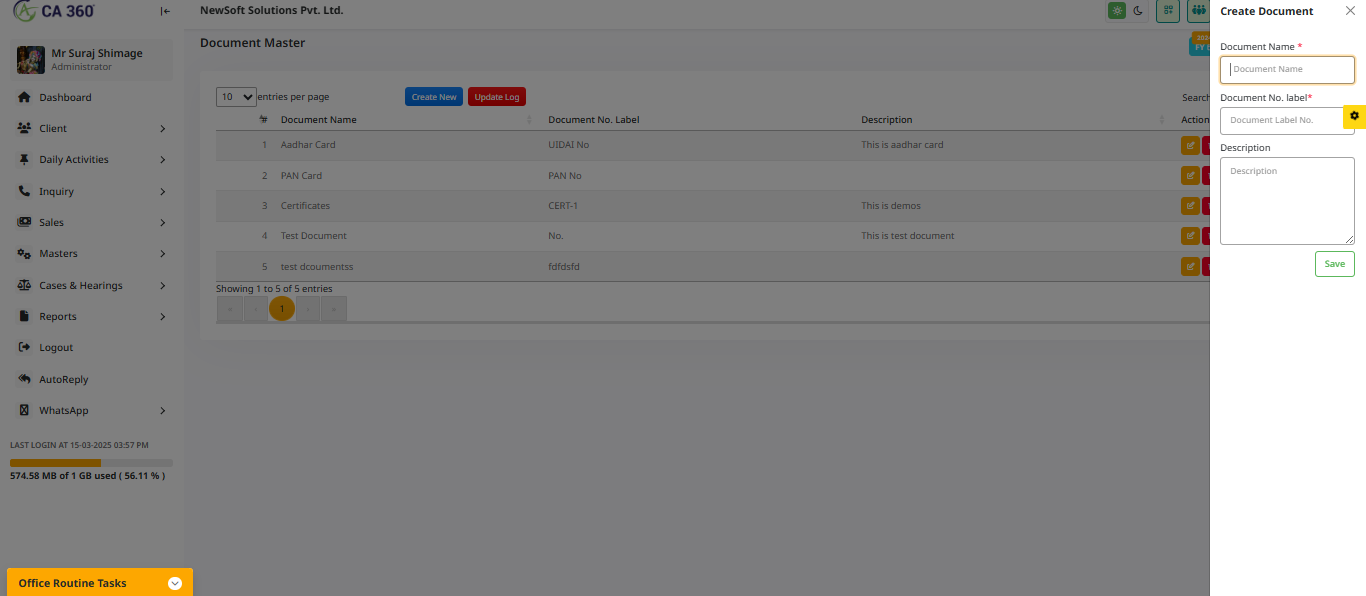
Create Document
Enter the document name, document number, label, and description, then save the information.
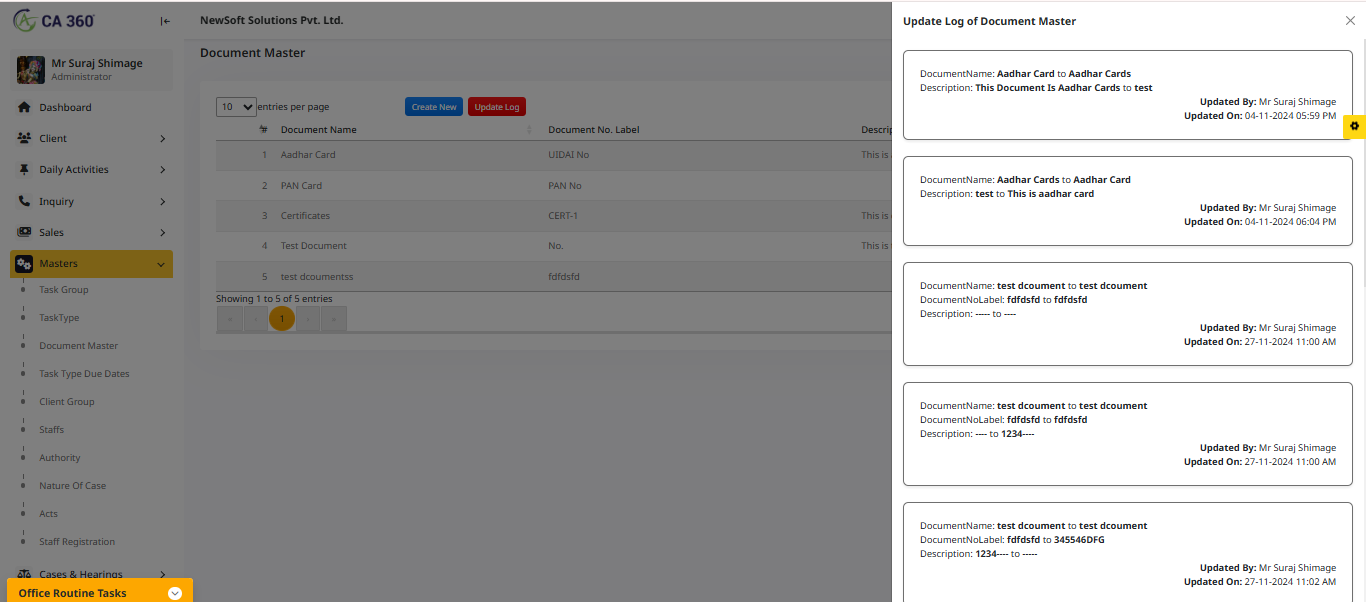
Upload Log of Document Master
In this section, display the document name, description, the person who can update the document, and the date and time of the update.
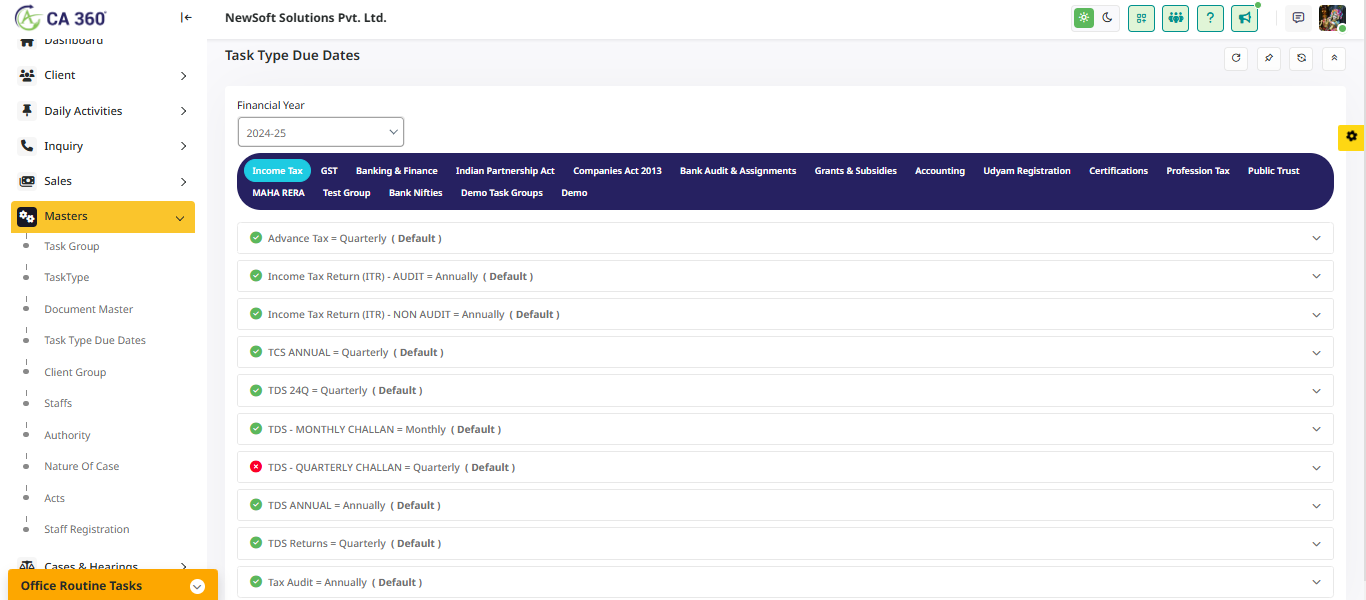
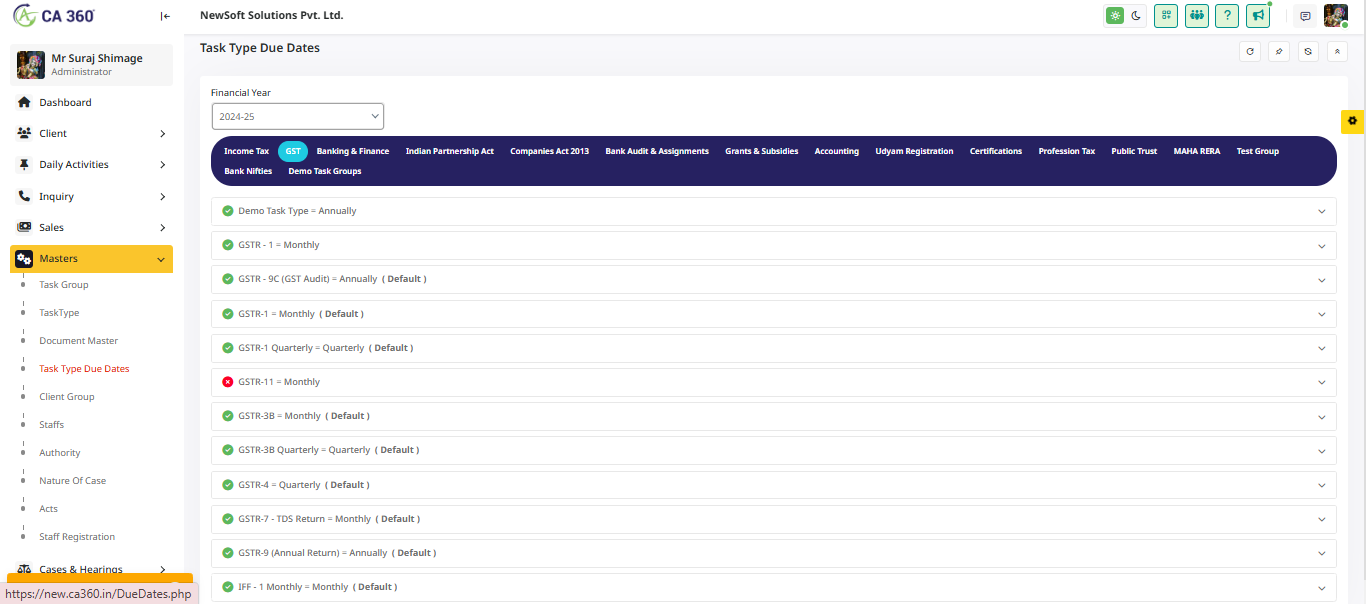
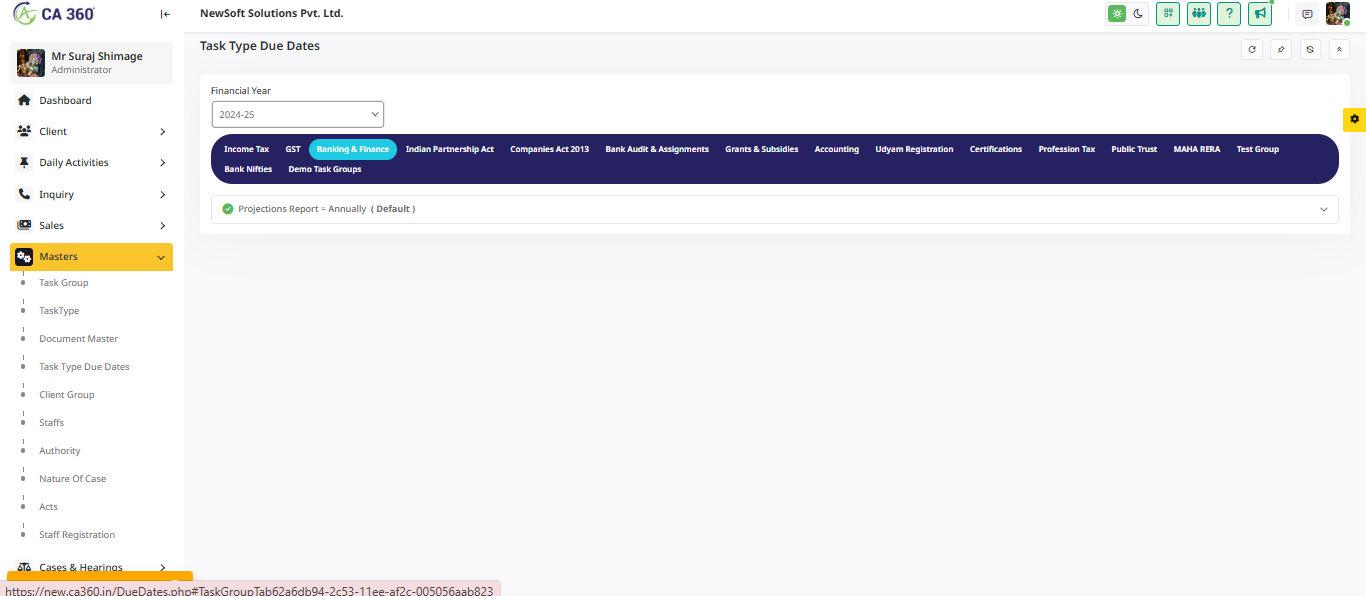
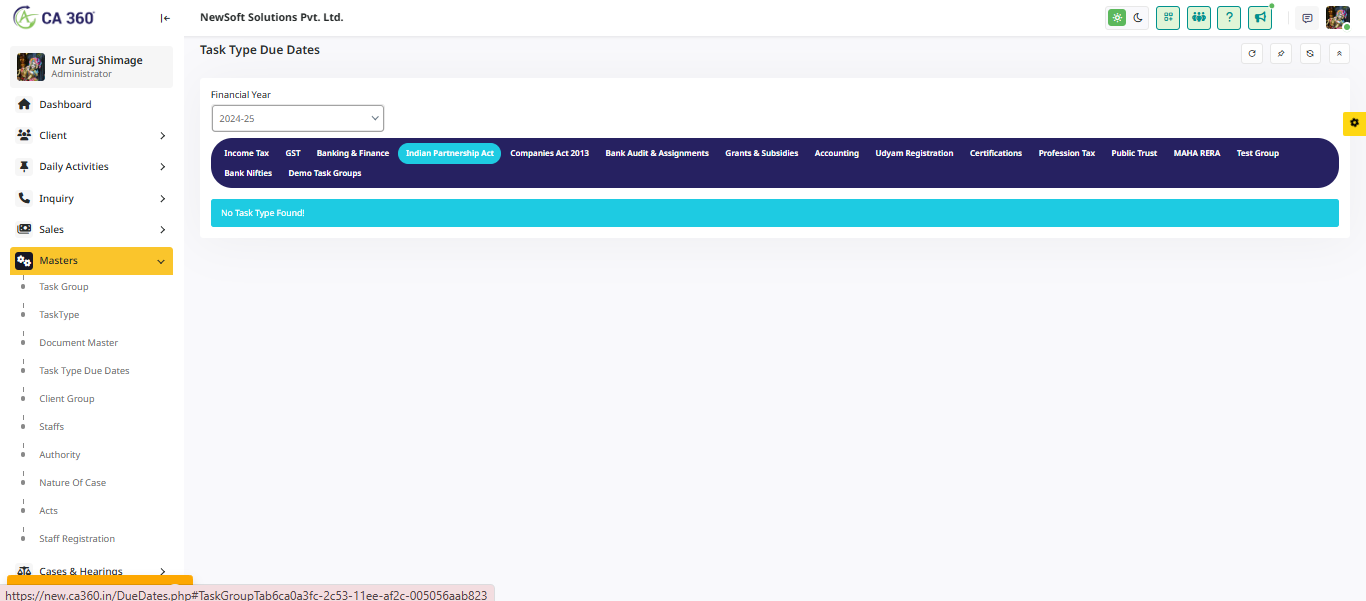
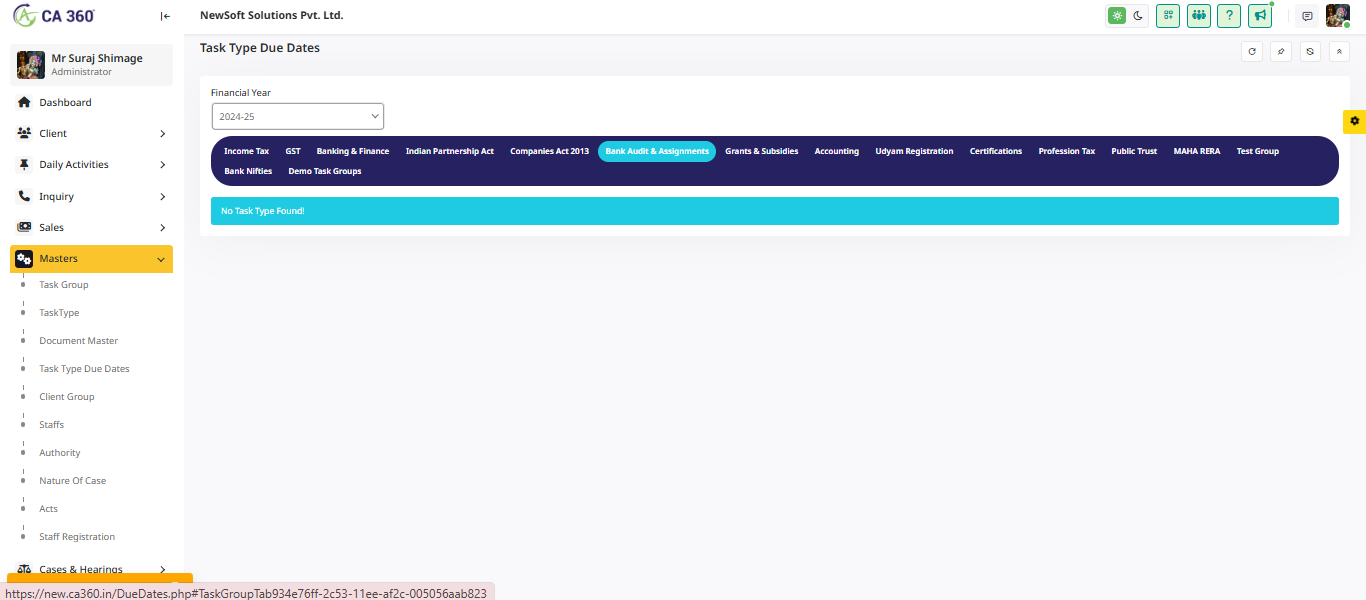
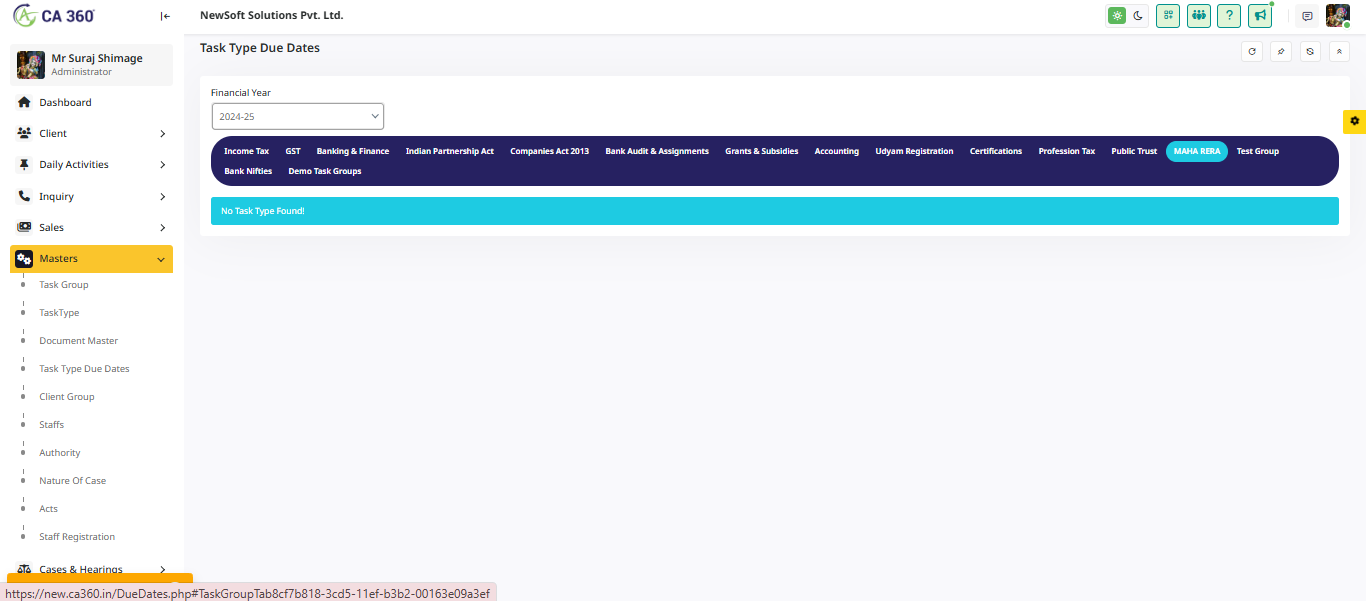
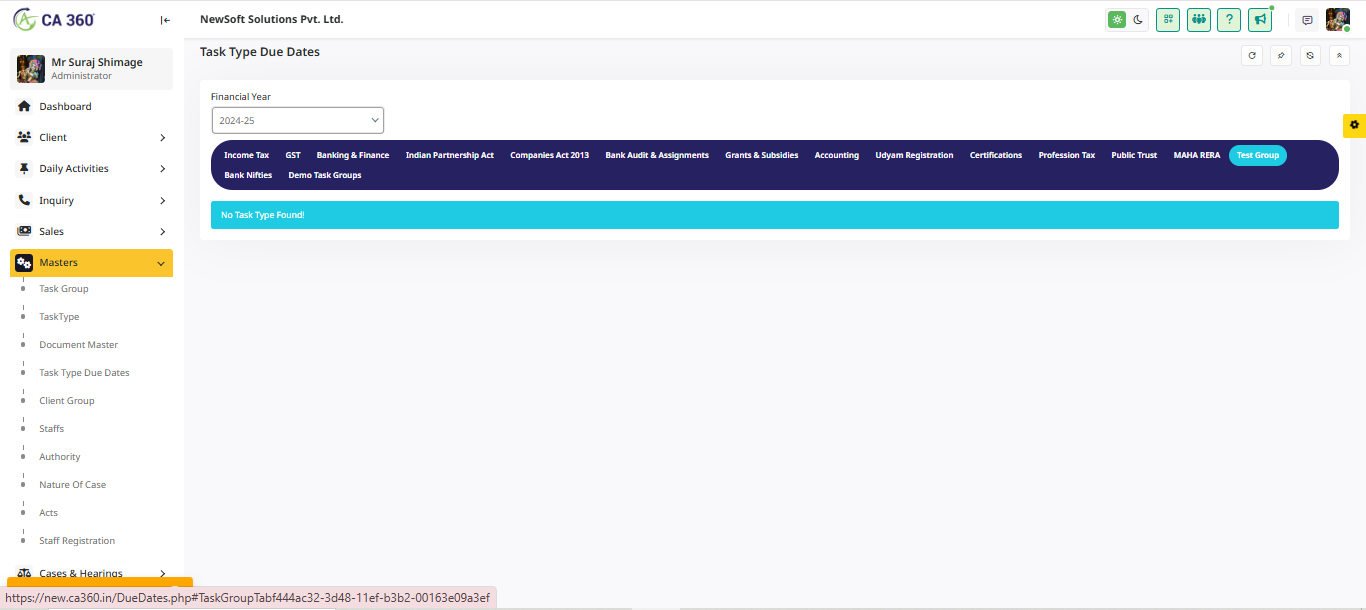
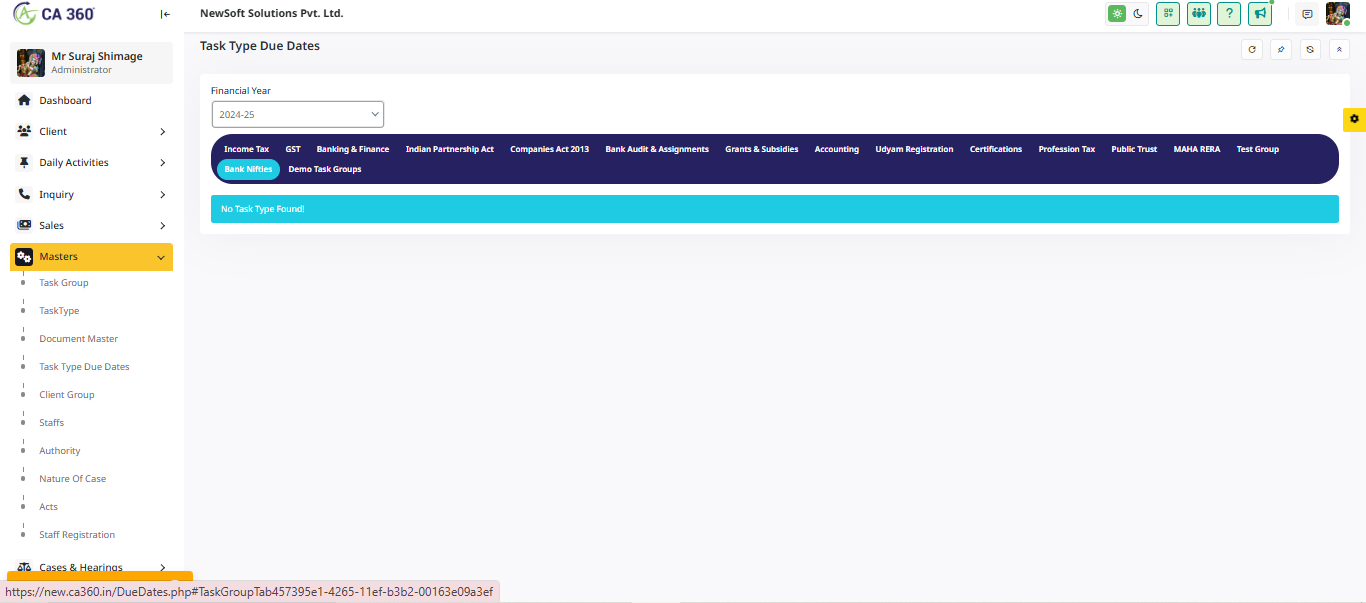
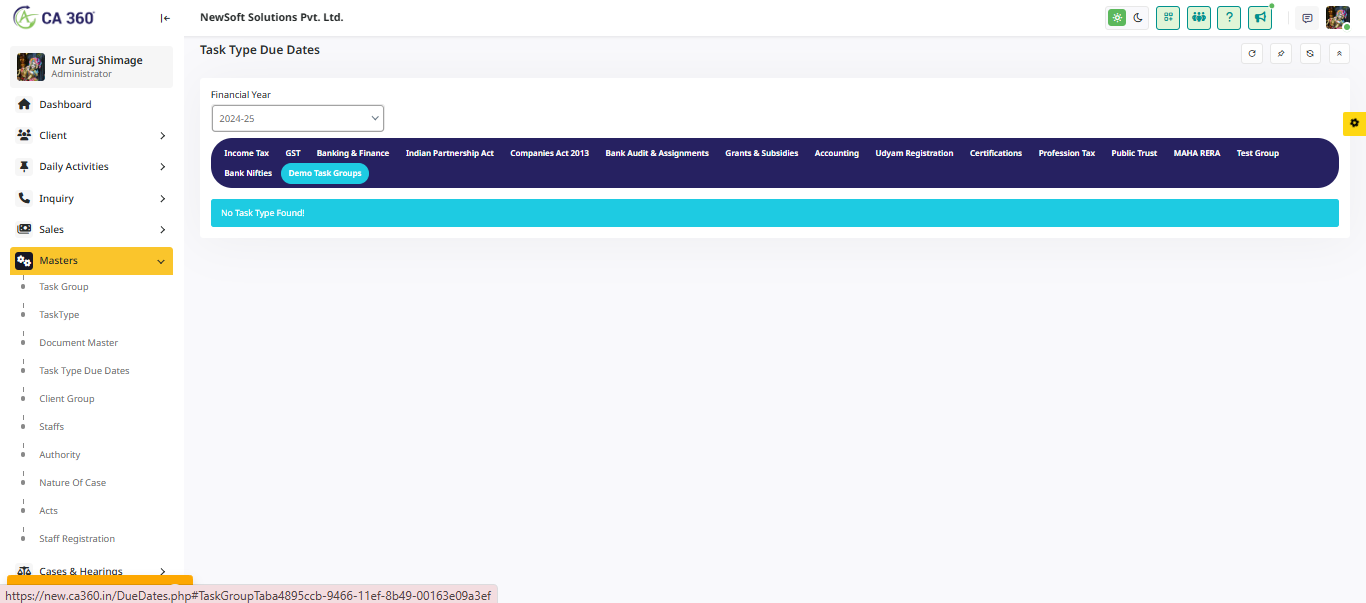
Task Type Due Dates:
The Task Type Due Dates section helps users efficiently manage task deadlines based on the selected financial year. By choosing a specific financial year, all relevant due dates and task details are displayed on the same page, allowing for seamless tracking and organization.
How It Works:- Select a Financial Year – Choose the desired financial year from the available options.
- View Due Dates – The system will display task-related deadlines for the selected period.
- Manage Deadlines Efficiently – Easily track and update due dates to ensure compliance and timely task completion.
Income Tax
income tax, including applicable rates, deductions, exemptions, and payment schedules. This section should include information on tax brackets, filing deadlines, and any specific rules or benefits that apply to your income tax situation.
GST
Goods and Services Tax (GST) is a single tax on the supply of goods and services, replacing multiple indirect taxes levied by the government. It is applied at each step of the production and distribution chain. Businesses are required to register for GST if their turnover exceeds the threshold limit set by the government. GST is categorized into different slabs, and it helps streamline tax procedures, making it easier for businesses to comply with tax laws.
Banking And Finance
Information related to banking and financial services, any other relevant financial data.
Indian Partnership Act
The Indian Partnership Act, 1932 governs the laws related to partnerships in India.
Companies Act 2013
The Companies Act, 2013 is the primary legislation governing the incorporation, regulation, and dissolution of companies in India. It replaced the earlier Companies Act, 1956, and aims to enhance corporate governance, improve transparency, and ensure greater accountability in the management of companies.In this section, the information for Annually

Bank Audit and Assignments
Related to bank audits and assignments, including the scope, timeline, and responsibilities involved in the auditing process.
Grants and Subsidies
Grants and subsidies are financial assistance provided by governments or other organizations to support specific projects, activities, or sectors. They aim to promote economic development, social welfare, and environmental sustainability. Grants are typically awarded based on specific criteria, while subsidies aim to reduce the cost of goods or services to make them more accessible. In this section, you'll find information on available grants and subsidies, including eligibility requirements, application procedures, and deadlines.

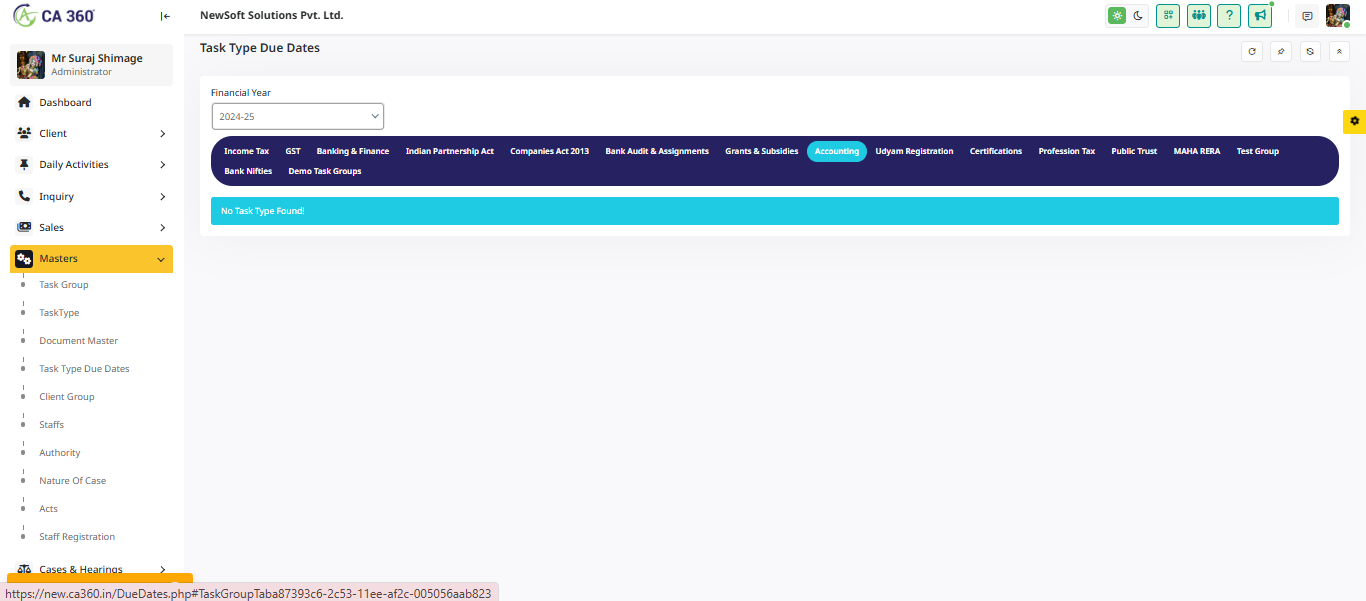
Accounting
In this section, you can manage and view all financial records, including income, expenses, and balance sheets. It provides tools for tracking transactions, generating reports, and ensuring accuracy in financial statements.
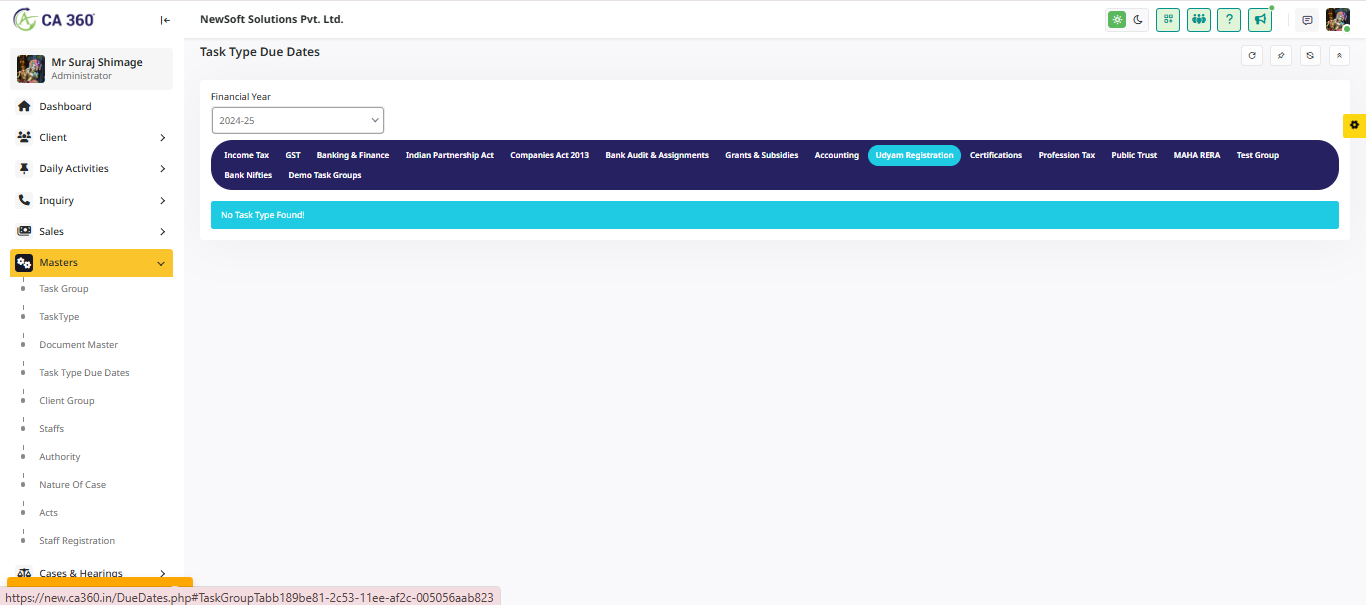
Udyam Registration
Udyam Registration is an initiative by the Government of India to promote and support Micro, Small, and Medium Enterprises (MSMEs) in the country. It is a simplified process that provides a unique identification number to businesses, allowing them to avail various benefits and schemes from the government, such as access to credit, subsidies, and priority in government tenders. The registration process is free of charge and can be completed online on the Udyam Registration portal.To register, businesses need to provide basic details such as the type of business, business activity, bank details, and other relevant documents. The registration number obtained is used to avail of several schemes and benefits under the MSME sector.
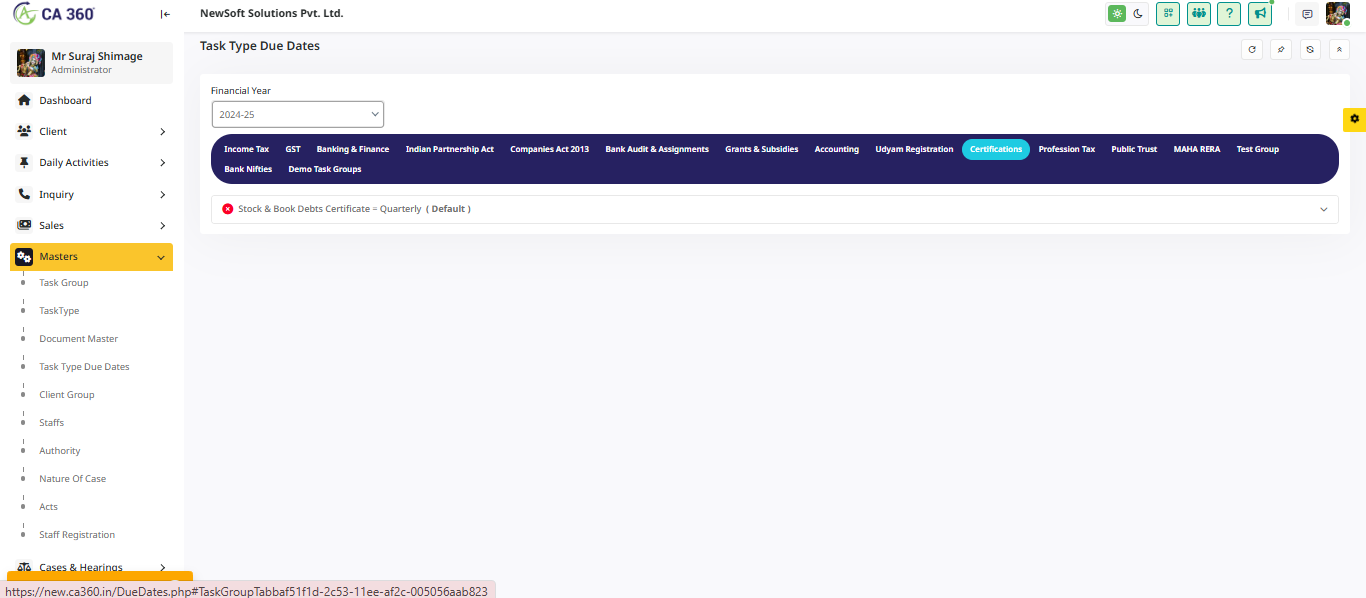
Certification
In this section, provide the necessary details regarding the certification, including the type of certification, the issuing authority, the validity period, and any other relevant information.
Profession Tax
In this section, provide the details related to Profession Tax, including applicable rates, payment schedule, and any necessary documentation for compliance.

Public Trust
A Public Trust refers to a legal arrangement where the government or an organization holds assets or property for the benefit of the public.

MAHA RERA
The Maharashtra Real Estate Regulatory Authority (MahaRERA) was established under the Real Estate (Regulation and Development) Act, 2016, with the aim of promoting transparency, accountability, and efficiency in the real estate sector within Maharashtra.
Test Group
This section provides details about the test group, including its composition, objectives, and any relevant data related to the group’s activities and performance.
Bank Nifties
The Bank Nifty is a stock market index that represents the performance of the banking sector in India. It is composed of 12 major banks, which are selected based on free-float market capitalization.
Demo Task Group
The Demo Task Group section provides information regarding the tasks assigned to the demo group, including task details, deadlines, and status updates. This section helps organize and manage the tasks related to the demo, ensuring everything is on track for successful completion.
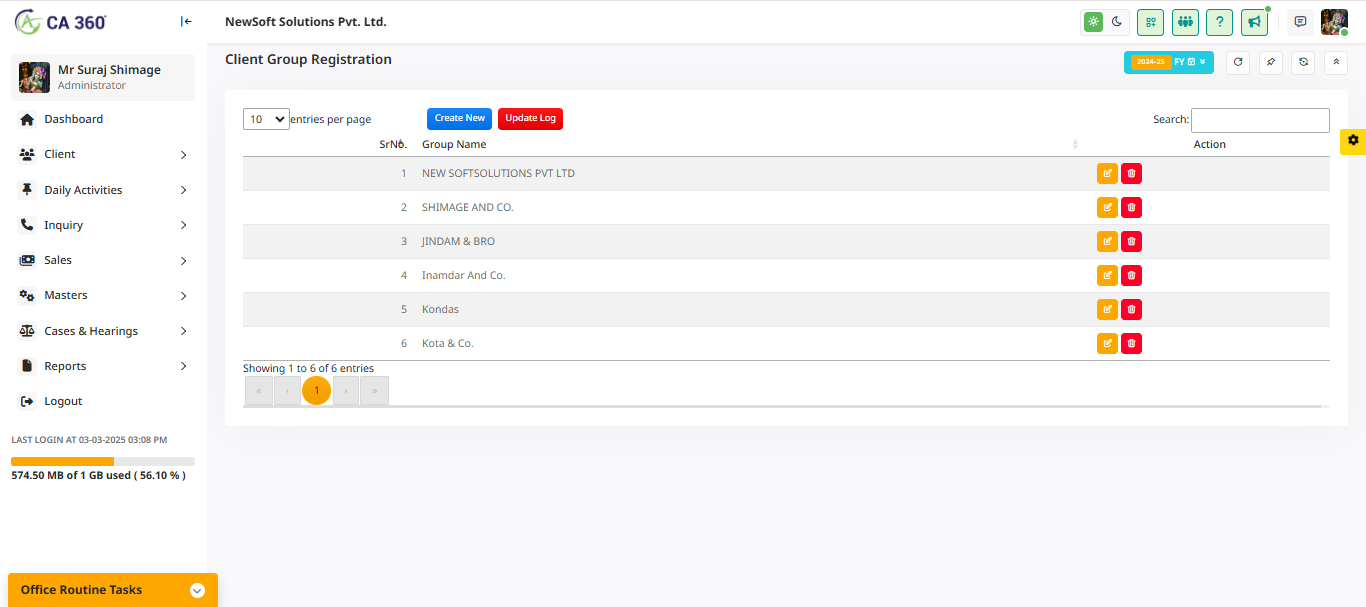
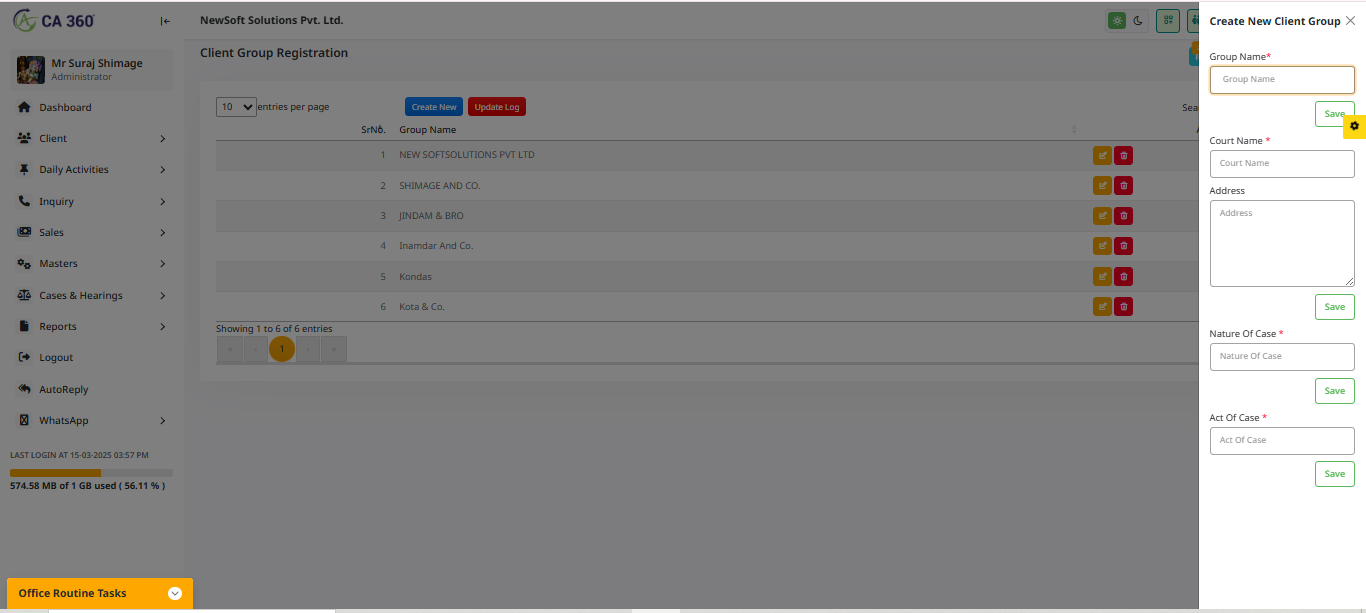
Client Group :
The Client Group section allows you to create and manage groups by organizing clients, staff, or tasks into specific categories. This helps streamline workflows, improve efficiency, and ensure that all related information is systematically stored and easily accessible.
How to Use:- View Existing Groups – A complete data table displays all registered client groups.
- Create a New Client Group:
- Efficient Management – Easily categorize and track clients, staff, or tasks within the created groups.
Create New Client Group
In this section, create a new client group by entering the group name and saving it.
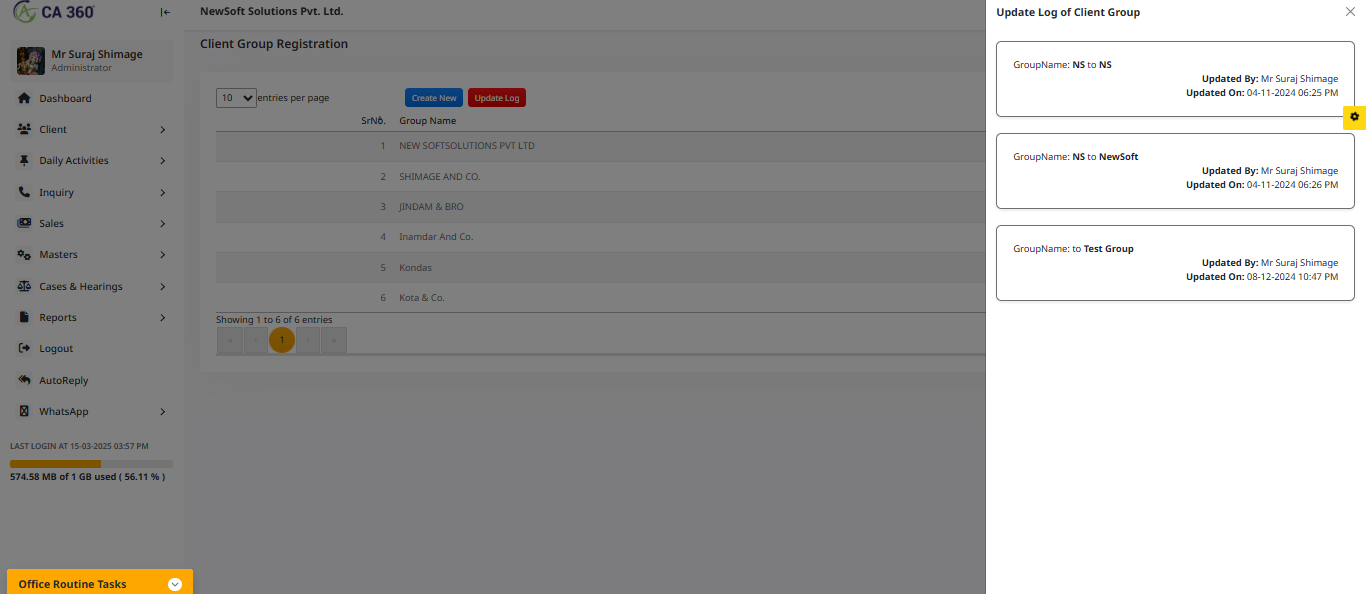
Update Log of Client Group
In this section, the client group can be updated. It displays the group name, the name of the person who made the update, and the date and time of the update.
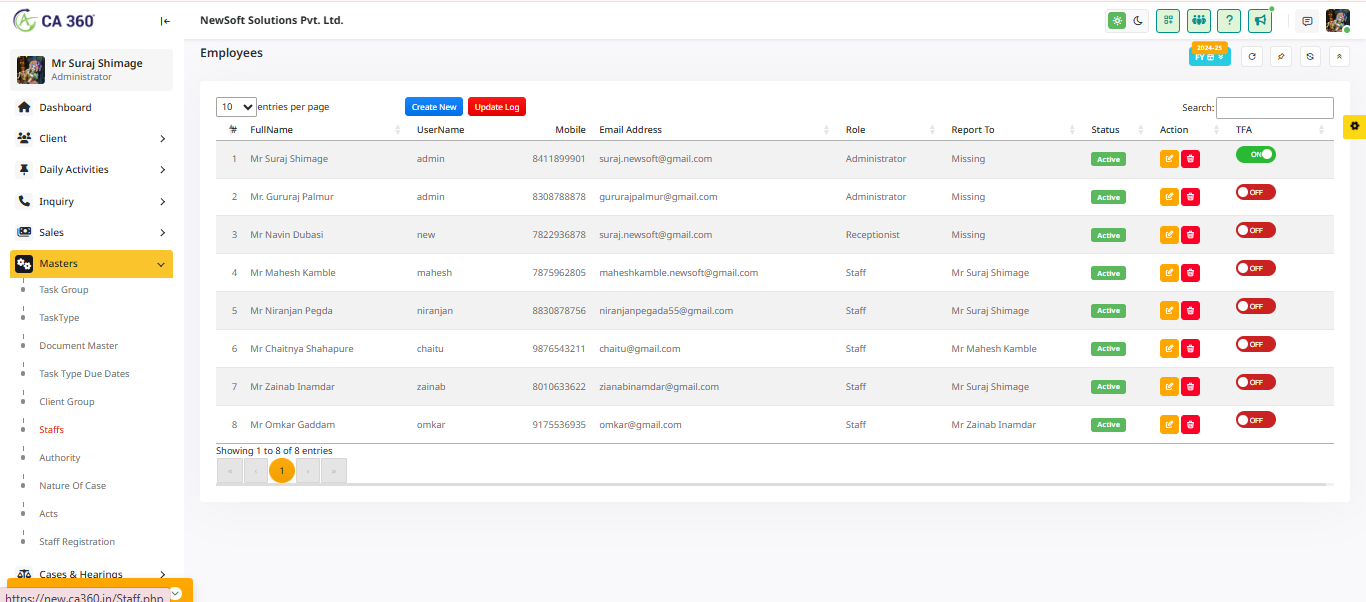
Staff :
The Staff Module in CA360 allows users to manage employees efficiently. Users can view, add, update, or manage staff details from this section.
Accessing the Employees DataTable:- Click on Staff to open the Employees DataTable.
- Click on the Create New button.
- The system redirects you to the Staff Registration Page.
Staff
In this section, if you are creating a new staff registration, click here to be redirected to the Staff Registration page.
Update Log of User
This section displays the log updates for users, including complete details such as username, password, role, address, mobile number, and more. It also shows the name of the person who made the update along with the date and time.

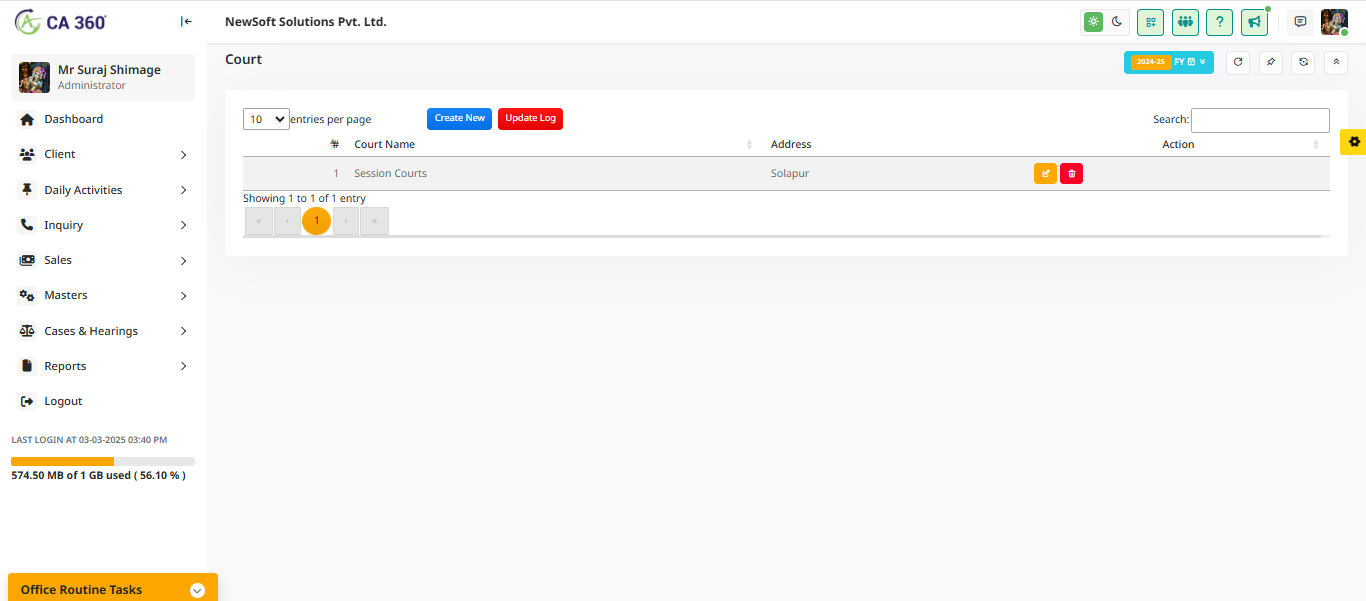
Authority :
The Authority section allows you to register and manage courts, including their names and addresses. This feature ensures that court-related information is stored systematically, making it easily accessible for legal proceedings or documentation purposes.
How to Use:- View Existing Courts – A data table displays all registered courts and their details.
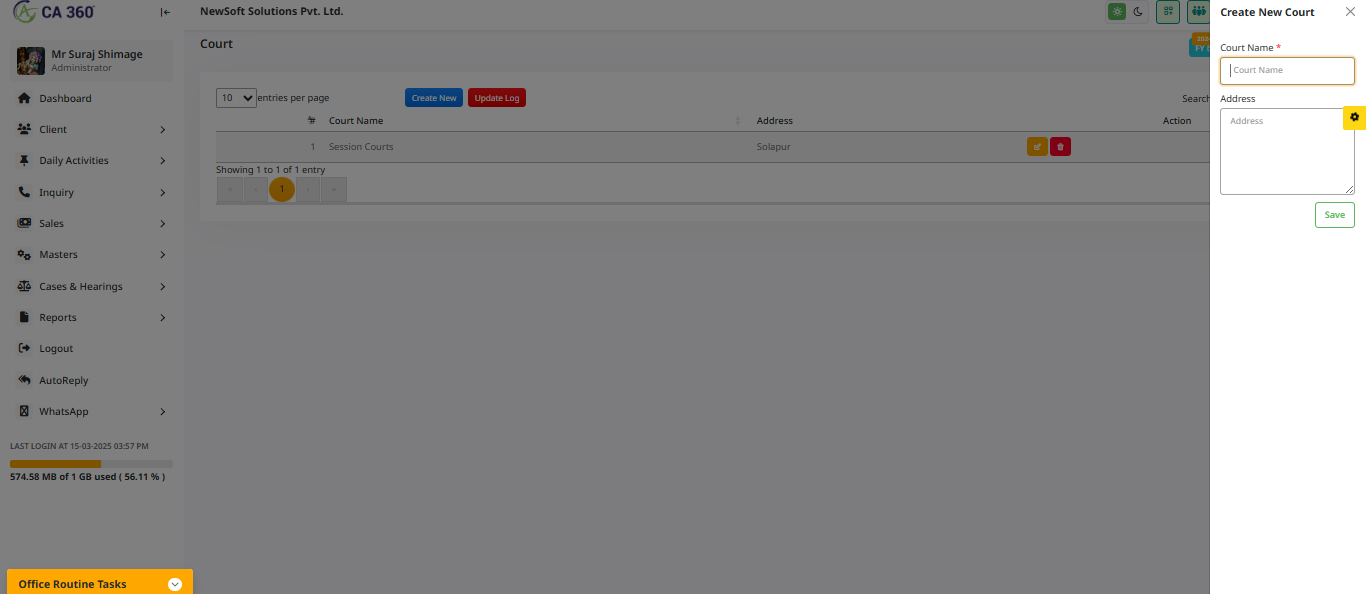
- Create a New Court:
Create New court
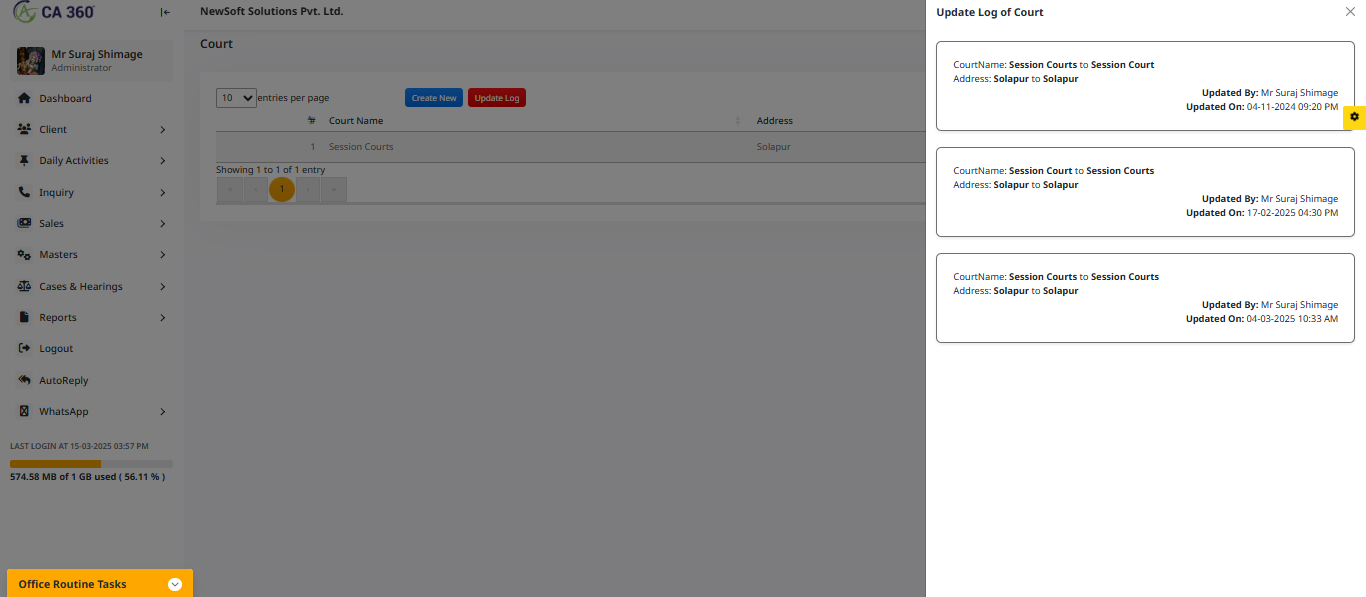
Update Log of court
This section displays the court name, address, and the details of the person who updated it, including their name and the date and time of the update.
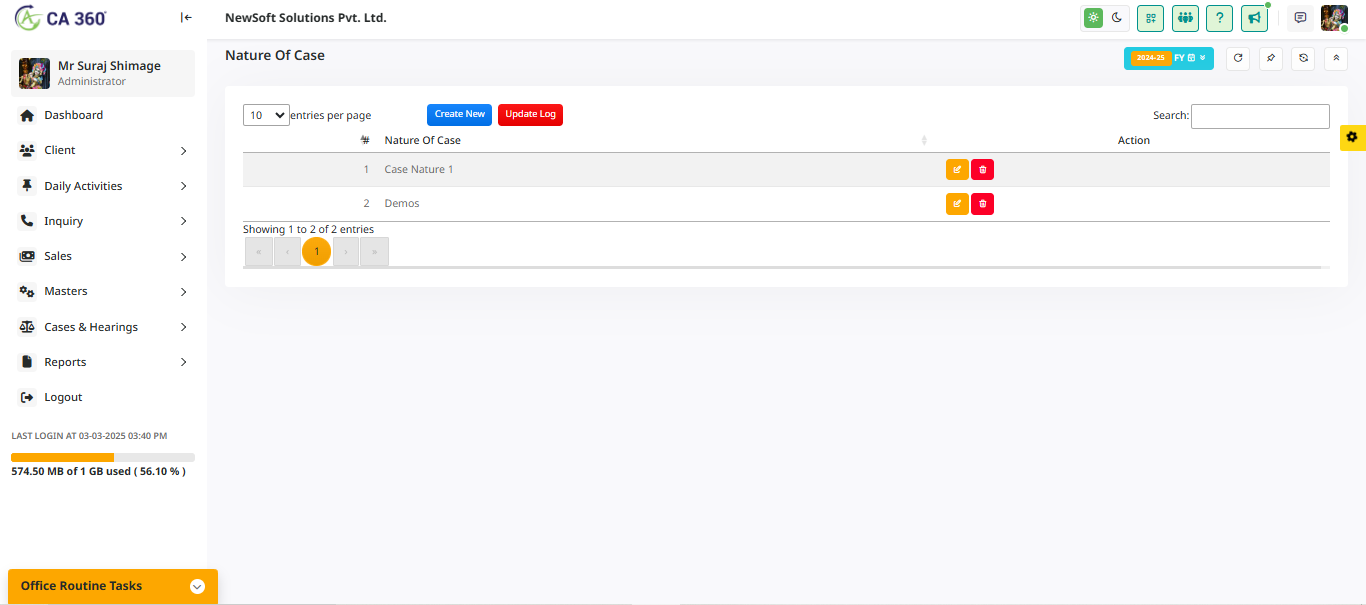
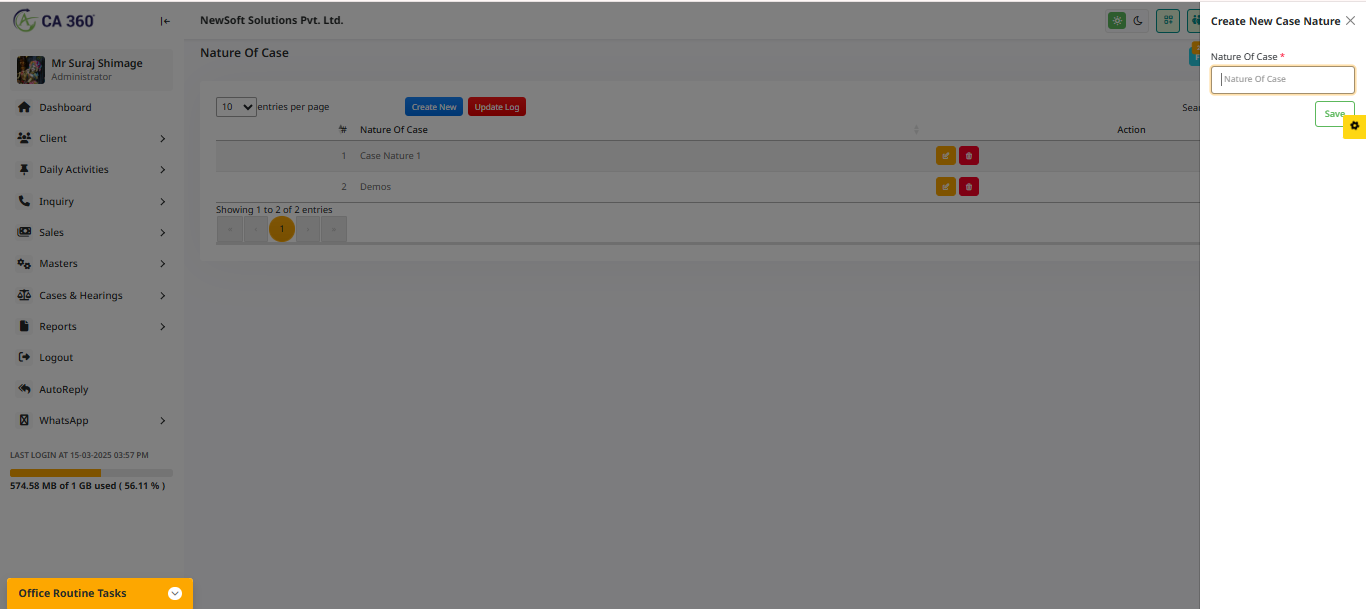
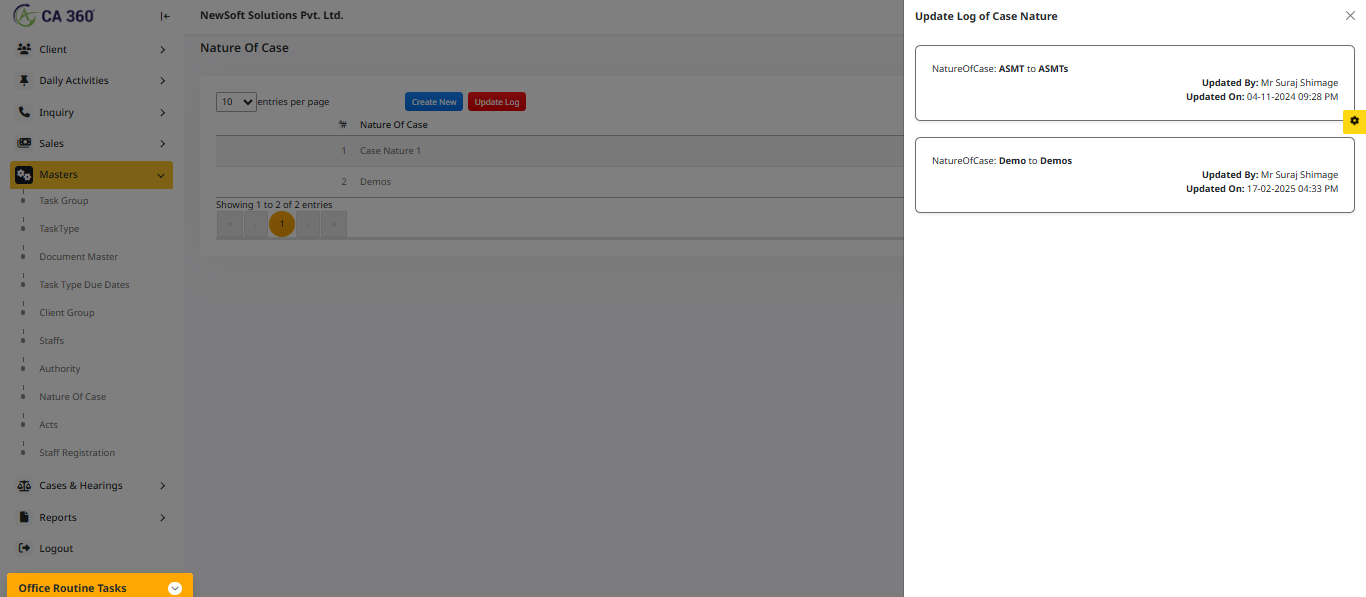
Nature Of Case:
The Nature of Case section allows you to define and categorize the type or category of a legal case. By providing a clear description of the case's nature, this feature helps in organizing and classifying cases based on their specific legal issues, making it easier to manage and track cases with similar characteristics.
How to Use:- View Existing Case Natures – A data table displays all registered case natures.
- Create a New Case Nature:
Create New Case Nature
Update Log of Case Nature
This section displays the nature of the case, along with the username and date-time of the latest update.
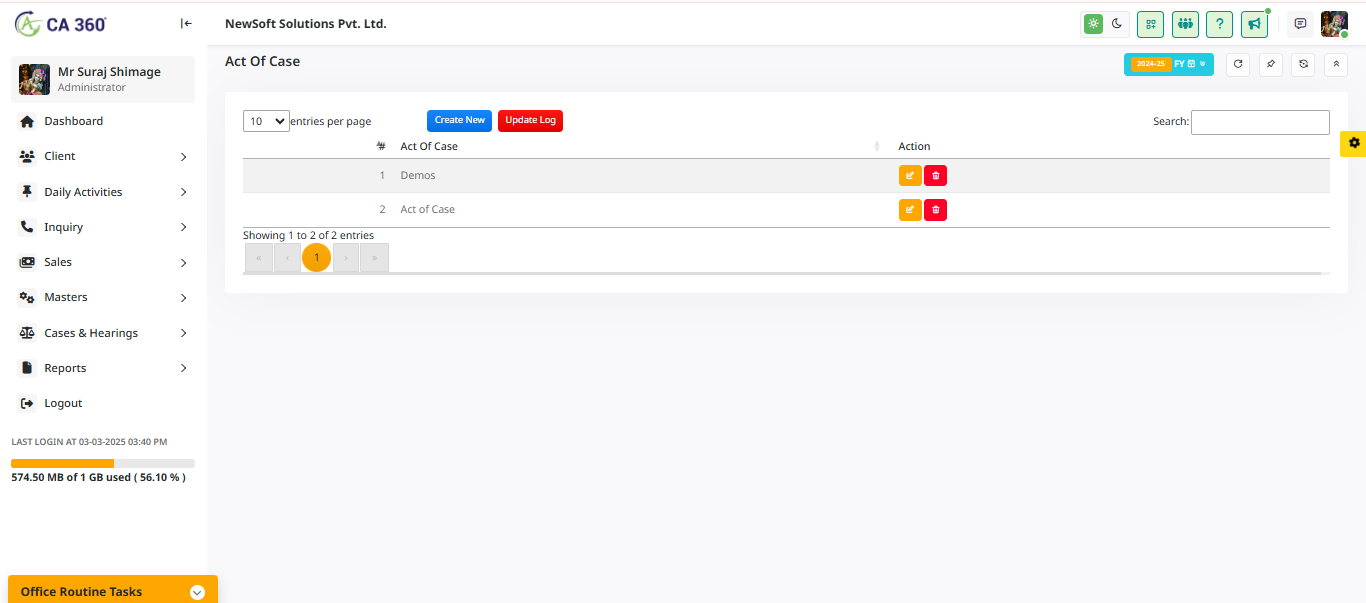
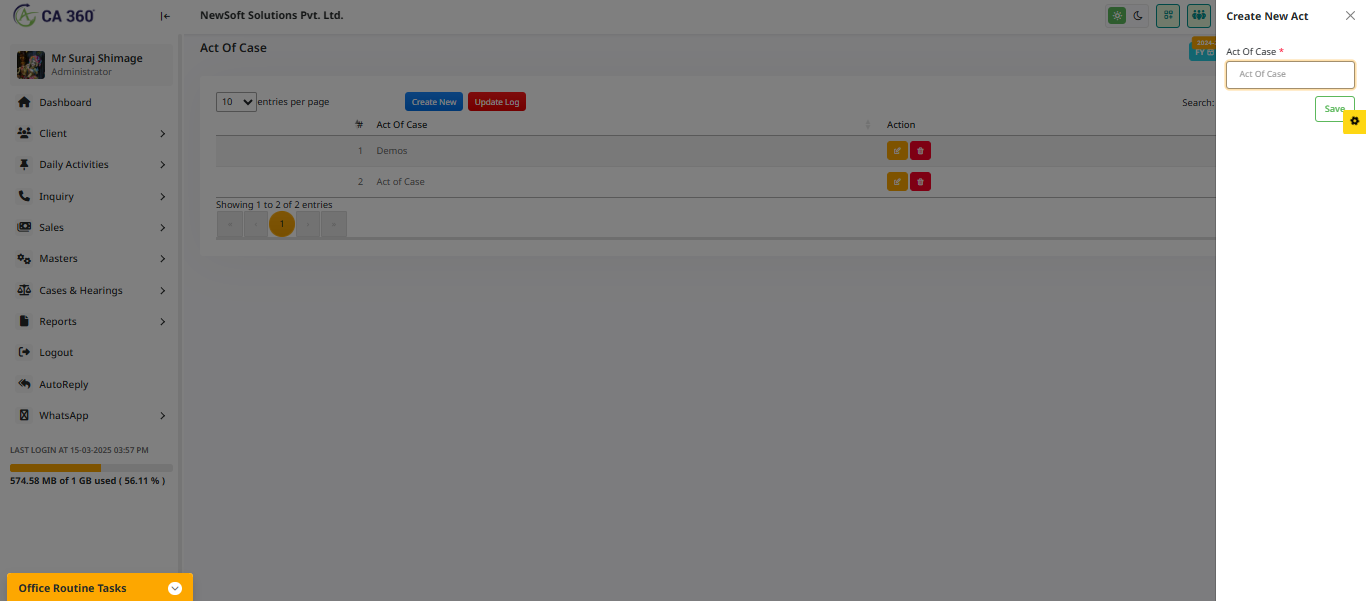
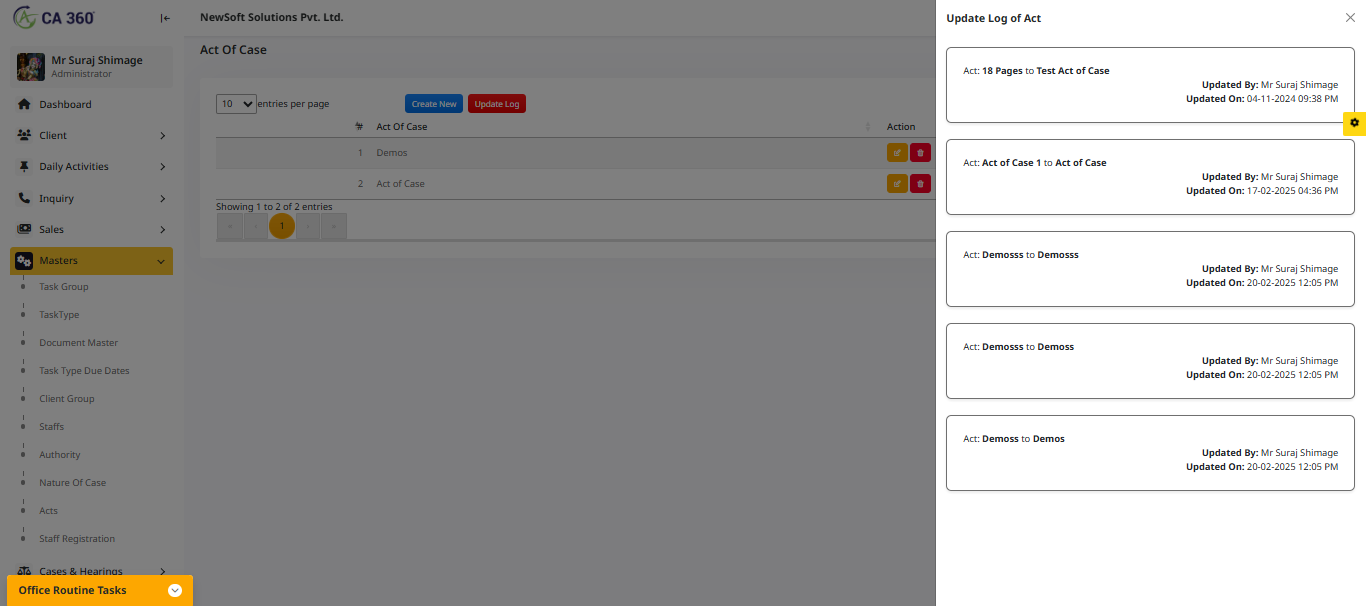
Act:
The Act section allows you to specify the legal act or statute under which a case is filed. This helps categorize cases according to the relevant laws or regulations, ensuring that each case is properly documented and aligned with the appropriate legal framework.
How to Use:- View Existing Acts – A data table displays all registered legal acts associated with cases.
- Create a New Act:
Create New Act
Update Log of Act
This section displays the activity name, the user who updated it, and the date and time of the update.
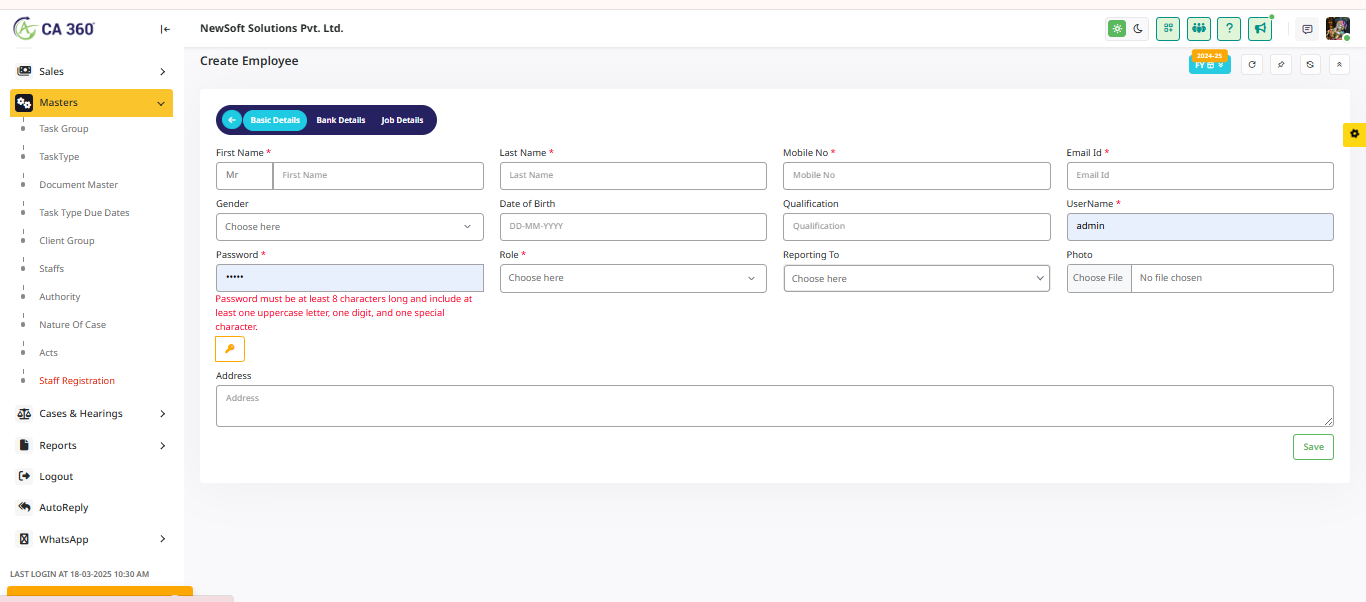
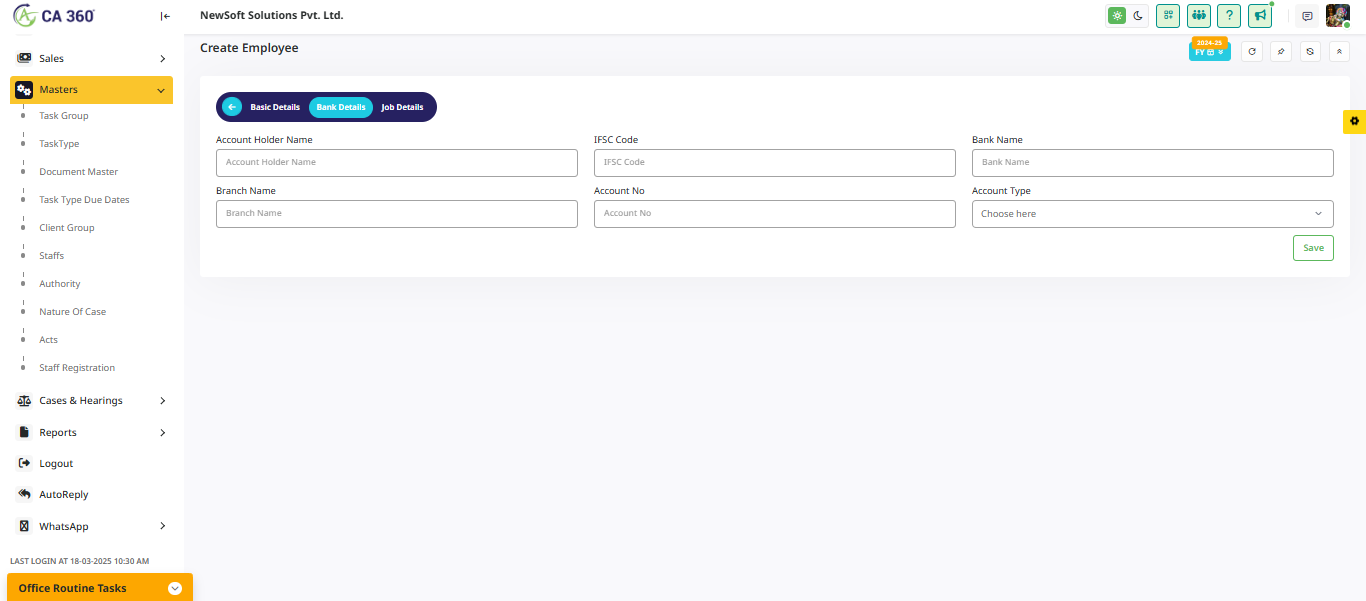
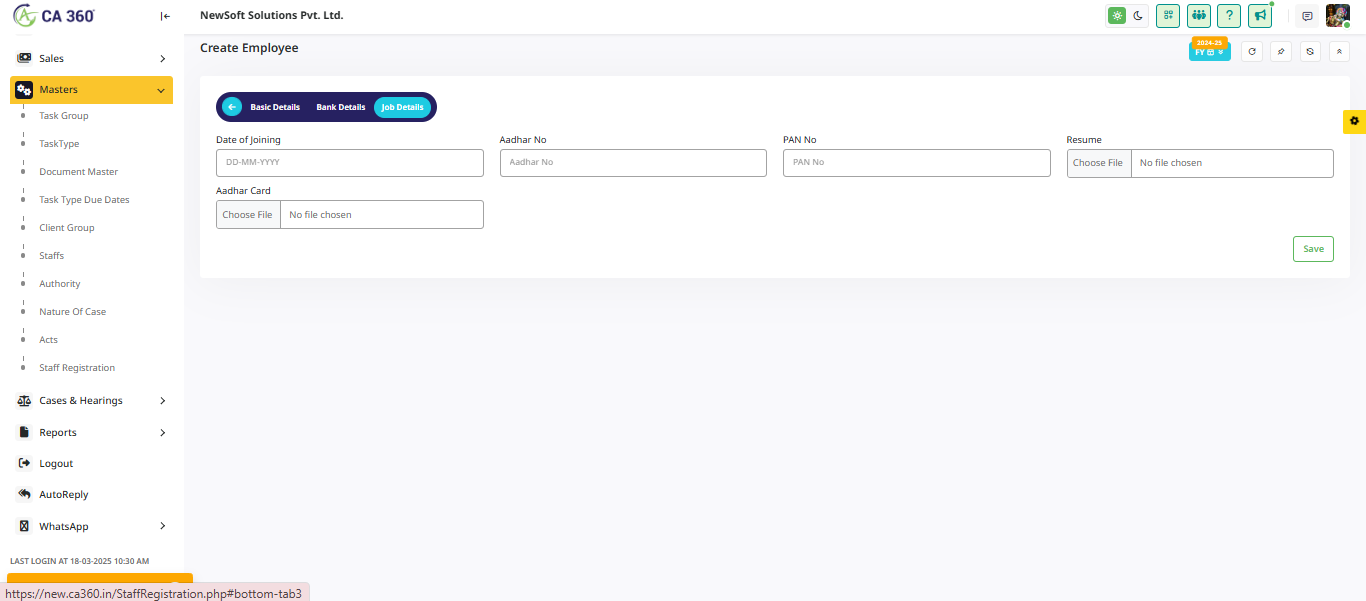
Staff Registration :
The Staff Registration section allows you to add new staff members by recording their essential details. This ensures that all staff information is organized and easily accessible for efficient management and quick reference.
How to Use:- Register a New Staff Member:
Basic Details
Bank Details
Job Details
- Registering new cases and scheduling hearings
- Setting calendar reminders for upcoming hearings and case deadlines.
- Viewing a list of cases scheduled for hearings.
- Tracking the status and details of ongoing cases.
- Generating reports on cases and hearings for detailed insights and status updates.
- This feature ensures efficient management of legal matters, allowing for effective scheduling and tracking of all related activities.
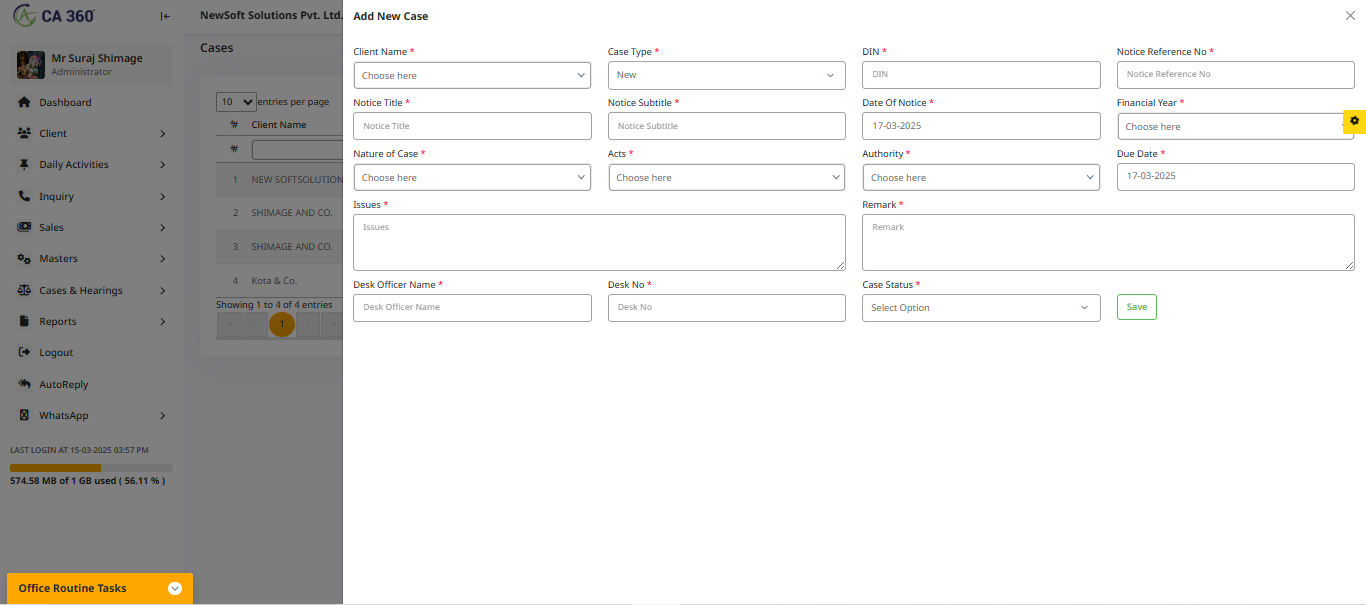
Create Cases :
The Create Cases section allows you to register new legal cases by entering essential details, such as the case title, parties involved, nature of the case, court information, and more. This ensures that all case information is documented accurately and is easily accessible for future reference and management.
How to Use:- View Existing Cases - A data table displays all registered cases, including relevant details.
- Create a New Case:
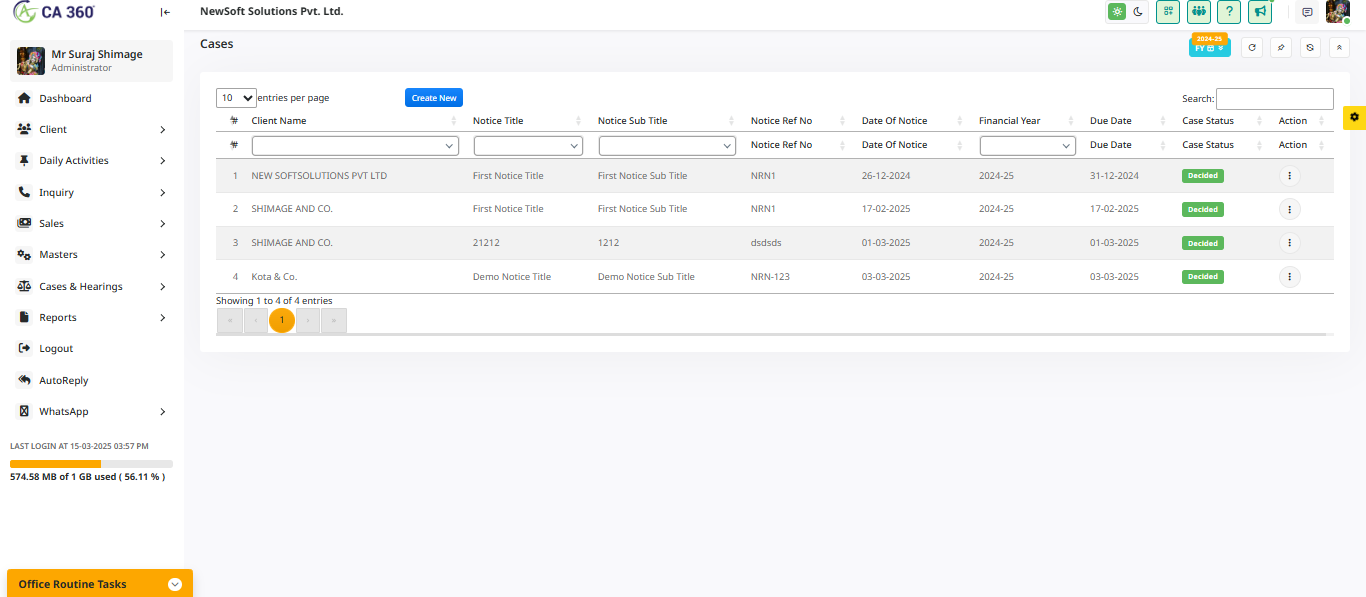
Add New Case
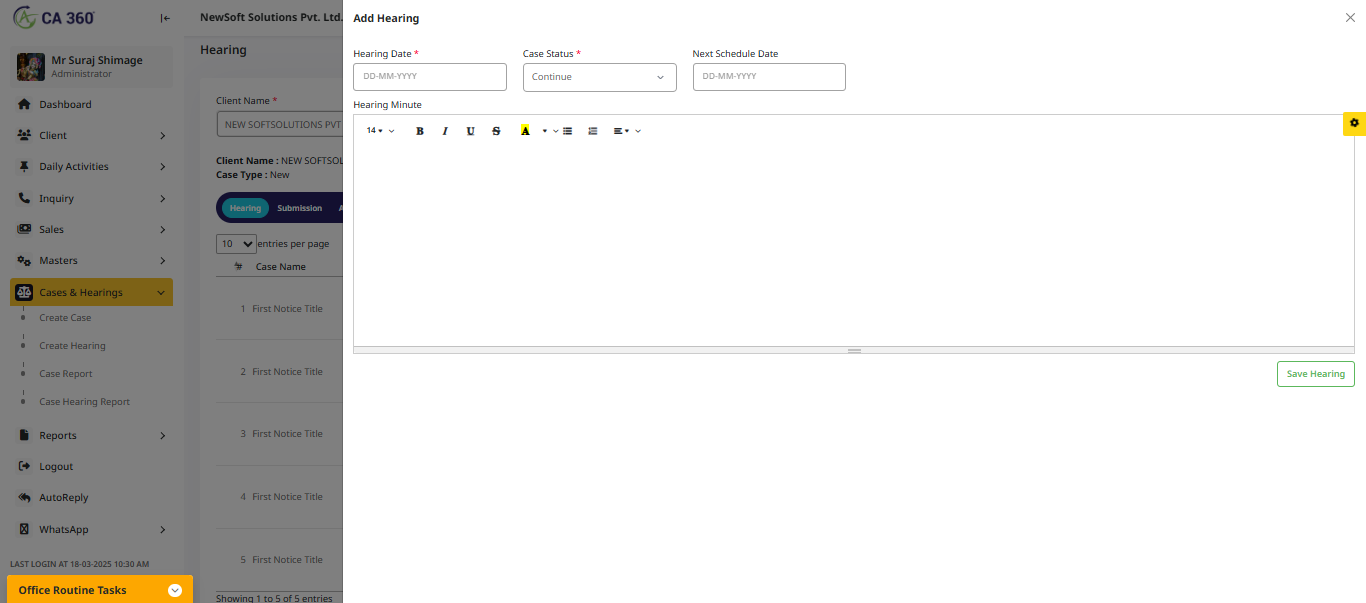
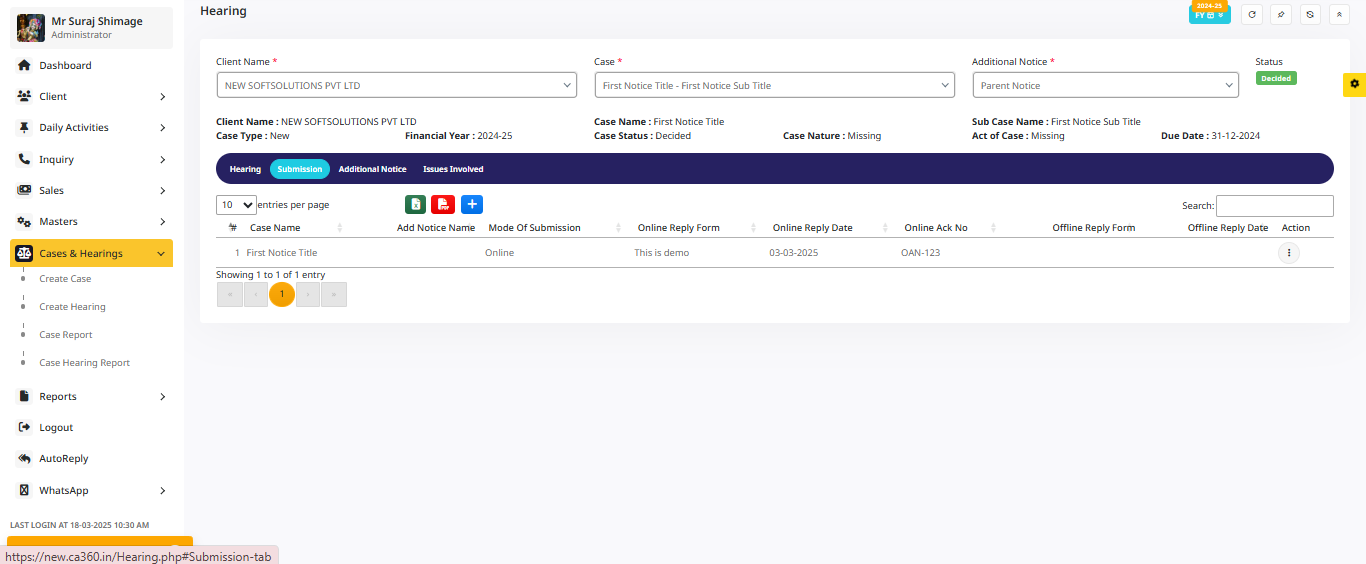
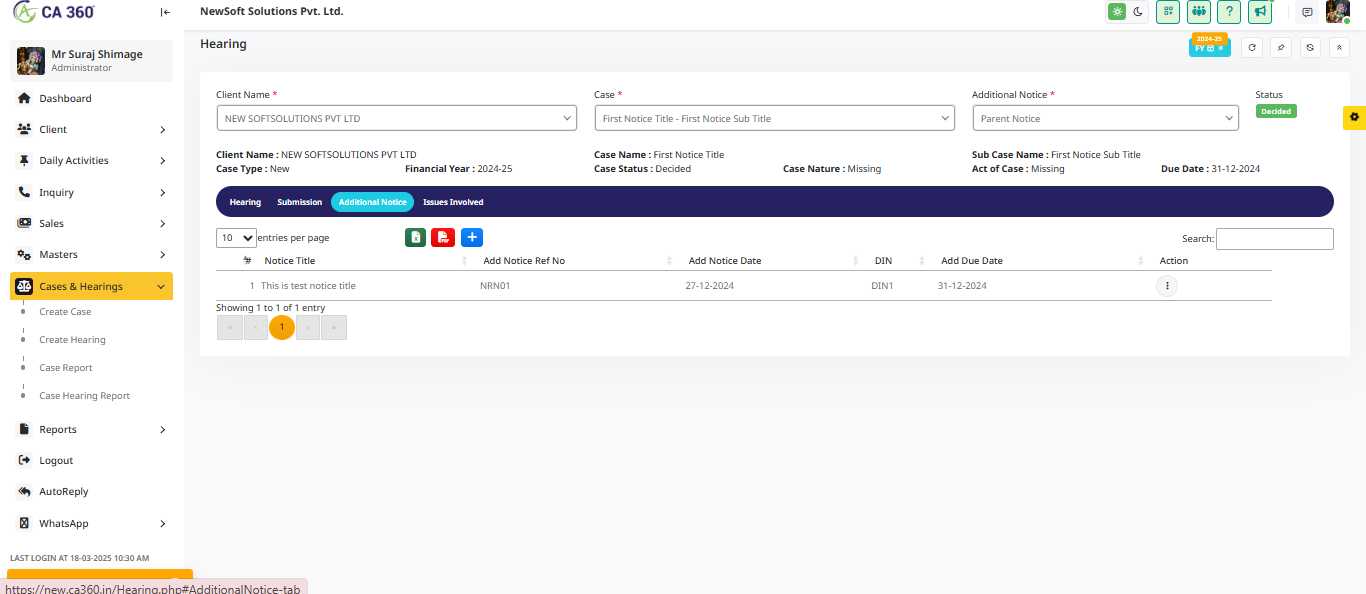
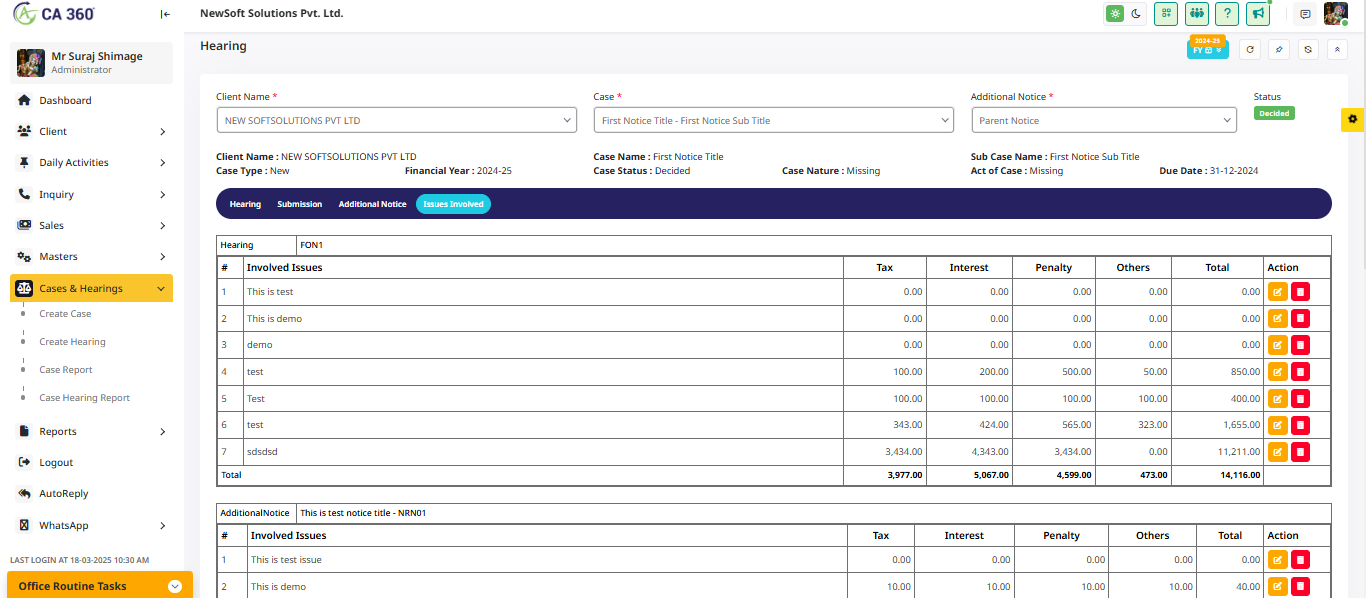
Create Hearing :
The Create Hearing section allows you to schedule or register a new hearing for a legal case. This feature involves entering essential details such as the hearing date, time, location (courtroom), participants (lawyers, clients, witnesses), and other important information. It helps in organizing and managing the schedule for legal proceedings, ensuring that all involved parties are informed and prepared for the upcoming hearing.
Hearing
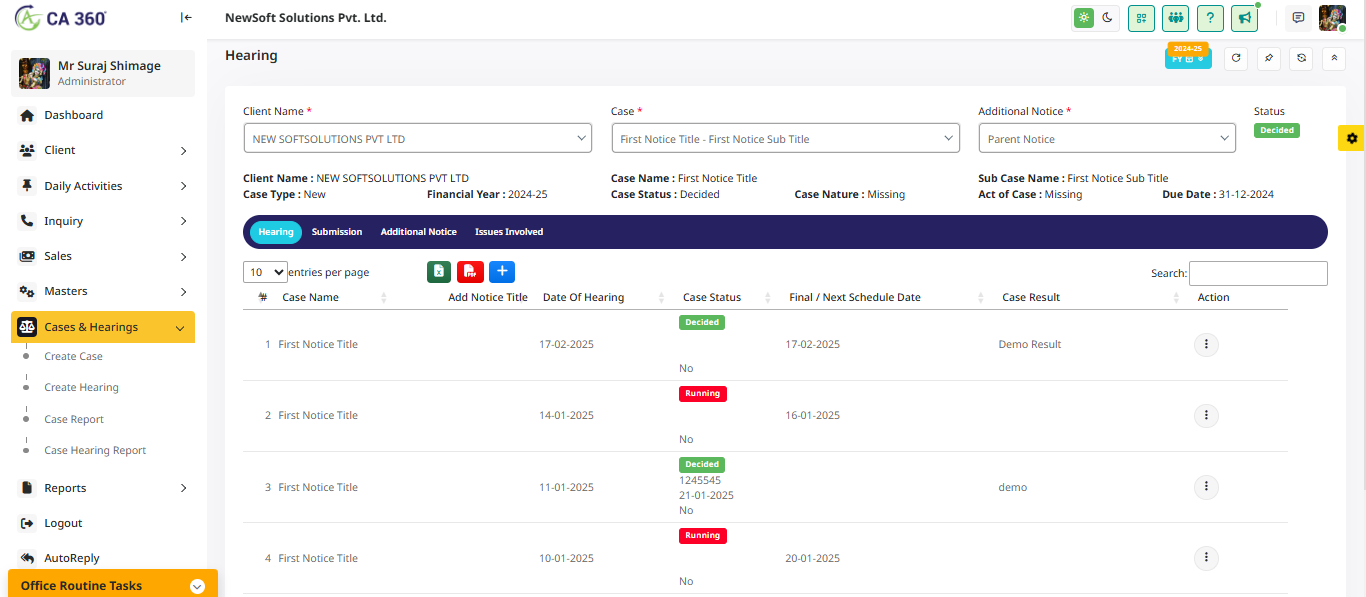
Add Hearing
Hearing Submission
Hearing Additional Notice
Hearing Issues involved
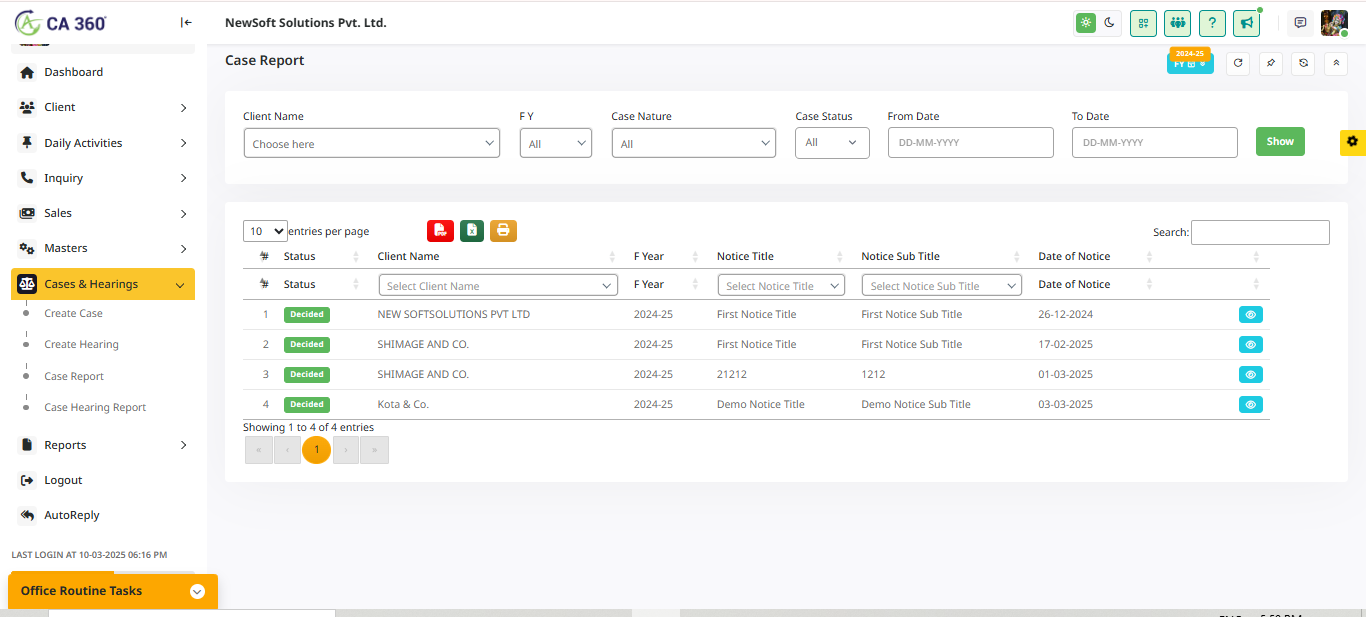
Case Report :
This section displays a list of cases that are scheduled for upcoming hearings. It helps users stay informed about upcoming legal proceedings, allowing them to prepare by ensuring all necessary arrangements and documentation are ready before the scheduled dates. This feature supports effective case management, ensuring legal teams and stakeholders are well-prepared for upcoming hearings. An "exceptional case" refers to a legal matter that is unique due to its complexity, significant impact, or special circumstances. These cases may involve novel legal issues, high-profile clients, large stakes, or other factors that differentiate them from routine cases. Managing exceptional cases often requires specialized knowledge, strategic planning, and careful handling to navigate complexities and secure favorable outcomes for all parties involved.
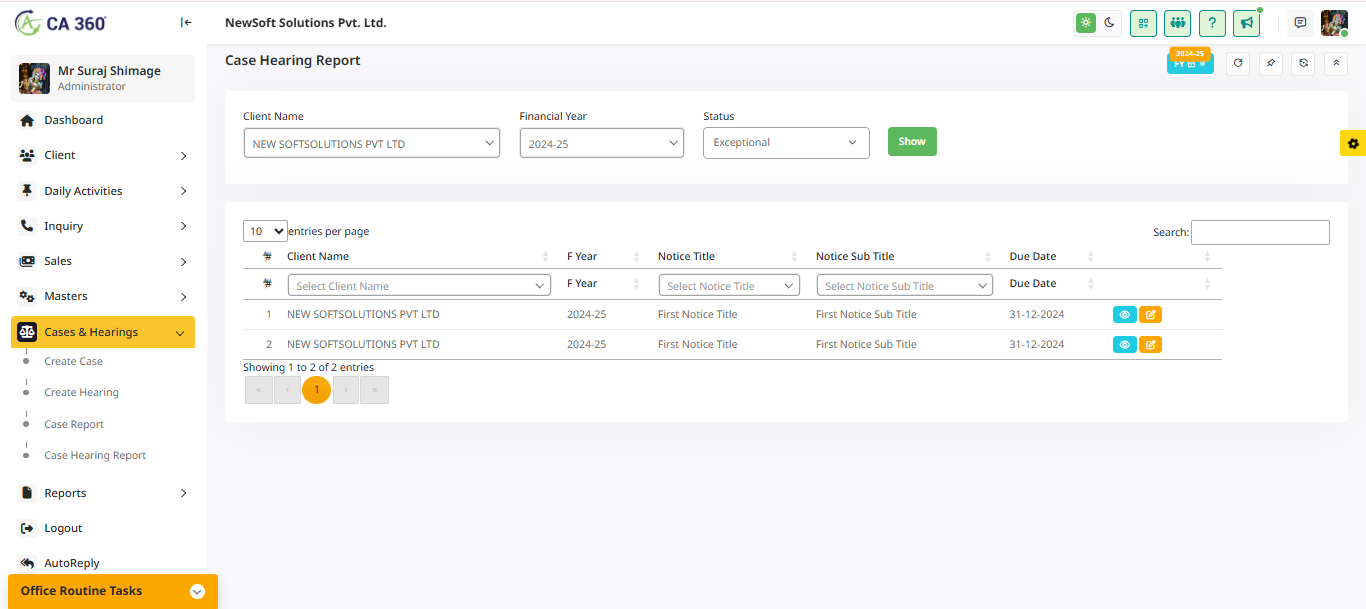
Case Hearing Report :
This section displays a list of cases that are scheduled for upcoming hearings. It helps users stay informed about upcoming legal proceedings, allowing them to prepare by ensuring all necessary arrangements and documentation are ready before the scheduled dates. This feature supports effective case management, ensuring legal teams and stakeholders are well-prepared for upcoming hearings. An "exceptional case" refers to a legal matter that is unique due to its complexity, significant impact, or special circumstances. These cases may involve novel legal issues, high-profile clients, large stakes, or other factors that differentiate them from routine cases. Managing exceptional cases often requires specialized knowledge, strategic planning, and careful handling to navigate complexities and secure favorable outcomes for all parties involved.
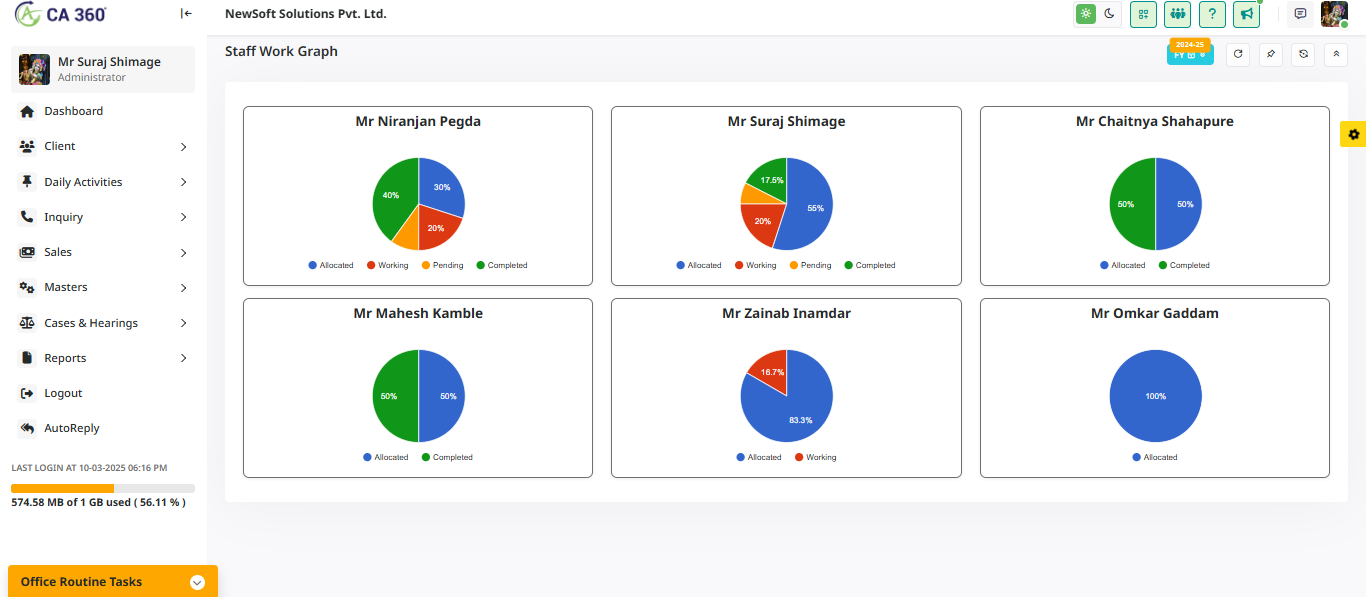
Staff Work Graph :
This graph shows the staff work progress, including allocated, pending, success, and working tasks. The data reflects real-time performance, and improvements are tracked over time.
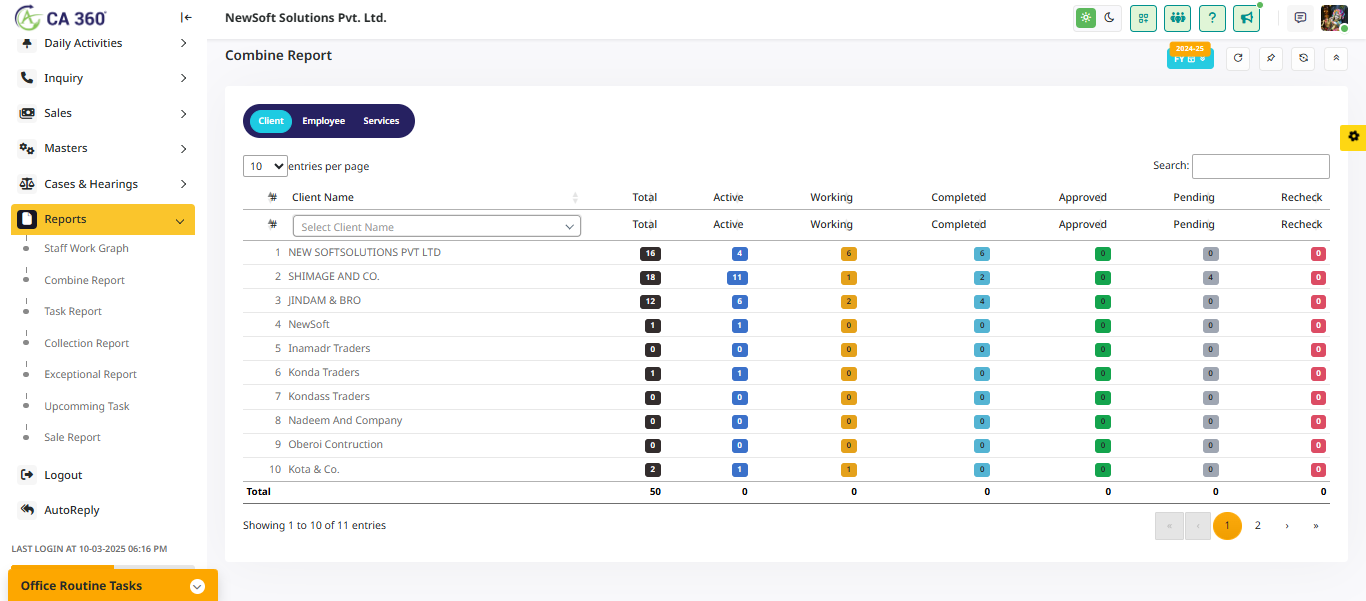
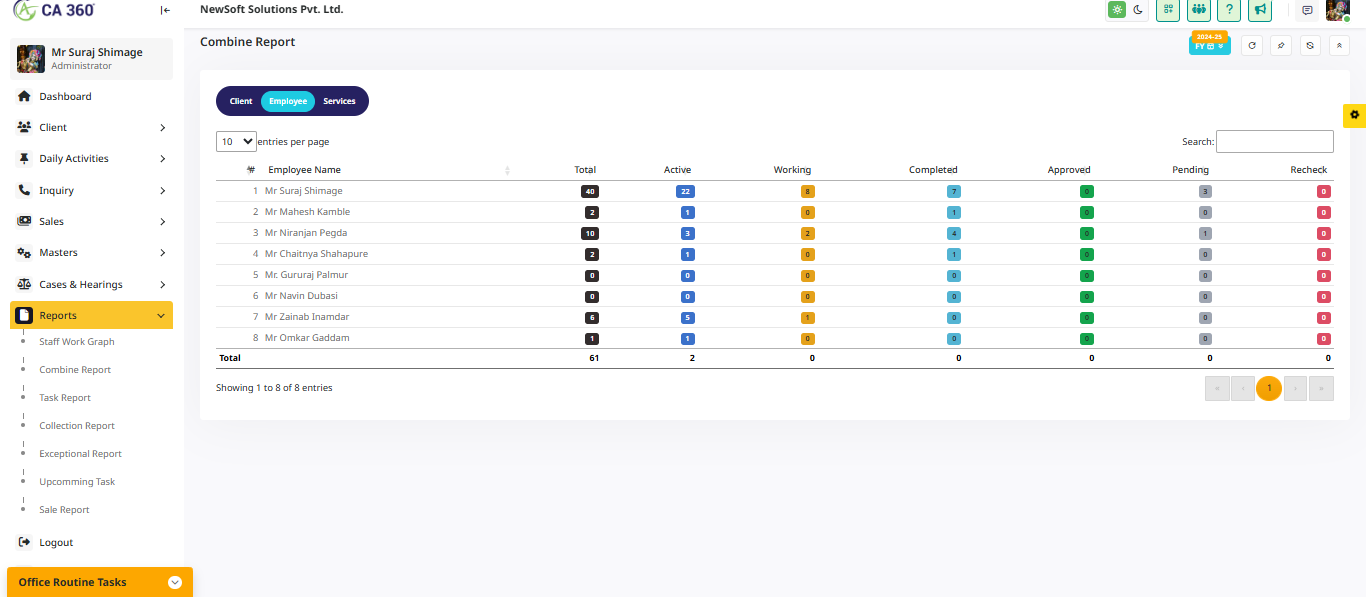
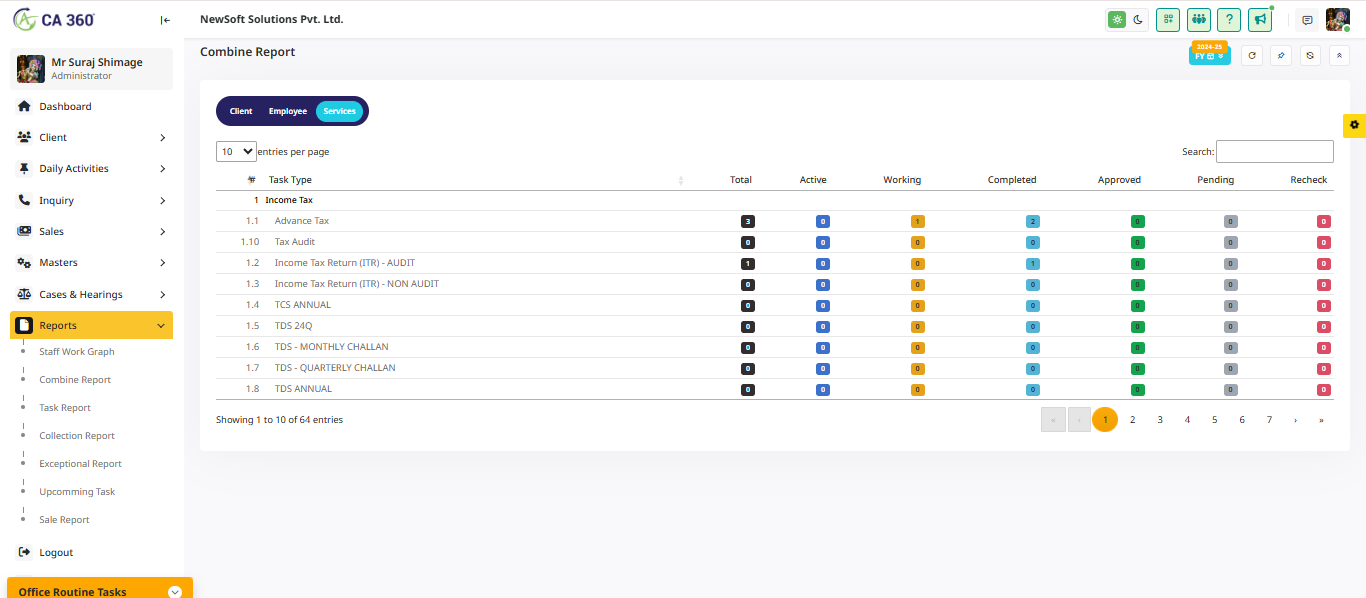
Combine Report :
The Combine Report displays data on clients, employees, and services in a structured table using DataTables. It provides insights into total, active, working, completed, approved, pending, and rechecked statuses. Users can read this report in CA360.
Combine Report Client
Combine Report Employee
Combine Report Services
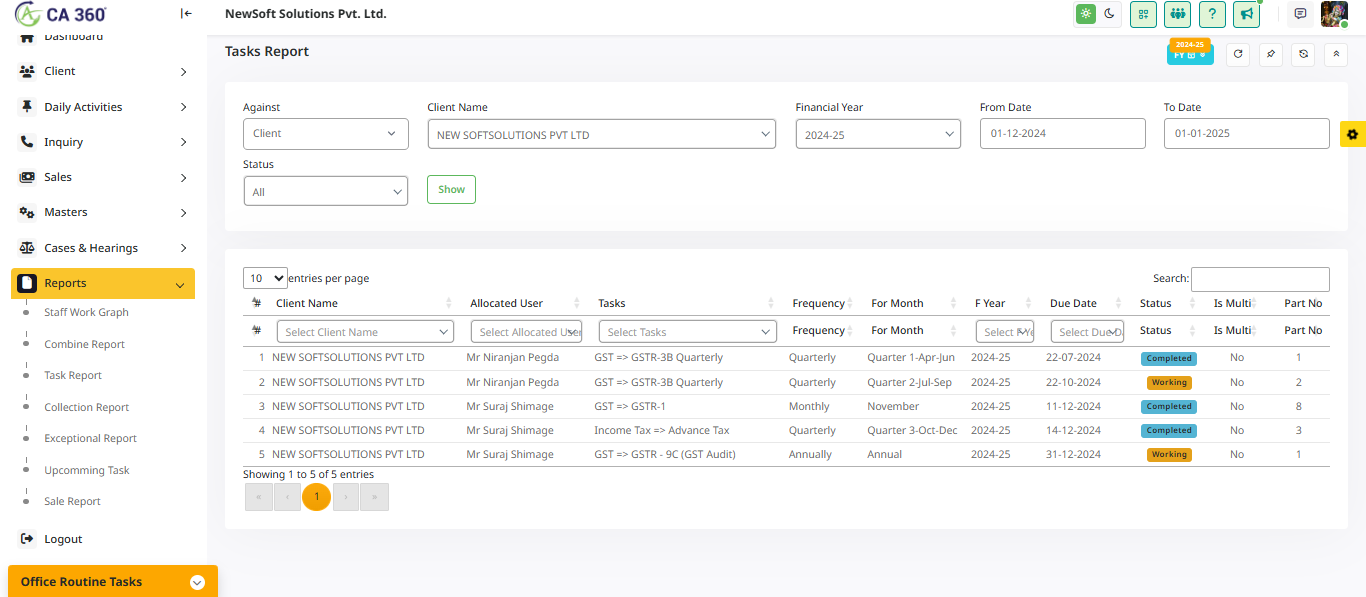
Task Report :
The Task Report provides a detailed overview of tasks. Users can filter the report by selecting parameters such as Against, Client Name, Financial Year, Date Range (From Date - To Date), and Status. After applying the filters and clicking the Show button, the complete report is displayed. This report can be accessed in CA360.
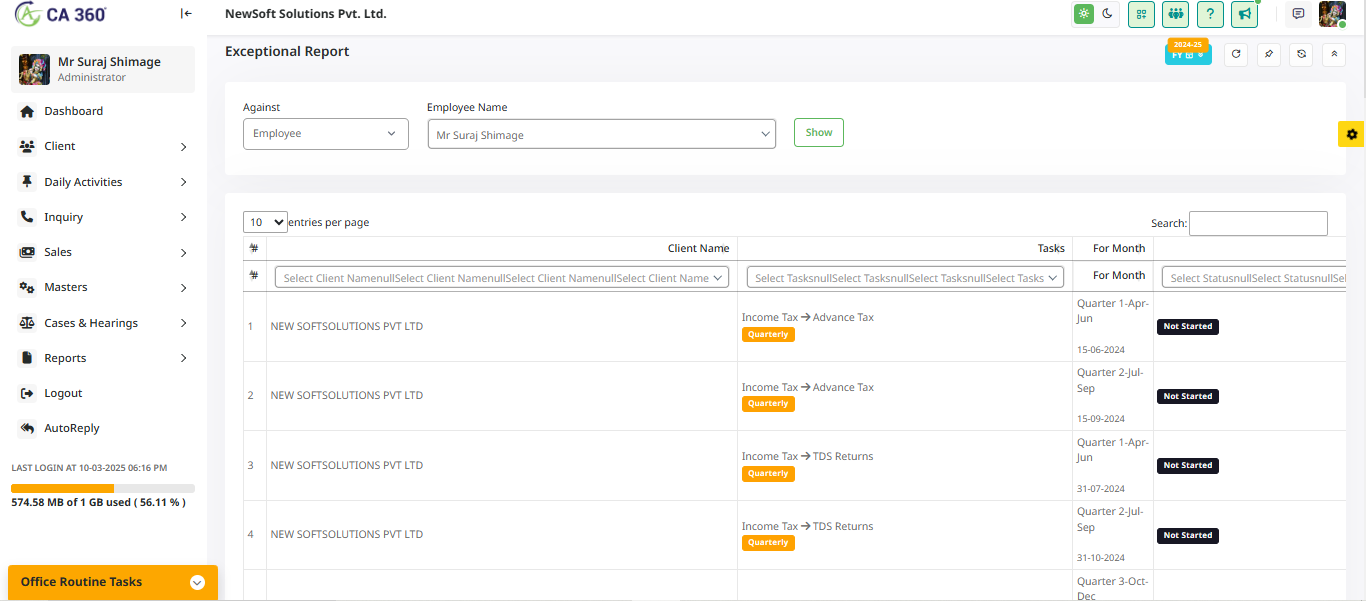
Exceptional Report:
The Exceptional Report provides a detailed analysis of exceptional cases. Users can filter the report by selecting Against and Employee Name. After applying the filters and clicking the Show button, the complete report is displayed. This report can be accessed in CA360
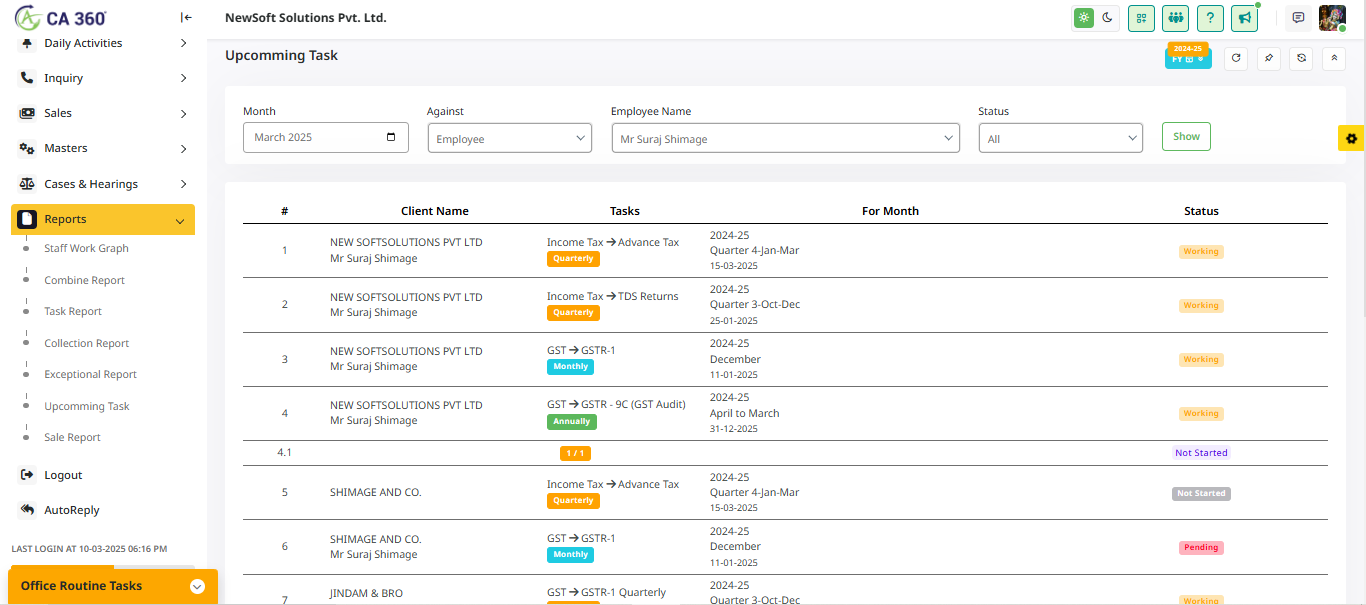
Upcoming Task:
The Upcoming Task report provides a detailed view of upcoming tasks. Users can filter the report by selecting the Month, Against, Client Name, and Status. After applying the filters and clicking the Show button, the complete report is displayed. This report can be accessed in CA360.
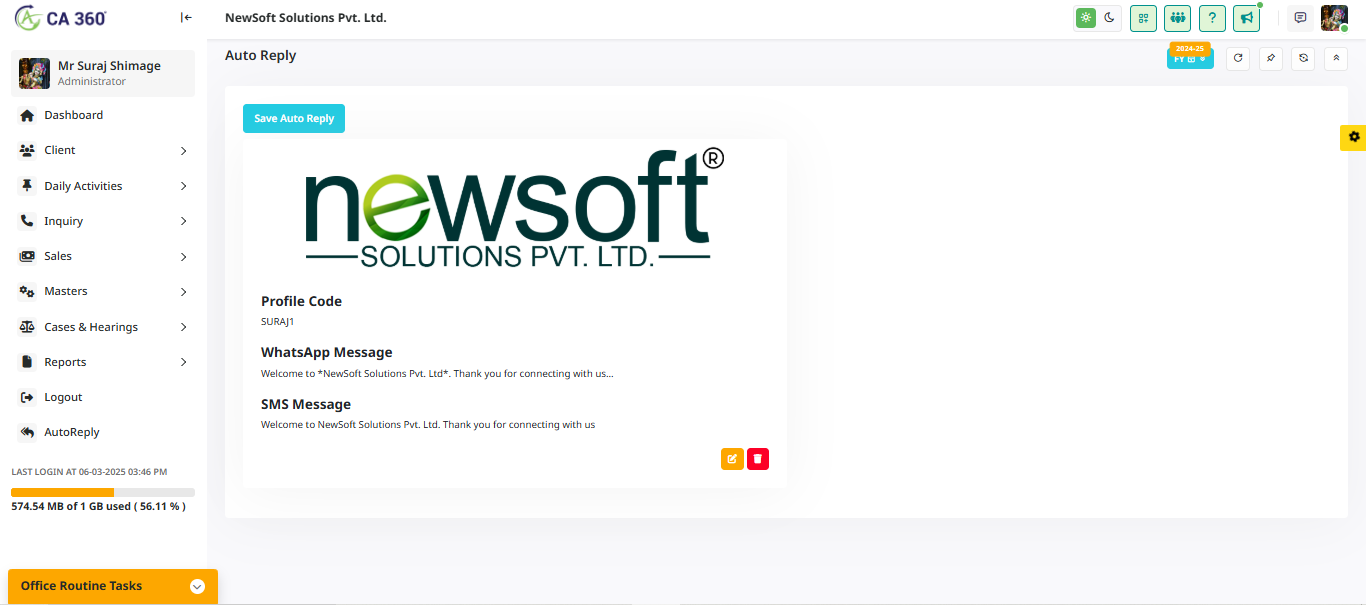
Create New AutoReply
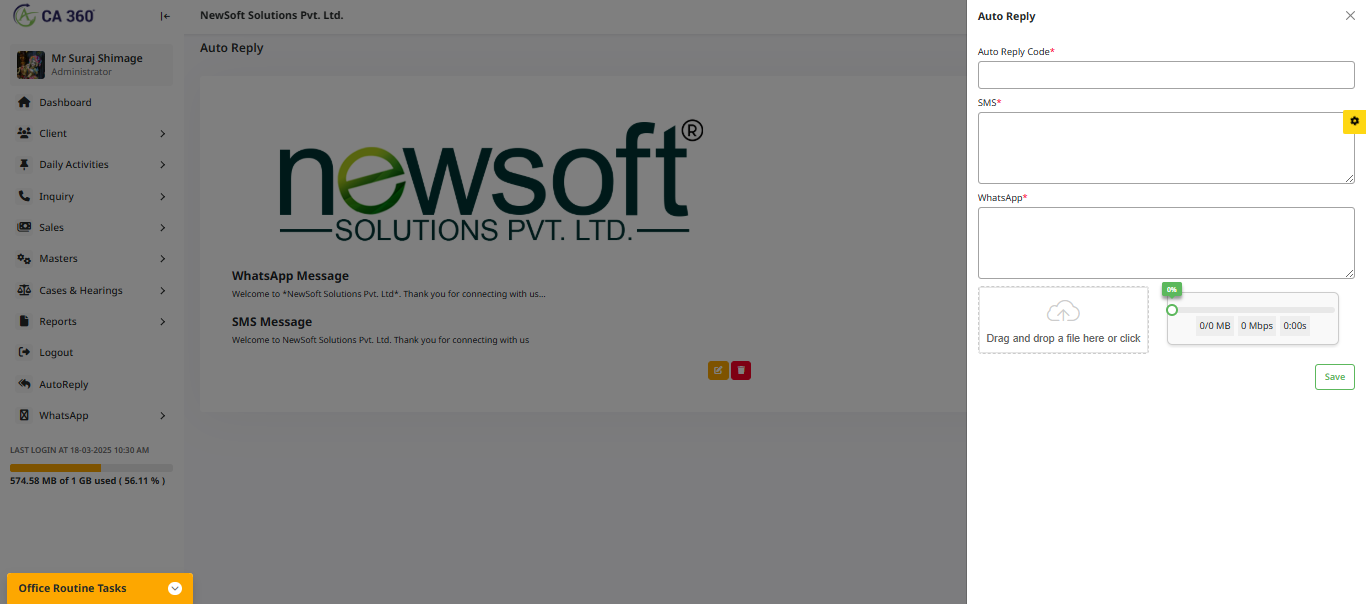
Auto Reply:
An auto-reply is a pre-set response that is automatically sent when someone messages or whatsapp. It helps manage communication efficiently, especially when you're unavailable or need to provide instant responses.
Uses of Auto-Reply:
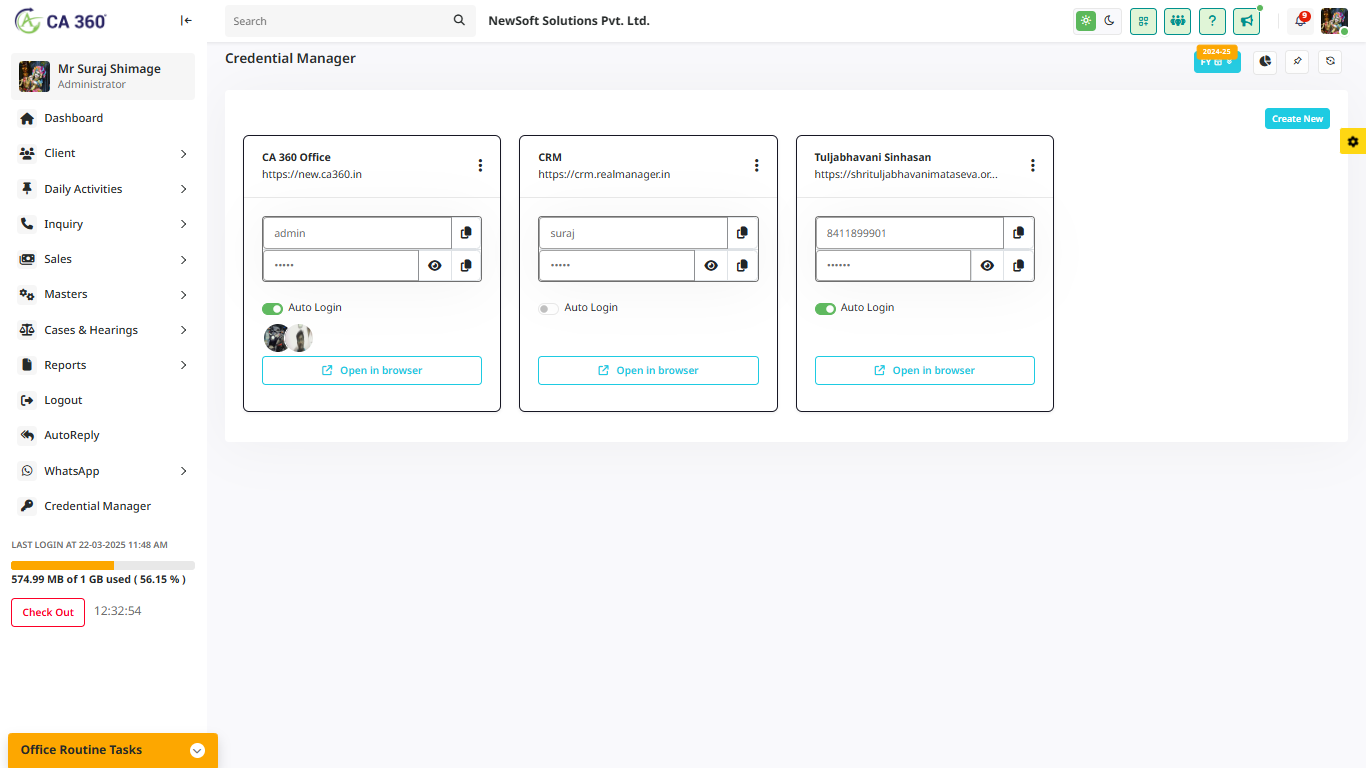
Credential Manager
In this section, credentials are displayed, including the Name, URL, Username, and Password. You can copy the username and password as needed. If auto-login is enabled, clicking 'Open in Browser' will log you in automatically and take you to the dashboard. If auto-login is disabled, clicking 'Open in Browser' will open the login page, where you need to manually enter the username and password.
Create New
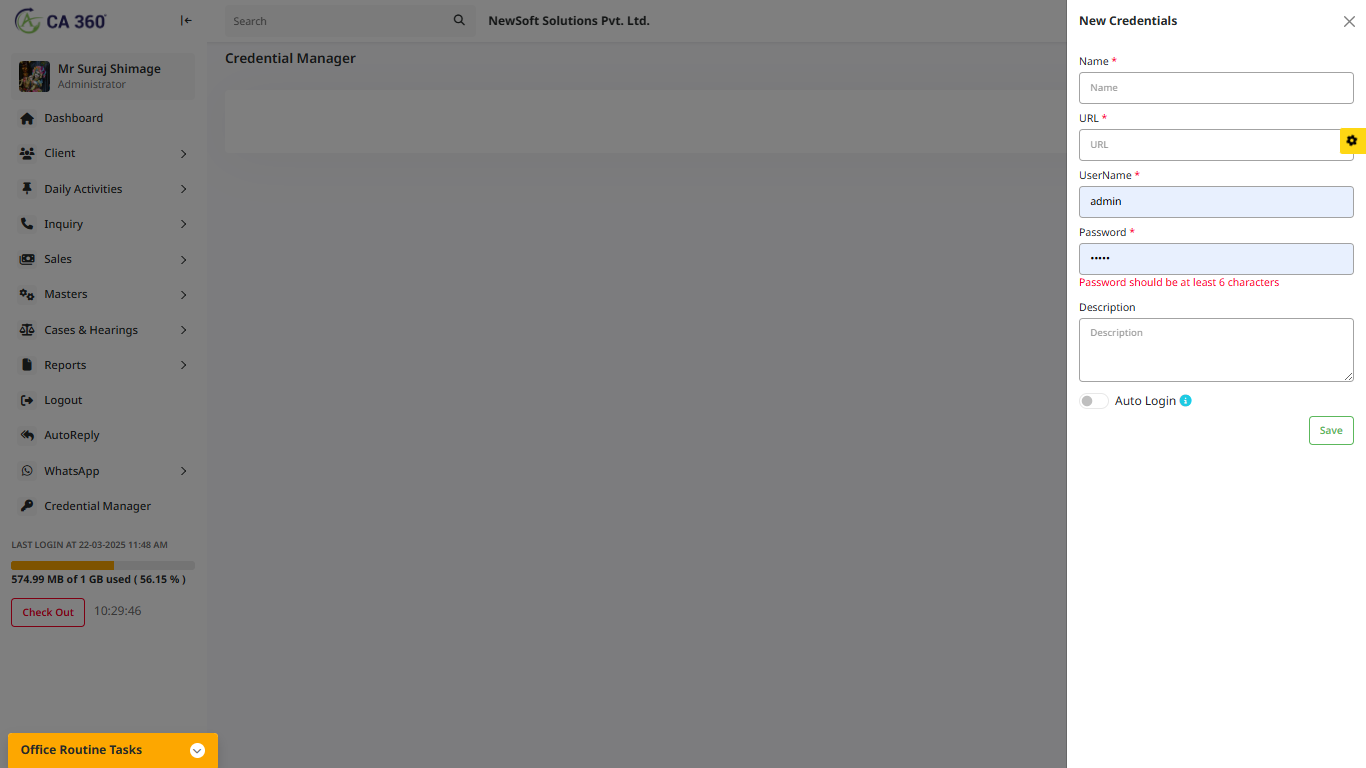
About Credential Manager:
A Credential Manager is a tool that securely stores and manages login credentials, such as usernames and passwords, for different applications and websites. It helps users access their accounts easily without having to remember multiple credentials. Key features of a Credential Manager include:

Thank You
Thank you for choosing to download.
We hope you're having a great experience with it. We would greatly appreciate it if you could take a moment to share your feedback and rate the app. Your review means a lot to us!